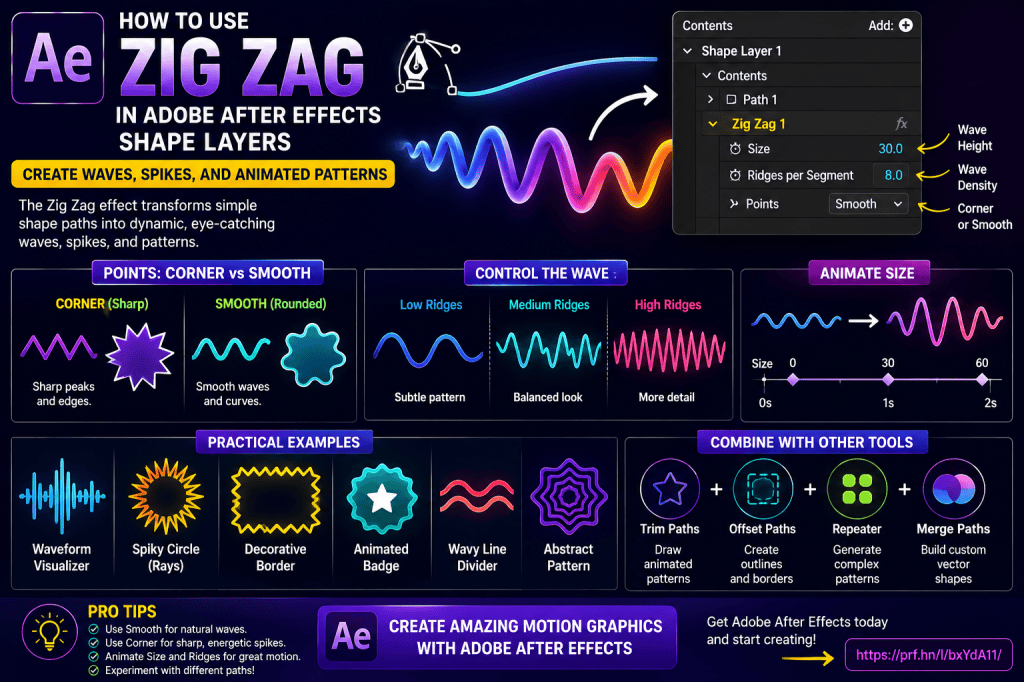
The Zig Zag operator in Adobe After Effects can transform a simple Shape Layer path into waves, spikes, ripples, and complex repeating patterns.
Start with something as simple as a straight line or circle, add Zig Zag, and After Effects can procedurally generate dozens of peaks and valleys along the path.
Because the effect remains editable and animatable, Zig Zag is particularly useful for:
- animated waves;
- audio-style graphics;
- jagged lines;
- decorative borders;
- circular bursts;
- badges;
- abstract backgrounds;
- energetic transitions;
- motion-graphics patterns;
- hand-drawn-style effects.
The two controls that matter most are Size and Ridges per Segment, while the Points setting determines whether the result looks sharp or smooth.
In this guide, you’ll learn exactly how Zig Zag works, how to animate it, how it behaves on different Shape Layer paths, and how to combine it with Trim Paths, Repeater, Offset Paths, Round Corners, and expressions.
Affiliate disclosure: This article contains affiliate links. If you purchase Adobe After Effects through one of these links, we may earn a commission at no additional cost to you.
What Is Zig Zag in After Effects?
Zig Zag is a Shape Layer path operator.
It adds regularly spaced peaks and valleys along an existing vector path.
Imagine a straight line:
────────────
Apply Zig Zag and it can become:
///////\
Switch to smoother points and the same basic path can resemble:
~~~~~~~~~~~~
The underlying path remains simple.
After Effects generates the additional geometry procedurally.
That is what makes Zig Zag so useful.
Instead of manually drawing dozens of points, you control the entire result with only a few properties.
Where Is Zig Zag?
Select a Shape Layer.
Open:
Contents
Choose:
Add → Zig Zag
After Effects adds:
Zig Zag 1
Expand it.
You’ll find the primary controls:
Size
Ridges per Segment
Points
These three properties determine most of the appearance.
Understanding Size
Size controls the distance that the generated peaks and valleys extend away from the original path.
At:
Size = 0
the path looks essentially unchanged.
Increase Size and the deformation becomes stronger.
For example:
Size = 5
creates a subtle effect.
Size = 25
creates obvious waves or spikes.
Size = 100
can create dramatic geometry.
The appropriate value depends on the size of your composition and Shape.
Animate Size
Because Size is keyframeable, you can animate:
0 → 50
The path changes from its original geometry into a Zig Zag pattern.
Reverse it:
50 → 0
and the pattern collapses back into the original path.
This alone can create useful transitions.
Understanding Ridges per Segment
Ridges per Segment controls the density of the Zig Zag pattern.
A low value produces relatively few peaks.
A high value creates many.
For example:
Ridges per Segment = 2
produces a simple pattern.
Increase it to:
10
and the geometry becomes much denser.
Size vs Ridges
These two controls solve different problems.
Size determines:
how large the deformation is.
Ridges per Segment determines:
how frequently the deformation repeats.
Think:
Size = amplitude
Ridges = frequency
This analogy is particularly useful when creating wave-like graphics.
Understanding Points
The Points setting controls the character of the peaks.
You’ll typically work with two styles:
Corner
and:
Smooth
Corner
Corner creates sharp peaks.
This is ideal for:
- sawtooth patterns;
- spikes;
- bursts;
- energetic graphics;
- technical designs.
Smooth
Smooth rounds the peaks and valleys.
This is better for:
- waves;
- ripples;
- organic patterns;
- softer backgrounds.
Corner vs Smooth
A simple change from Corner to Smooth can make the same path look completely different.
For example:
Corner:
/////\
Smooth:
~~~~~~~~
So before drawing a more complicated Shape, experiment with the Points setting.
Your First Zig Zag Animation
Let’s create a simple animated wave.
Step 1: Create a Composition
Create a new composition.
For example:
1920 × 1080
with your preferred frame rate and duration.
Step 2: Draw a Line
Deselect all layers.
Choose the Pen Tool.
Draw a horizontal path.
Give it:
Stroke
but no Fill.
Increase Stroke Width so the line is easy to see.
Step 3: Add Zig Zag
Open:
Contents
Choose:
Add → Zig Zag
Expand:
Zig Zag 1
Step 4: Set Points to Smooth
Change:
Points → Smooth
The sharp Zig Zag becomes wave-like.
Step 5: Increase Size
Try:
Size = 30
The line develops larger waves.
Step 6: Increase Ridges
Adjust:
Ridges per Segment
until the wave density looks appropriate.
You now have a procedural wave generated from one straight path.
If you’d like to practice Shape Layer animation and procedural motion graphics yourself, you can explore Adobe’s current After Effects options here:
Explore Adobe After Effects and current plans
Animate the Wave Appearing
At the beginning:
Size = 0
Create a keyframe.
Move forward.
Set:
Size = 30
The straight line transforms into a wave.
Apply Easy Ease if appropriate.
Then refine the timing in the Graph Editor.
Project 1: Animated Sound Wave
Create a horizontal line.
Add Zig Zag.
Set:
Points = Smooth
Use a moderate number of Ridges.
Animate Size.
The result resembles a stylized waveform.
Add Continuous Movement
A static waveform is useful, but motion makes it more interesting.
You can animate:
- path Position;
- Zig Zag Size;
- Shape Layer Position;
- Offset-like movement using other techniques.
For a true scrolling waveform, additional path or expression techniques may be preferable.
Audio-Reactive Zig Zag
Because Size is numerical, it can be linked to audio amplitude.
First convert audio to keyframes.
Then connect:
Zig Zag → Size
to the audio amplitude.
Louder audio creates larger waves.
Quieter audio creates smaller waves.
Smooth the Audio
Raw audio amplitude can produce extremely nervous animation.
Use smoothing or map the amplitude to a restrained Size range.
For example:
quiet audio:
Size = 5
loud audio:
Size = 40
rather than allowing unlimited values.
Project 2: Sawtooth Wave
Create a line.
Set:
Points = Corner
Increase Ridges.
You now have a sawtooth-style pattern.
This works well for:
- technology graphics;
- warning visuals;
- energy indicators;
- stylized charts.
Project 3: Animated Spikes
Start with a straight path.
Use Corner points.
Set Size:
0
then animate to:
60
The spikes grow outward from the original line.
This can create an energetic transition.
Add Overshoot
Animate Size:
0 → 70 → 55
The spikes extend beyond their final size and settle back.
This creates more dynamic motion.
Project 4: Zig Zag Circle
Create an Ellipse Path.
Add Zig Zag.
Use Corner points.
Instead of a smooth circle, you now get a spiky circular Shape.
This can resemble:
- sun;
- burst;
- badge;
- seal;
- energy field.
Increase Ridges
More ridges create more spikes around the circumference.
Reduce Ridges for a simpler starburst.
Project 5: Animated Sunburst
Create a circle.
Add Zig Zag.
Use:
Points = Corner
Animate:
Size 0 → 40
and:
Rotation
of the Shape Layer.
The circle transforms into a rotating sunburst.
Add a Second Circle
Place another circle in the center.
Now the outer Zig Zag geometry can act as rays around a central disc.
Project 6: Badge or Seal
Create a circle.
Add Zig Zag.
Use relatively small Size and many Ridges.
The result resembles the serrated edge of a badge or seal.
Add:
- text;
- icon;
- inner circle.
This is useful for:
- awards;
- certificates;
- promotional graphics.
Animate the Badge
Start with:
Size = 0
Animate to the final serrated edge.
At the same time:
Scale the entire badge from:
90% → 100%
This creates a polished reveal.
Project 7: Circular Ripple
Create a circle.
Set Points:
Smooth
Adjust Size and Ridges.
The circle develops a wavy perimeter.
Animate Size gently.
This creates a pulsating organic ring.
Use Several Rings
Duplicate or repeat the ring.
Vary:
- Scale;
- opacity;
- Size.
This can create an audio or sonar-style visualization.
Project 8: Organic Blob
Start with a circle.
Apply Zig Zag.
Set:
Points = Smooth
Use relatively few Ridges and moderate Size.
The perfect circle becomes irregular.
Combine with:
- Rotation;
- Scale;
- Turbulent Displace;
for more organic animation.
Zig Zag vs Turbulent Displace
Both can create irregular shapes, but they work differently.
Zig Zag
creates regular procedural ridges along the path.
Turbulent Displace
creates more random distortion.
Use Zig Zag for:
- rhythmic;
- repeating;
- controlled geometry.
Use Turbulent Displace for:
- irregular;
- organic;
- randomized deformation.
Combine Them
A smooth Zig Zag circle can provide the basic structure.
Turbulent Displace can add subtle irregularity.
This can create sophisticated animated blobs.
Project 9: Decorative Border
Create a rectangle.
Add Zig Zag.
The edges become decorative.
Use small Size and many Ridges for a subtle border.
Sharp Decorative Border
Use:
Corner
for a serrated appearance.
Soft Decorative Border
Use:
Smooth
for a wavy edge.
Project 10: Animated Frame
Create a rectangular path around your composition.
Apply Zig Zag.
Animate Size from:
0 → 15
The frame becomes decorative.
Use Trim Paths to draw the frame onto the screen.
Zig Zag + Trim Paths
This is an excellent combination.
Start with a path.
Add Zig Zag.
Add Trim Paths.
Animate:
End 0 → 100
The Zig Zag path draws itself onto the screen.
This works for:
- waves;
- borders;
- bursts;
- decorative lines.
Operator Order Matters
As with other Shape Layer operators, the hierarchy affects the result.
Try:
Path
↓
Zig Zag
↓
Trim Paths
and compare it with other operator arrangements.
If the result isn’t what you expect, inspect the order inside Contents.
Project 11: Drawing Wave
Create a smooth Zig Zag line.
Add Trim Paths.
Animate End.
The wave draws itself from left to right.
This is useful for:
- audio graphics;
- infographic lines;
- decorative title animation.
Project 12: Animated Electricity
Create a line.
Use:
Corner
with many Ridges.
Increase Size.
Use Trim Paths to reveal it quickly.
Add Glow.
The result can resemble stylized electricity.
Make It Less Regular
A basic Zig Zag is mathematically regular.
For more convincing electricity, combine it with:
- Turbulent Displace;
- path animation;
- additional irregularity.
Project 13: Neon Wave
Create a smooth Zig Zag line.
Add:
Glow
Duplicate the Stroke if necessary.
Use:
- bright core;
- softer outer glow.
Animate Trim Paths.
This creates a neon waveform.
Project 14: Heartbeat-Style Graphic
Zig Zag itself creates regular repetition, whereas a real ECG-style line has uneven peaks.
Still, you can use Zig Zag as a starting point for stylized medical or data graphics.
For more accurate custom shapes, manually draw the path.
Project 15: Animated Underline
Create a line beneath text.
Add a subtle smooth Zig Zag.
Use Trim Paths.
Reveal it beneath the title.
This creates a more playful alternative to a perfectly straight underline.
Project 16: Wavy Text Divider
Create a horizontal Shape Layer path between sections.
Use:
Smooth Zig Zag
with low Size.
This creates a decorative divider.
Animate its Size subtly for additional motion.
Project 17: Ocean Wave Graphic
Create a long horizontal line.
Use:
Smooth
and moderate Ridges.
Duplicate it vertically.
Offset each copy horizontally.
Use several lines to create stylized ocean waves.
Repeater for Multiple Waves
Instead of manually duplicating layers, try a Repeater.
Create one wavy path.
Add:
Repeater
Set Position:
0, 60
Create multiple copies vertically.
Now one source line creates an entire wave field.
Zig Zag + Repeater
This is another powerful combination.
Create:
one path
↓
Zig Zag
↓
Repeater
Now the procedural pattern is duplicated automatically.
Project 18: Wave Background
Create one horizontal smooth Zig Zag line.
Repeat it vertically.
Reduce opacity.
Animate the entire system slowly.
This produces a modern abstract background.
Animate Repeater Position
Change vertical spacing over time.
The waves can expand apart or compress together.
Animate Zig Zag Size
At the same time, animate Size.
The entire field becomes more or less turbulent.
Project 19: Radial Pattern
Create a small Zig Zag Shape.
Use Repeater to distribute copies radially.
This can create complex:
- mandalas;
- bursts;
- abstract logos.
Project 20: Spiky Loader
Create a circle.
Add Zig Zag.
Use Corner points.
Animate Layer Rotation continuously.
The result can become an unusual loading indicator.
Use Subtle Motion
For UI elements, avoid overly aggressive Size values.
The animation should communicate activity without becoming distracting.
Zig Zag + Offset Paths
Offset Paths can expand or contract the Zig Zag geometry.
This can produce:
- thick geometric borders;
- layered patterns;
- expanding badges.
Example: Double Zig Zag Border
Create a Zig Zag circle.
Duplicate or offset the geometry outward.
Give the versions different appearance properties.
Now you have a layered serrated badge.
Zig Zag + Round Corners
A sharp Zig Zag can be softened with Round Corners depending on the Shape hierarchy.
This provides another way to transition between:
spiky
and:
soft
geometry.
Corner vs Round Corners
Remember that Zig Zag already has:
Points → Smooth
So try that first.
Round Corners becomes more useful when the Zig Zag is part of a more complex Shape system.
Zig Zag + Merge Paths
You can create Zig Zag geometry and combine it with other Shapes using Merge Paths.
For example:
Spiky outer circle
minus:
inner circle
=
serrated ring.
Project 21: Serrated Ring
Create a circle.
Add Zig Zag.
Create a smaller inner circle.
Use Merge Paths:
Subtract
to cut out the center.
Now you have a ring with a spiky outside edge.
Animate the Ring
Animate:
Zig Zag Size
and:
inner circle size.
The ring transforms dynamically.
Project 22: Animated Coupon Edge
Create a rectangle.
Use Zig Zag along the Shape to create a perforated or serrated visual style.
Depending on the exact desired coupon edge, Merge Paths or custom paths may also be required.
Project 23: Speech Bubble with Energy Edge
Create a speech bubble Shape.
Apply Zig Zag with small Size.
The bubble becomes more energetic.
Useful for:
- comic graphics;
- shouting dialogue;
- alerts.
Project 24: Comic Burst
Create a circle.
Add Corner Zig Zag.
Use a relatively large Size.
Add text in the center:
WOW!
or:
NEW!
The result resembles a comic-book burst.
Animate the Comic Burst
Animate:
Scale:
0 → 110 → 100
and Zig Zag Size:
0 → final value.
This creates a lively pop animation.
Project 25: Sale Badge
Use the same technique with:
SALE
NEW
50% OFF
or other promotional copy.
The procedural Shape makes the badge easy to resize and reuse.
Use Expressions with Zig Zag
Size and Ridges can both participate in expression-driven animation.
For example:
- audio amplitude;
- Slider Controls;
- time-based animation.
Create a Size Slider
Add:
Slider Control
Rename it:
Wave Height
Connect:
Zig Zag → Size
to the Slider.
Now the wave amplitude is controlled centrally.
Create a Ridges Slider
Add another Slider:
Wave Density
Connect it to:
Ridges per Segment.
Now you can redesign the pattern without digging into the Shape Layer.
Master Wave Controller
Create:
CTRL — WAVE
with:
- Wave Height;
- Wave Density;
- Stroke Width;
- Animation Speed;
- Color.
This makes the graphic much easier to reuse.
Animate Size with a Sine Wave
A time-based expression can make Size oscillate smoothly.
Conceptually:
Size = base + sine(time × speed) × amplitude
This creates continuous breathing wave motion.
Don’t Allow Negative Values Accidentally
Depending on the intended design, negative Size values may produce a reversed deformation.
Use appropriate mapping or clamping when necessary.
Randomizing Zig Zag
A single Zig Zag operator creates regular patterns.
If you want random variation between ridges, Zig Zag alone may not be enough.
Combine it with:
- Turbulent Displace;
- path deformation;
- multiple layers.
Zig Zag and Motion Blur
If a Zig Zag Shape rotates or moves rapidly, Motion Blur may improve the result.
For simple Size animation, Motion Blur may be less important.
Test visually.
Zig Zag and Glow
Sharp or smooth Zig Zag Strokes work very well with Glow.
This is especially useful for:
- audio visualizers;
- energy graphics;
- futuristic UI;
- neon backgrounds.
Zig Zag and Gradient Stroke
Use a Gradient Stroke instead of a flat Stroke.
Now the wave can contain multiple colors along its path.
Animate the gradient for additional movement.
Use Multiple Zig Zag Operators?
Shape Layers can contain multiple operators, but adding several Zig Zag operators can quickly create complicated geometry.
Experiment carefully.
Often one Zig Zag plus another operator is enough.
Shape Layer Hierarchy
A typical simple setup might be:
Shape Layer
→ Contents
→ Path
→ Zig Zag
→ Stroke
For a drawing animation:
→ Path
→ Zig Zag
→ Trim Paths
→ Stroke
The exact structure depends on your design.
Naming Your Operators
Instead of:
Zig Zag 1
rename it:
WAVE SHAPE
or:
SPIKE GENERATOR.
This becomes especially helpful when a Shape Layer contains multiple operators.
Common Mistake: Size Is Too Large
Huge Size values can create geometry that overwhelms the original Shape.
Start small.
Common Mistake: Too Many Ridges
Extremely high ridge counts can create dense, visually noisy paths.
Use only as many as the design requires.
Common Mistake: Wrong Points Mode
If you want waves but see spikes:
change:
Corner → Smooth.
Common Mistake: Using Zig Zag for Random Noise
Zig Zag is fundamentally regular.
Use distortion tools if you need randomness.
Common Mistake: Ignoring the Original Path
The number and arrangement of segments in the original path influence the result.
A circle, rectangle, and custom path can behave differently.
Common Mistake: Operator Order
If Trim Paths, Repeater, or Merge Paths produces an unexpected result, inspect the Contents hierarchy.
Common Mistake: Animating Everything
You don’t need to animate:
- Size;
- Ridges;
- Rotation;
- Scale;
- Position;
all at once.
Often one or two animated properties produce a cleaner result.
Common Mistake: Excessive Audio Reaction
For audio-driven Zig Zag, smooth and constrain the amplitude.
Zig Zag Quick Reference
Size
Controls the amplitude of the Zig Zag.
Ridges per Segment
Controls how frequently the pattern repeats.
Points: Corner
Creates sharp peaks.
Points: Smooth
Creates rounded waves.
Five Zig Zag Exercises
Exercise 1 — Wave
Straight line + Smooth Zig Zag.
Exercise 2 — Sawtooth
Straight line + Corner Zig Zag.
Exercise 3 — Sunburst
Circle + Corner Zig Zag.
Exercise 4 — Wavy Ring
Circle + Smooth Zig Zag.
Exercise 5 — Wave Field
Smooth Zig Zag line + Repeater.
These exercises cover most of the core behavior.
Practical Project: Animated Wave Divider
Create a horizontal path.
Add Smooth Zig Zag.
Use:
Size = 15
with a moderate number of Ridges.
Add Trim Paths.
Animate:
End 0 → 100.
Use it as a section divider beneath a title.
Practical Project: Audio-Reactive Wave
Create a smooth Zig Zag line.
Convert audio to keyframes.
Connect audio amplitude to Size.
Map the amplitude to a restrained range.
Add Glow.
Now the wave responds to music or speech.
Practical Project: Animated Sale Badge
Create a circle.
Add Corner Zig Zag.
Use enough Ridges to create a badge edge.
Animate:
- Size;
- Scale;
- Rotation.
Add promotional text.
Practical Project: Abstract Wave Background
Create one smooth Zig Zag line.
Use Repeater to duplicate it vertically.
Animate:
- Zig Zag Size;
- Repeater spacing;
- overall Position.
Lower the opacity.
You now have a reusable motion background.
Frequently Asked Questions
What does Zig Zag do in After Effects?
Zig Zag adds procedural ridges and valleys along Shape Layer paths.
Where is Zig Zag?
Select a Shape Layer and choose:
Contents → Add → Zig Zag.
What does Size control?
Size determines how far the ridges extend from the original path.
What does Ridges per Segment control?
It controls how many repetitions are generated along each path segment.
What’s the difference between Corner and Smooth?
Corner produces sharp peaks, while Smooth creates rounded wave-like peaks.
Can Zig Zag be animated?
Yes. Size and Ridges per Segment can be animated.
Can Zig Zag create waves?
Yes. Use:
Points = Smooth.
Can it create spikes?
Yes. Use:
Points = Corner.
Can I use Zig Zag on circles?
Yes. This can create bursts, badges, and wavy rings.
Can I combine Zig Zag with Trim Paths?
Yes.
Can I combine it with Repeater?
Yes.
Can I combine it with Merge Paths?
Yes.
Can I make Zig Zag audio-reactive?
Yes. Link Size to audio amplitude keyframes.
Is Zig Zag random?
No. It creates a regular procedural pattern. Use distortion tools if you need more random geometry.
Do I need a plug-in?
No. Zig Zag is built into After Effects Shape Layers.
Practice Zig Zag in After Effects
Create a straight horizontal path.
Add:
Zig Zag.
Switch between:
Corner
and:
Smooth.
Then change:
Size.
Next change:
Ridges per Segment.
Once you understand those three controls, try the operator on:
- circle;
- rectangle;
- star;
- custom path.
Then combine it with:
Trim Paths
and:
Repeater.
That is enough to create dozens of different motion-graphics effects from a handful of Shape Layers.
If you’d like to practice Zig Zag and other procedural Shape Layer techniques yourself, you can explore Adobe’s current After Effects options here:
Get Adobe After Effects and start creating procedural motion graphics
What Should You Learn Next?
Zig Zag adds regular peaks and valleys to paths.
The next Shape Layer operator worth learning is:
Pucker & Bloat.
Pucker & Bloat can pull a Shape inward or push it outward to create:
- stars;
- flowers;
- pinched shapes;
- inflated geometry;
- abstract morphs;
- animated logo effects.
The next article will therefore be:
How to Use Pucker & Bloat in Adobe After Effects Shape Layers.
We’ll look at positive and negative Amount values, Shape transformations, animation techniques, and combinations with Repeater and other Shape Layer operators.
Final Thoughts
Zig Zag demonstrates how much geometry After Effects can generate from an extremely simple path.
Start with:
one line
or:
one circle.
Then control:
Size
Ridges per Segment
and:
Points.
From those controls you can create:
- waves;
- spikes;
- ripples;
- badges;
- sunbursts;
- decorative borders;
- waveform graphics;
- abstract backgrounds.
The most useful rule to remember is:
Size controls amplitude.
Ridges controls frequency.
Corner creates spikes.
Smooth creates waves.
Combine Zig Zag with Trim Paths for drawing animations, Repeater for procedural patterns, Merge Paths for custom geometry, and expressions for automated movement.
That turns a small Shape Layer operator into a versatile tool for procedural motion design.
Explore Adobe After Effects and start creating waves, patterns, and procedural animations






