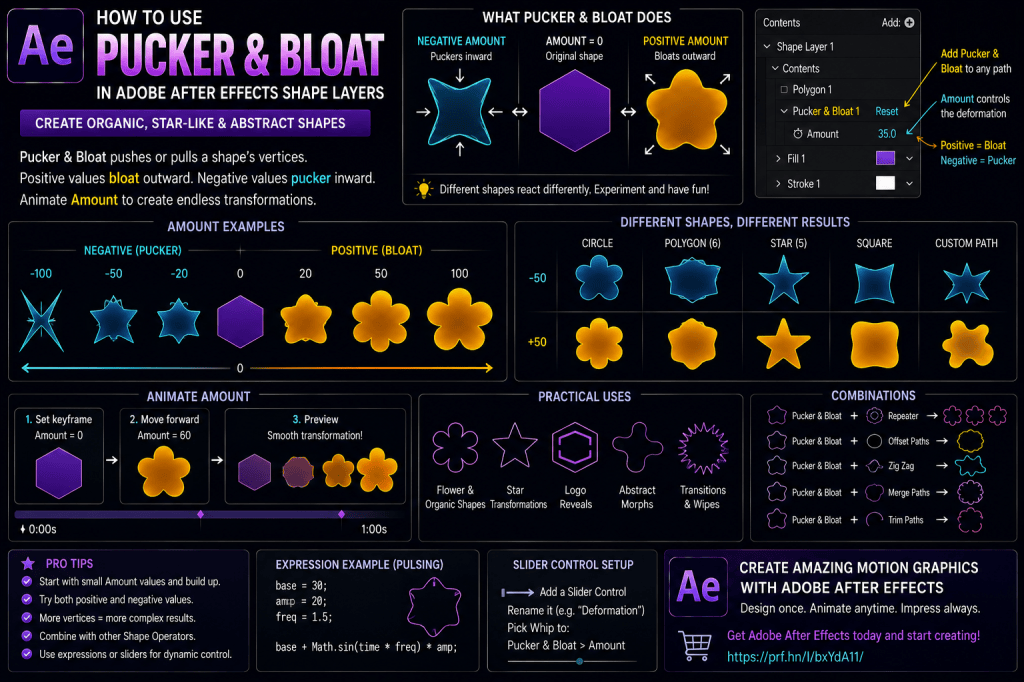
Pucker & Bloat is one of the more creative Shape Layer operators in Adobe After Effects.
With a single Amount control, it can dramatically transform ordinary vector shapes.
A circle can become a flower.
A polygon can turn into a star.
A simple icon can collapse inward.
A rounded shape can inflate outward into an abstract form.
And because Pucker & Bloat is fully animatable, these transformations can become part of logo reveals, transitions, UI motion, abstract backgrounds, and procedural motion graphics.
In this guide, you’ll learn how Pucker & Bloat works in Adobe After Effects, what positive and negative Amount values do, how different source shapes respond, how to animate the effect, and how to combine it with Repeater, Trim Paths, Zig Zag, Merge Paths, and expressions.
Affiliate disclosure: This article contains affiliate links. If you purchase Adobe After Effects through one of these links, we may earn a commission at no additional cost to you.
What Is Pucker & Bloat in After Effects?
Pucker & Bloat is a Shape Layer path operator that pushes vector geometry inward or outward around its vertices.
The basic idea is simple.
Positive values generally push or bloat the geometry outward.
Negative values pull or pucker it inward.
The exact visual result depends heavily on the original Shape.
For example:
A circle may develop petal-like curves.
A polygon may become sharper or more star-like.
A star can become dramatically exaggerated or compressed.
A custom Pen Tool path can develop entirely new geometry.
This makes Pucker & Bloat less predictable than tools such as Round Corners, but that unpredictability is part of what makes it creatively useful.
Where Is Pucker & Bloat?
Select a Shape Layer.
Open:
Contents
Choose:
Add → Pucker & Bloat
After Effects adds:
Pucker & Bloat 1
Expand it.
The main property is:
Amount
That one value controls the entire deformation.
Understanding Amount
At:
Amount = 0
the Shape remains unchanged.
Move the value in one direction and the path begins puckering inward.
Move it in the opposite direction and the geometry bloats outward.
The visual result depends on:
- path type;
- number of vertices;
- Shape proportions;
- other Shape Layer operators.
Start Small
When experimenting, don’t immediately jump to extreme values.
Try something like:
-20
0
+20
and compare the results.
Then increase the range.
Very large values can create highly distorted or self-intersecting geometry.
Your First Pucker & Bloat Animation
Let’s start with a simple polygon.
Step 1: Create a Composition
Create a new After Effects composition.
For example:
1920 × 1080
with your preferred frame rate and duration.
Step 2: Create a Polygon
Deselect all layers.
Choose the Polygon Tool.
Draw a five- or six-sided polygon.
Give it a Fill.
Rename the layer:
PUCKER BLOAT TEST
Step 3: Add Pucker & Bloat
Open:
Contents
Choose:
Add → Pucker & Bloat
Expand the new operator.
Step 4: Change Amount
Set:
Amount = 0
Then try:
Amount = -40
Observe the result.
Then:
Amount = +40
Notice how dramatically the Shape changes.
If you’d like to practice Pucker & Bloat and other procedural Shape Layer techniques yourself, you can explore Adobe’s current After Effects options here:
Explore Adobe After Effects and current plans
Step 5: Animate Amount
Set an initial keyframe:
Amount = 0
Move forward approximately one second.
Set:
Amount = 50
Preview the animation.
The Shape procedurally transforms without any manual path keyframes.
Why This Is Powerful
Animating path geometry manually often requires editing many vertices.
Pucker & Bloat lets After Effects calculate the deformation for you.
This makes it ideal for:
- abstract motion;
- icon transitions;
- logo reveals;
- rhythmic animation.
Project 1: Circle to Flower
Create a circle or polygon-like Shape with enough useful geometry.
Apply Pucker & Bloat.
Increase or decrease Amount until the perimeter develops petal-like curves.
Depending on the source Shape, the result can resemble:
- flower;
- rosette;
- decorative badge.
Animate the Flower Opening
Start:
Amount = 0
Then animate toward the floral value.
Add Scale:
90% → 100%
The Shape appears to bloom.
Add Rotation
Rotate the Shape Layer slowly while the geometry changes.
This creates a more elegant procedural reveal.
Project 2: Polygon to Star
Create a polygon.
Apply a negative or positive Pucker & Bloat value depending on the path.
Adjust until the corners become more pronounced.
The polygon can begin to resemble a star.
Why Use This Instead of a Star Tool?
The Star Tool is better when you simply need a static star.
Pucker & Bloat is useful when you want to animate between:
polygon
and:
star-like geometry
without changing tools.
Animate Polygon to Star
Start:
Amount = 0
End:
Amount = desired star value
This creates a clean procedural transformation.
Project 3: Animated Badge
Create a circle or polygon.
Use Pucker & Bloat to generate decorative edges.
Add:
- text;
- icon;
- inner circle.
Animate the Amount during the intro.
This works well for:
- badges;
- awards;
- promotional graphics.
Project 4: Pulsating Flower
Create a floral geometry using Pucker & Bloat.
Animate Amount between two nearby values.
For example:
35 → 50 → 35
Use Easy Ease.
Loop the animation with:
loopOut("pingpong")
Now the Shape gently breathes.
Keep the Range Small
Large oscillations can become distracting.
For subtle background motion, use a restrained Amount range.
Project 5: Breathing Logo Element
Suppose a logo contains a circular or geometric icon.
Apply Pucker & Bloat to a decorative duplicate.
Animate it slowly.
Keep the main logo stable.
This can create ambient brand motion without distorting the actual logo identity.
Project 6: Abstract Morph
Create a polygon.
Animate Amount from:
negative value
through:
0
to:
positive value.
The Shape passes through several radically different forms.
This can create an abstract transition.
Add Color Animation
Change Fill Color during the morph.
For example:
Blue → Purple → Pink.
Now geometry and color evolve together.
Project 7: Pucker Transition
Create a Shape large enough to cover the frame.
Animate Pucker & Bloat aggressively while also scaling the Shape.
Use it as:
- transition matte;
- abstract wipe;
- scene reveal.
Matte Workflow
You can use the animated Shape as a Track Matte for footage beneath.
This turns procedural vector deformation into a full-screen transition.
Project 8: Inflating Icon
Create a simple geometric icon.
Animate Amount toward a bloated value.
At the same time:
Scale:
95% → 105% → 100%
This can create a playful UI response.
Project 9: Warning Pulse
Create a star or alert-style symbol.
Use Pucker & Bloat for a brief pulse.
Combine with:
- Scale;
- color;
- Glow.
This works for:
- alerts;
- notifications;
- warnings.
Pucker & Bloat + Repeater
This is a particularly strong combination.
Create one Shape.
Apply Pucker & Bloat.
Then add Repeater.
Now every repeated copy inherits the deformation.
Project 10: Radial Flower Pattern
Create a small Shape.
Pucker it into a petal-like form.
Use Repeater to distribute copies around the center.
The result can become a complex flower or mandala.
Animate the Source Shape
Change Pucker & Bloat Amount.
All repeated petals update simultaneously.
This makes complex patterns easy to animate.
Project 11: Mandala Animation
Start with one polygon.
Apply:
- Pucker & Bloat;
- Repeater;
- Rotation.
Use multiple Repeaters if needed.
Animate:
- Amount;
- Repeater Rotation;
- overall Scale.
This can produce intricate procedural designs from one simple Shape.
Project 12: Spiral Pattern
Create a Shape.
Apply Pucker & Bloat.
Add Repeater with:
- Rotation;
- Scale;
- Position.
The repeated deformed copies can produce elaborate spirals.
Pucker & Bloat + Zig Zag
Zig Zag already creates peaks and valleys.
Pucker & Bloat can further distort that geometry.
This can produce very complex shapes quickly.
Use Carefully
Combining both operators at extreme values may produce:
- self-intersections;
- dense geometry;
- visual noise.
Start with small values.
Project 13: Spiky Organic Shape
Create a circle.
Add Zig Zag with:
Smooth or Corner
Then add Pucker & Bloat.
Adjust both Amounts.
The result can resemble:
- sea creature;
- energy field;
- abstract logo.
Pucker & Bloat + Round Corners
Round Corners can soften geometry generated by Pucker & Bloat.
If the Shape becomes too sharp, try adding Round Corners afterward.
Operator Order Matters
Compare:
Path → Pucker & Bloat → Round Corners
with:
Path → Round Corners → Pucker & Bloat
The results can differ significantly.
Pucker & Bloat + Offset Paths
Offset Paths can expand or contract the deformed geometry.
This is useful for:
- layered outlines;
- borders;
- echoes;
- badges.
Project 14: Decorative Outline
Create a floral or star-like Shape using Pucker & Bloat.
Add Offset Paths.
Generate an outer contour.
Give the contour a different Fill or Stroke.
Animate the offset slightly for a reveal.
Pucker & Bloat + Merge Paths
You can combine the deformed Shape with other geometry.
For example:
Pucker a circle.
Subtract another circle.
The result might become:
- decorative ring;
- flower border;
- custom badge.
Project 15: Floral Ring
Create an outer circle.
Apply Pucker & Bloat.
Create an inner circle.
Use Merge Paths:
Subtract
The result becomes a decorative ring.
Animate the Ring
Animate:
- Pucker & Bloat Amount;
- inner-circle size;
- overall Rotation.
This creates a dynamic logo or ornamental graphic.
Pucker & Bloat + Trim Paths
Pucker & Bloat mainly affects filled geometry, but the resulting path can also be styled with a Stroke.
Add Trim Paths to reveal the Stroke.
This can create:
- animated floral outlines;
- decorative borders;
- star-like line reveals.
Project 16: Drawing a Floral Outline
Create a polygon.
Apply Pucker & Bloat.
Use only Stroke.
Add Trim Paths.
Animate:
End 0 → 100
The decorative Shape draws itself.
Expressions
The Amount property can be expression-driven.
This opens the door to:
- audio reaction;
- time-based oscillation;
- master sliders;
- linked controls.
Create a Pucker Amount Slider
Add:
Slider Control
Rename it:
Shape Deformation
Connect it to:
Pucker & Bloat → Amount
Now the deformation can be adjusted from the Effect Controls panel.
Master Shape Controller
Create:
CTRL — SHAPE
Add:
- Deformation;
- Rotation Speed;
- Scale;
- Color;
- Offset.
Now the procedural Shape is easier to reuse.
Audio-Reactive Pucker & Bloat
Convert audio to keyframes.
Map amplitude to Amount.
For example:
Quiet:
Amount = 10
Loud:
Amount = 40
The Shape pulses with the soundtrack.
Why This Works Well
Pucker & Bloat changes the geometry itself, so audio can make the Shape feel like it is physically reacting to sound.
This is particularly useful for:
- music visualizers;
- podcast graphics;
- abstract backgrounds.
Smooth the Audio
Raw amplitude may cause rapid geometric jitter.
Use smoothing or constrained mapping.
Time-Based Pulsing
A sine-based expression can make Amount oscillate continuously.
Conceptually:
Amount = base + sin(time × speed) × amplitude
This creates rhythmic breathing motion without keyframes.
Pucker & Bloat + loopOut()
You can also animate the Amount manually and repeat it.
For example:
20 → 50 → 20
Then use:
loopOut("cycle")
or:
loopOut("pingpong")
depending on the keyframe structure.
Project 17: Loading Animation
Create a decorative Shape.
Repeat it radially.
Animate Pucker & Bloat Amount.
Rotate the full pattern.
This can create an unusual loading indicator.
Project 18: Organic UI Background
Create several large Pucker & Bloat Shapes.
Use:
- low opacity;
- slow Rotation;
- subtle Amount animation.
Place them behind interface graphics.
This creates a soft procedural background.
Project 19: Animated Flower Icon
Create a circle or polygon.
Transform it into a flower.
Add an inner circle.
Animate:
- outer petals open;
- inner circle scales in;
- icon settles.
This creates a reusable floral icon animation.
Project 20: Starburst Transition
Create a polygon.
Use Pucker & Bloat to form starburst geometry.
Scale it rapidly beyond the frame.
Use it as a matte to reveal the next scene.
Pucker & Bloat vs Path Morphing
Pucker & Bloat is procedural.
Path morphing uses manually defined Path keyframes.
Use Pucker & Bloat when:
- the deformation follows the operator’s geometry;
- you want fast procedural control;
- you want reusable rigs.
Use Path keyframes when:
- you need exact custom shapes;
- the transformation must follow specific artwork.
Pucker & Bloat vs Zig Zag
Both alter path geometry.
Zig Zag
adds repeated ridges and valleys.
Pucker & Bloat
pulls or pushes the existing path around its vertices.
Use Zig Zag for:
- waves;
- serrated edges;
- regular spikes.
Use Pucker & Bloat for:
- flowers;
- pinched geometry;
- inflated forms;
- star-like transforms.
Pucker & Bloat vs Offset Paths
Offset Paths changes the distance of the path boundary.
Pucker & Bloat changes the shape relationship around vertices.
The visual behavior is therefore very different.
Use Shape Layers with Enough Vertices
The source path strongly influences the final result.
A path with only a few vertices may produce broad deformation.
A path with more vertices may produce more intricate forms.
Polygon Sides Matter
Try changing Polygon Points.
For example:
3 sides.
5 sides.
8 sides.
12 sides.
Then apply the same Pucker & Bloat value.
You’ll get dramatically different designs.
Animate Polygon Points?
Some Shape Layer properties can also be animated or expression-driven.
Combining changing Polygon points with Pucker & Bloat can produce extremely procedural motion.
Use cautiously because geometry may change abruptly.
Design Exploration Technique
One of the best ways to use Pucker & Bloat is simply to experiment.
Start with:
- circle;
- triangle;
- pentagon;
- hexagon;
- star.
Try Amount values such as:
-75
-40
0
40
75
Save interesting results.
Build a Procedural Shape Library
You can create a project containing:
- flower;
- badge;
- starburst;
- blob;
- rosette;
- transition shapes.
Because they’re procedural, you can customize them quickly.
Naming Operators
Instead of leaving:
Pucker & Bloat 1
rename it:
FLOWER DEFORMATION
or:
LOGO MORPH
when the project becomes more complex.
Performance
Pucker & Bloat itself is generally straightforward.
But combining it with:
- many Repeater copies;
- Zig Zag;
- multiple Glow effects;
- complex vectors;
can increase preview complexity.
Build incrementally.
Common Mistake: Extreme Amount Values
Huge values can create self-intersections or unusable geometry.
Start with smaller values.
Common Mistake: Wrong Shape for the Desired Result
If you want a flower but your rectangle produces something strange, try a polygon or circle.
The source geometry matters.
Common Mistake: Expecting a Specific Shape
Pucker & Bloat isn’t an automatic “make flower” button.
Its output depends on the source path.
Experiment.
Common Mistake: Too Many Operators
Pucker & Bloat + Zig Zag + Repeater + Offset Paths can become visually overwhelming.
Introduce operators one at a time.
Common Mistake: Ignoring Hierarchy
The order of Pucker & Bloat relative to:
- Merge Paths;
- Round Corners;
- Repeater;
can change the output.
Common Mistake: Audio Reaction Too Strong
Constrain the Amount range.
Common Mistake: Shape Loses Readability
If you’re applying the effect to an icon or logo, don’t distort it so far that the original design becomes unrecognizable unless that is intentional.
Pucker & Bloat Quick Reference
Amount = 0
Original Shape.
Negative Amount
Pulls geometry inward in one direction of the operator.
Positive Amount
Pushes geometry outward in the opposite direction.
Small values
Subtle transformation.
Large values
Extreme procedural geometry.
Five Pucker & Bloat Exercises
Exercise 1 — Polygon
Apply negative and positive Amount values.
Exercise 2 — Flower
Turn a circular or polygon Shape into petals.
Exercise 3 — Star Morph
Animate a polygon toward star-like geometry.
Exercise 4 — Radial Pattern
Combine with Repeater.
Exercise 5 — Floral Ring
Combine with Merge Paths and subtract an inner circle.
These exercises will quickly reveal how different Shape types respond.
Practical Project: Animated Flower
Create a polygon.
Apply Pucker & Bloat until you get a petal shape.
Animate:
Amount:
0 → final value.
Scale:
85% → 100%.
Rotation:
-15° → 0°.
Add an inner circle.
You now have a simple procedural flower reveal.
Practical Project: Music Visualizer Shape
Create a smooth decorative Shape.
Map audio amplitude to:
Pucker & Bloat Amount
Add:
- Glow;
- subtle Scale;
- gradient Fill.
The Shape reacts dynamically to the soundtrack.
Practical Project: Geometric Logo Reveal
Create a polygon.
Animate it from neutral geometry into a star-like brand Shape using Pucker & Bloat.
Reveal the logo name afterward.
Practical Project: Abstract Scene Transition
Create a large procedural Shape.
Animate:
- Pucker & Bloat Amount;
- Rotation;
- Scale.
Use it as a matte.
The Shape expands over the frame and reveals the next scene.
Frequently Asked Questions
What does Pucker & Bloat do in After Effects?
It procedurally deforms Shape Layer paths by pulling or pushing geometry around their vertices.
Where is Pucker & Bloat?
Select a Shape Layer and choose:
Contents → Add → Pucker & Bloat.
What does Amount do?
Amount determines the strength and direction of the deformation.
Can Amount be animated?
Yes.
Can Pucker & Bloat create flowers?
Yes. Certain circular and polygonal shapes can produce flower-like results.
Can it create stars?
It can turn some polygon geometry into star-like forms.
Can I use it on custom paths?
Yes.
Can I combine it with Repeater?
Yes.
Can I combine it with Zig Zag?
Yes.
Can I combine it with Merge Paths?
Yes.
Can I combine it with Offset Paths?
Yes.
Can I make it audio-reactive?
Yes. Link Amount to audio amplitude or another controller.
Is it the same as path morphing?
No. Pucker & Bloat is procedural, whereas path morphing uses explicit Path keyframes.
Do I need a plug-in?
No. Pucker & Bloat is built into After Effects Shape Layers.
Practice Pucker & Bloat in After Effects
Start with one polygon.
Add:
Pucker & Bloat.
Set:
Amount = -50.
Then:
0.
Then:
+50.
Observe how the geometry changes.
Next, repeat the exercise with:
- circle;
- triangle;
- star;
- custom path.
Then animate Amount.
Finally, combine it with:
- Repeater;
- Merge Paths;
- Offset Paths.
You’ll quickly discover dozens of interesting procedural shapes.
If you’d like to practice these Shape Layer techniques yourself, you can explore Adobe’s current After Effects options below:
Get Adobe After Effects and start creating procedural vector animations
What Should You Learn Next?
Pucker & Bloat deforms geometry around the Shape’s vertices.
Another powerful operator is:
Twist.
Twist lets you rotate path geometry progressively around a center point.
It can create:
- spirals;
- warped stars;
- swirling patterns;
- animated transitions;
- abstract motion graphics.
The next article will therefore be:
How to Use Twist in Adobe After Effects Shape Layers: Create Spirals and Warped Vector Animations.
We’ll look at Angle, Center, source geometry, animation techniques, and combinations with Repeater and Pucker & Bloat.
Final Thoughts
Pucker & Bloat is a great example of why Shape Layers in After Effects are more powerful than they first appear.
You can begin with:
one circle
or:
one polygon
and transform it into:
- flower;
- star;
- badge;
- blob;
- burst;
- abstract logo.
The core workflow is simple:
Create a Shape.
Add Pucker & Bloat.
Adjust Amount.
But the creative possibilities expand quickly when you combine it with:
Repeater
for radial patterns,
Merge Paths
for cutouts,
Offset Paths
for borders,
Trim Paths
for animated outlines,
and expressions for automatic motion.
Instead of drawing every final shape manually, you build procedural geometry that remains editable and animatable.
That’s what makes Pucker & Bloat such a useful tool for creative After Effects motion design.
Explore Adobe After Effects and start building procedural Shape Layer animations






