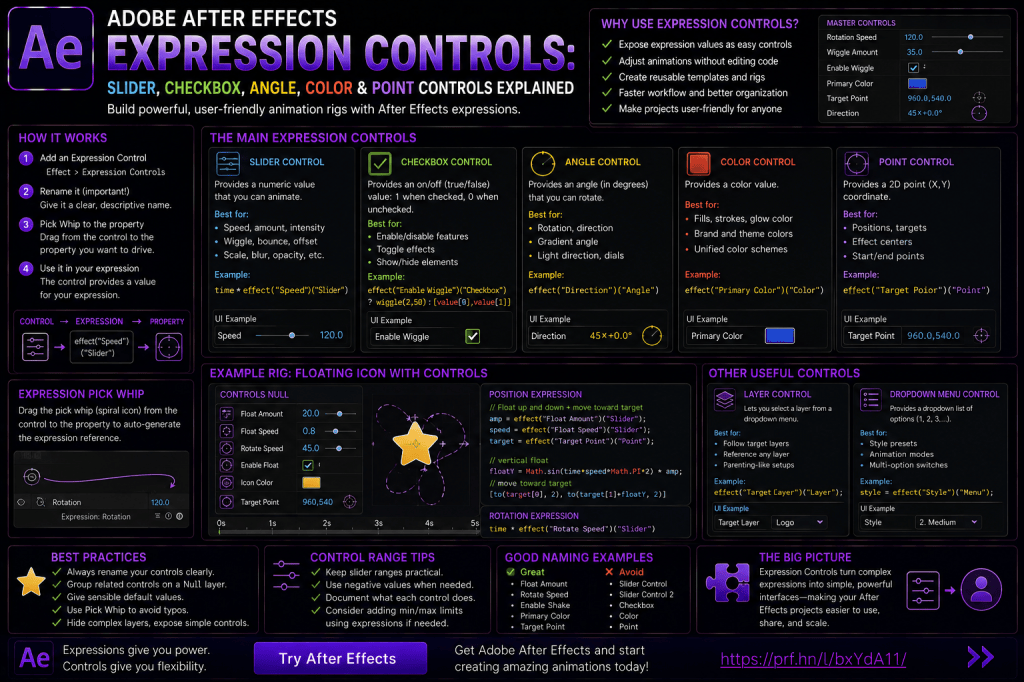
Expressions can dramatically improve the way you animate in Adobe After Effects.
With expressions, you can create automatic rotation, looping animation, random movement, bounce, overshoot, counters, procedural effects, and much more.
But expressions introduce another problem.
You may end up opening the expression code every time you want to change something.
Imagine you have:
wiggle(3,40)
and you want to experiment with different amounts of movement.
You need to find the expression and change 40.
Then perhaps change it to 25.
Then 60.
Then back to 35.
There is a much cleaner solution:
Expression Controls.
Expression Controls let you create user-friendly controls such as sliders, checkboxes, angles, colors, and points that can drive your expressions.
Instead of editing code, you adjust a control.
For example:
Wiggle Amount: 35
Move the Slider and the animation updates.
This is one of the most important steps toward building professional, reusable After Effects animation rigs.
In this guide, we’ll explore the main After Effects Expression Controls, including Slider Control, Checkbox Control, Angle Control, Color Control, Point Control, Layer Control, and Dropdown Menu Control, and show how they can be used in practical animation projects.
Affiliate disclosure: This article contains affiliate links. If you purchase Adobe After Effects through one of these links, we may earn a commission at no additional cost to you.
What Are Expression Controls in After Effects?
Expression Controls are effects designed primarily to provide values that expressions can reference.
Unlike visual effects such as Blur or Glow, an Expression Control usually doesn’t change the image by itself.
Instead, it supplies information.
For example:
Slider Control → 50
An expression can read that value and use it as:
- animation speed;
- Wiggle amplitude;
- Scale amount;
- opacity;
- blur strength;
- bounce intensity;
- offset distance.
Think of Expression Controls as the control panel for your expressions.
Where Are Expression Controls?
Select a layer.
Then go to:
Effect → Expression Controls
Depending on your After Effects version, you’ll find controls such as:
- 3D Point Control;
- Angle Control;
- Checkbox Control;
- Color Control;
- Dropdown Menu Control;
- Layer Control;
- Point Control;
- Slider Control.
Each provides a different type of value.
Why Expression Controls Matter
Consider this expression:
wiggle(2,50)
It works perfectly.
But 2 and 50 are buried inside the code.
A better workflow is to expose those numbers as controls.
For example:
Wiggle Frequency: 2
Wiggle Amount: 50
Now anyone using the project can adjust the animation without opening the expression.
This makes your project:
- cleaner;
- easier to modify;
- easier to hand off;
- easier to reuse;
- better suited to templates.
Expression Controls Don’t Animate Anything by Themselves
This is one of the most important concepts for beginners.
Adding a Slider Control doesn’t automatically animate your layer.
The Slider simply contains a number.
You must connect that number to another property using an expression.
Conceptually:
Slider
↓
Expression
↓
Animated property
For example:
Rotation Speed Slider
↓
time * slider
↓
Rotation
The Slider becomes the speed control.
1. Slider Control
Slider Control is probably the most useful Expression Control.
It stores a numerical value.
That number can control almost anything that accepts a numerical input.
Examples include:
- animation speed;
- Wiggle amount;
- blur;
- Scale;
- Rotation;
- Opacity;
- bounce amplitude;
- frequency;
- spacing.
How to Add a Slider Control
Select your layer.
Choose:
Effect → Expression Controls → Slider Control
The effect appears in the Effect Controls panel.
By default, it’s named:
Slider Control
Rename it immediately.
For example:
Rotation Speed
Clear naming becomes extremely important when your project contains many controls.
Rename Expression Controls
Instead of:
Slider Control
Slider Control 2
Slider Control 3
use:
Rotation Speed
Wiggle Amount
Bounce Decay
Your future self will appreciate this.
So will anyone else who opens the project.
Connect a Slider to Rotation
Create a Shape Layer.
Add a Slider Control.
Rename it:
Rotation Speed
Reveal Rotation.
Enable expressions.
Then connect the Rotation expression to the Slider.
Conceptually:
time * Rotation Speed
Now:
Slider = 0
No rotation.
Slider = 45
45 degrees per second.
Slider = 180
Fast rotation.
You can adjust the animation without touching the expression.
Use the Expression Pick Whip
You don’t need to manually type every property reference.
After enabling an expression, use the Expression Pick Whip.
Drag it from the expression to the Slider property.
After Effects automatically creates the reference.
This reduces typing errors.
It’s one of the most useful expression workflow tools.
A Typical Slider Reference
After Effects may generate an expression resembling:
effect("Rotation Speed")("Slider")
This means:
Look at the effect called:
Rotation Speed
and retrieve its:
Slider
value.
You can then use that value inside a larger expression.
Slider-Controlled Wiggle
Instead of:
wiggle(2,50)
create two Slider Controls:
Wiggle Frequency
Wiggle Amount
Then use those values inside wiggle().
Conceptually:
wiggle(frequency, amount)
Now both parameters can be changed directly from Effect Controls.
This is much better for experimentation.
Why This Is Useful
Imagine creating a camera-shake preset.
You can expose:
Shake Speed
and:
Shake Amount
The user doesn’t need to know anything about expressions.
They simply adjust two Sliders.
That’s how expression-driven animation becomes user-friendly.
If you’d like to practice expressions and Expression Controls yourself, you can explore Adobe’s current After Effects options here:
Explore Adobe After Effects and current plans
Animate Slider Controls
Expression Controls themselves can also be keyframed.
This is extremely powerful.
Suppose a Wiggle expression uses:
Wiggle Amount
At the beginning:
Amount = 0
At an impact:
Amount = 60
Shortly afterward:
Amount = 0
Now your camera shake occurs only around the impact.
The expression handles the procedural motion.
The Slider keyframes determine when and how strongly it occurs.
Slider-Controlled Bounce
Remember our bounce expression?
It may use:
- amplitude;
- frequency;
- decay.
Instead of hard-coding these numbers, create:
Bounce Amount
Bounce Frequency
Bounce Decay
Now the physical character of the animation can be adjusted from a simple control panel.
Slider-Controlled Blur
Add a Slider called:
Blur Amount
Connect it to:
Gaussian Blur → Blurriness
Now one Slider controls the effect.
Why do this when the Blur effect already has its own control?
Because a single master Slider can control multiple effects simultaneously.
One Slider, Multiple Properties
Imagine a Slider named:
Transition Amount
Connect it to:
- Blur;
- Scale;
- Opacity;
- distortion.
Now changing one value affects several properties.
This allows you to build higher-level animation systems.
Instead of adjusting four effects independently, you adjust one master control.
2. Checkbox Control
Checkbox Control provides a simple binary state:
On
or:
Off
In expression terms, this is typically represented numerically.
It is perfect for enabling or disabling optional behavior.
Add a Checkbox Control
Select a layer.
Choose:
Effect → Expression Controls → Checkbox Control
Rename it:
Enable Wiggle
Now you can use the checkbox inside an expression.
Conceptually:
If checked → use Wiggle
If unchecked → use normal value
Checkbox-Controlled Wiggle
Imagine a reusable title template.
You want users to choose whether the title has procedural motion.
Add:
Enable Motion
When checked:
Wiggle runs.
When unchecked:
the title remains stable.
This is much cleaner than asking the user to disable the expression manually.
Checkbox for Visibility
You can connect a Checkbox Control to Opacity.
Conceptually:
Checked → 100%
Unchecked → 0%
Now the Checkbox acts as a visibility switch.
This is useful for:
- optional logos;
- subtitles;
- badges;
- icons;
- decorative graphics.
Checkbox for Alternate Behavior
Checkboxes can control more than visibility.
They can choose between:
- animation modes;
- colors;
- speeds;
- positions;
- effects.
Conceptually:
If checkbox = on
use value A.
Otherwise
use value B.
This introduces simple conditional logic into your animation rig.
3. Angle Control
Angle Control provides a rotational value.
It’s particularly useful when you want a user-friendly dial rather than a generic numerical Slider.
Use it for:
- Rotation;
- gradient direction;
- light direction;
- effect angles;
- directional movement.
Add Angle Control
Choose:
Effect → Expression Controls → Angle Control
Rename it:
Direction
You can now connect this value to properties that need an angle.
Angle-Controlled Rotation
Connect a layer’s Rotation to:
Angle Control
Now rotating the control changes the layer.
For basic Rotation this may seem redundant.
But Angle Control becomes more valuable when one master angle drives multiple elements.
One Angle, Multiple Layers
Imagine a compass-style animation.
Create:
Master Direction
as an Angle Control.
Connect several graphical elements to it.
Now rotating one control updates the entire system.
This is useful for:
- dashboards;
- maps;
- directional graphics;
- technical animation.
Angle Control for Gradients
Many effects include angle or direction properties.
Instead of adjusting each separately, connect them to one Angle Control.
Now the entire visual system can share a consistent direction.
4. Color Control
Color Control stores a color value.
It is extremely useful for creating reusable branded graphics.
Instead of opening multiple Shape Layers and effects to change colors, create:
Primary Color
Secondary Color
Accent Color
Then connect your design elements to those controls.
Add Color Control
Choose:
Effect → Expression Controls → Color Control
Rename it:
Brand Color
Use the Expression Pick Whip to connect a Fill or other color property to the control.
Now changing one Color Control can update the connected element.
Master Brand Colors
Create a Null Object named:
DESIGN CONTROLS
Add:
Primary Color
Secondary Color
Accent Color
Connect:
- Shape Layer fills;
- strokes;
- text-related effects;
- glow colors;
- background elements.
Now you can recolor an entire composition from one place.
Why Color Controls Are Excellent for Templates
Imagine selling or sharing a Motion Graphics Template.
The user wants to match the animation to their company branding.
Without Expression Controls, they may need to search through dozens of layers.
With Color Controls:
Primary Brand Color
Accent Color
That’s much easier.
5. Point Control
Point Control stores a two-dimensional coordinate.
In other words:
X and Y
This is useful for controlling:
- positions;
- effect centers;
- anchor locations;
- target points;
- start/end points.
Add Point Control
Choose:
Effect → Expression Controls → Point Control
Rename it:
Target Position
Connect another property to it.
Now the Point Control acts as an interactive coordinate control.
Point Control for Effect Centers
Many effects contain a center point.
Instead of opening the effect itself, connect the center to a master Point Control.
This becomes especially useful when multiple effects should share the same target.
Point Control for Start and End Locations
Create:
Start Point
and:
End Point
These controls can drive:
- lines;
- beams;
- arrows;
- connecting graphics.
Move the points and the graphical system updates.
Point Control and Motion Graphics
Point Controls are extremely useful for procedural layouts.
For example, you could create:
Title Position
Subtitle Position
Logo Position
Then connect elements accordingly.
This lets you adjust layout from one control layer.
6. 3D Point Control
A 3D Point Control stores:
X
Y
and:
Z
coordinates.
Use it when working with three-dimensional properties or effects that need a 3D point.
This is conceptually similar to Point Control but includes depth.
When to Use 3D Point Control
Useful examples include:
- 3D target positions;
- camera-related rigs;
- 3D effects;
- spatial control systems.
For ordinary 2D motion graphics, Point Control is usually sufficient.
7. Layer Control
Layer Control allows an expression to reference another layer selected from a dropdown.
This is extremely powerful in reusable rigs.
Instead of hard-coding:
Follow “Logo Layer”
you provide:
Target Layer: [dropdown]
The user selects which layer should be referenced.
Why Layer Control Matters
Suppose an arrow should always point toward a particular layer.
If the target is hard-coded, changing the target requires editing the expression.
With Layer Control:
Target: Product
or:
Target: Logo
or:
Target: Text
The user simply selects another layer.
Layer Control for Tracking Systems
You can use Layer Control in systems where:
- one object follows another;
- graphics point toward a target;
- labels attach to different elements;
- effects reference selectable layers.
This makes expressions far more reusable.
8. Dropdown Menu Control
Dropdown Menu Control lets you create a menu containing multiple choices.
For example:
Animation Style
- None
- Subtle
- Strong
- Extreme
An expression can detect which option is selected and change behavior accordingly.
Why Dropdowns Are Powerful
Checkboxes give you:
two choices.
Dropdowns give you:
multiple choices.
This makes them excellent for template design.
Example: Animation Speed Presets
Create a Dropdown:
Animation Speed
Options:
- Slow
- Medium
- Fast
Your expression can translate those choices into numerical speed values.
The user doesn’t need to understand:
35 degrees per second
versus:
120 degrees per second.
They simply choose:
Slow
or:
Fast.
Example: Motion Style Dropdown
Create:
Motion Style
with:
- Static
- Float
- Wiggle
- Spin
The expression can switch between behaviors.
This is more advanced, but it demonstrates how Expression Controls can become a real user interface.
Expression Controls on a Null Object
You can add controls directly to the layer being animated.
But for complex projects, a dedicated Null Object is often better.
Create a Null named:
MASTER CONTROLS
Add all important Expression Controls there.
For example:
Animation Speed
Wiggle Amount
Enable Motion
Primary Color
Accent Color
Direction
Now you have one central control panel.
Why Use a Master Control Layer?
It keeps your project organized.
Instead of searching through:
- 20 Shape Layers;
- 10 text layers;
- several effects;
you select:
MASTER CONTROLS
and make your changes there.
This is particularly useful for:
- templates;
- client projects;
- complex motion graphics;
- reusable systems.
Organize Your Controls
A control layer can become messy too.
Use clear naming.
Instead of:
Slider Control 1
use:
GLOBAL — Animation Speed
Instead of:
Color Control
use:
COLOR — Primary
Good names dramatically improve project usability.
Group Controls Logically
For example:
MOTION — Speed
MOTION — Amount
MOTION — Decay
COLOR — Primary
COLOR — Accent
OPTIONS — Enable Glow
OPTIONS — Enable Wiggle
This makes a large control panel much easier to understand.
Build a Simple Master Animation Rig
Let’s combine several controls.
Create a Null:
MASTER CONTROLS
Add:
Rotation Speed — Slider
Enable Wiggle — Checkbox
Wiggle Amount — Slider
Brand Color — Color
Now connect them to a logo composition.
The logo can:
- rotate automatically;
- optionally Wiggle;
- change Wiggle intensity;
- change color.
All from one layer.
This is a basic animation rig.
Build a Camera Shake Controller
Create a Null:
CAMERA SHAKE CONTROLS
Add:
Shake Frequency
Shake Amount
Enable Shake
Connect them to a camera or parent Null.
Now the user can adjust:
speed
strength
on/off
without touching the expression.
Animate the Shake Amount
You can also keyframe:
Shake Amount
For example:
Before impact:
0
At impact:
50
After impact:
0
Now the camera shake appears only when required.
This combines:
keyframes
Expression Controls
wiggle()
into one flexible system.
Build a Bounce Controller
Create:
Bounce Amount
Bounce Frequency
Bounce Decay
Connect them to your bounce expression.
Now one layer can control the physical response of several elements.
Build a Color Theme Controller
Create:
Background Color
Primary Color
Secondary Color
Accent Color
Connect your composition’s design elements.
Now you can create multiple themes quickly.
For example:
Corporate
Dark
Bright
Monochrome
without manually recoloring every layer.
Expression Controls and Essential Properties
Expression-driven controls become even more useful when combined with After Effects’ template and Essential Properties workflows.
You can expose important parameters while keeping complicated layers and expressions hidden.
This allows another editor to customize the animation without understanding its internal structure.
Expression Controls and Motion Graphics Templates
If you’re creating reusable graphics for editing workflows, Expression Controls can form the foundation of a clean user experience.
Instead of exposing technical values, present controls such as:
Animation Speed
Logo Color
Show Subtitle
Accent Direction
Motion Style
The template becomes much easier to use.
Use Friendly Names
Think about the person using the project.
Avoid:
amp
freq
dec
in the visible interface.
Prefer:
Bounce Amount
Bounce Speed
Bounce Falloff
The expression code can remain technical.
The control panel should be understandable.
Control Ranges
Slider Controls can technically accept many values, but not every value makes sense.
For example:
Opacity
normally needs:
0–100.
Rotation Speed
might reasonably be:
-360 to +360.
Bounce Amount
might require a much smaller useful range.
When designing templates, consider what values users actually need.
Link Multiple Layers to One Slider
This is one of the biggest advantages of Expression Controls.
Suppose five icons should all rotate at the same speed.
Instead of five independent Rotation values, connect all five to:
Global Rotation Speed
Change one Slider.
All five update.
Add Multipliers for Variation
They don’t have to move identically.
For example:
Layer A:
Master Speed × 1
Layer B:
Master Speed × -1
Layer C:
Master Speed × 0.5
Now one master control creates coordinated but varied movement.
Create Responsive Relationships
Expression Controls become even more powerful when combined with mathematics.
For example:
Master Scale
could influence:
- object Scale;
- spacing;
- stroke width;
- blur amount.
One user-facing parameter can control several related properties.
This is the foundation of procedural design systems.
Use Controls Instead of Magic Numbers
A “magic number” is a number buried inside code without explanation.
For example:
wiggle(4.7,38)
Why 4.7?
Why 38?
Instead, expose:
Wiggle Speed
and:
Wiggle Amount
Your expression becomes easier to understand and maintain.
Expression Pick Whip Best Practice
Use the Pick Whip whenever practical.
It helps:
- create correct property references;
- reduce spelling errors;
- understand expression syntax.
After Effects writes the reference for you.
Then you can inspect what it generated.
This is one of the best ways to learn expression syntax naturally.
Relative vs Absolute References
Expressions can reference controls:
- on the same layer;
- on another layer;
- inside another composition in some workflows.
For a master control system, references often point toward a dedicated Null.
This means layer names become important.
Don’t Rename Critical Layers Carelessly
After Effects often updates expression references when layers are renamed within the application, but complicated projects still benefit from stable naming conventions.
Use clear controller names from the beginning.
For example:
CTRL — MASTER
CTRL — CAMERA
CTRL — COLORS
This makes the project easier to navigate.
Common Expression Control Mistake: Adding a Slider but Nothing Happens
Remember:
A Slider doesn’t automatically control anything.
You must connect it to another property using an expression.
Common Mistake: Too Many Controls
Not every number needs to be exposed.
If a project has 75 Sliders, the control panel may become harder to use than the original layers.
Expose only parameters that users genuinely need.
Common Mistake: Poor Naming
Avoid:
Slider 1
Slider 2
Checkbox
Use descriptive names.
Common Mistake: Controls Scattered Everywhere
For complicated projects, centralize important controls.
Common Mistake: No Default Values
Choose sensible defaults.
When the project opens, it should already look good.
Controls should allow customization rather than require repair.
Common Mistake: Extreme Slider Values
Test your rig.
What happens when someone enters:
-1000
or:
100000?
If extreme values break the design, constrain or map the input where appropriate.
Common Mistake: Overengineering
You don’t need a master control system for every five-second animation.
Use Expression Controls when they make the project easier.
Expression Controls Cheat Sheet
Slider Control
Best for:
numbers
Examples:
speed, amount, intensity, Scale.
Checkbox Control
Best for:
on/off
Examples:
enable effect, show element.
Angle Control
Best for:
direction or Rotation
Examples:
gradient angle, master Rotation.
Color Control
Best for:
colors
Examples:
brand colors, theme controls.
Point Control
Best for:
2D coordinates
Examples:
target point, effect center.
3D Point Control
Best for:
3D coordinates
Examples:
3D targets.
Layer Control
Best for:
choosing another layer
Examples:
target layer, follow system.
Dropdown Menu Control
Best for:
multiple choices
Examples:
animation style, speed preset.
Which Expression Control Should You Use?
Ask:
What kind of information does the user need to change?
A number?
Use a Slider.
Yes or no?
Use a Checkbox.
Direction?
Use Angle.
Color?
Use Color Control.
Location?
Use Point Control.
Target layer?
Use Layer Control.
Multiple named choices?
Use Dropdown Menu Control.
It’s usually that simple.
Five Expression Control Exercises
Exercise 1 — Rotation Speed
Create a Slider that controls:
time * speed
Exercise 2 — Wiggle Rig
Create Sliders for:
Frequency
and:
Amount
Exercise 3 — Visibility Checkbox
Connect a Checkbox to Opacity.
Exercise 4 — Brand Color
Use one Color Control to change several Shape Layers.
Exercise 5 — Master Controller
Create a Null containing all controls for a small animation.
These exercises will quickly make Expression Controls feel natural.
Practical Project: Reusable Animated Logo
Create a logo animation with:
Animation Speed — Slider
Enable Float — Checkbox
Float Amount — Slider
Primary Color — Color Control
Rotation Direction — Angle or Slider
Now the same logo rig can generate multiple versions without rebuilding the animation.
Practical Project: Social Media Template
Create:
Background Color
Accent Color
Show Logo
Animation Speed
Motion Style
A user can create different versions from one After Effects project.
This is where expressions begin to provide real production efficiency.
Practical Project: YouTube Lower Third
Expose:
Accent Color
Animation Speed
Show Icon
Icon Position
Now the lower third can be reused across many videos.
Why Expression Controls Are a Professional Skill
Professional After Effects work isn’t only about making one animation look good.
It’s also about building projects that are:
- editable;
- reusable;
- understandable;
- scalable;
- safe to hand off.
Expression Controls directly support those goals.
Expressions Become Interfaces
This is the bigger idea.
At first, expressions feel like code.
But Expression Controls allow you to put an interface in front of that code.
The animator sees:
Shake Amount: 25
rather than:
wiggle(6.3,25)
The designer sees:
Brand Color
rather than searching through twelve Shape Layers.
The editor sees:
Show Subtitle
rather than changing Opacity manually.
That separation between logic and controls is extremely powerful.
Frequently Asked Questions
What are Expression Controls in After Effects?
They’re special effects that provide values—such as numbers, colors, points, or selections—that expressions can reference.
Does Slider Control animate a layer automatically?
No. You must connect the Slider to a property through an expression.
What is Slider Control used for?
It can control numerical values such as speed, amount, Scale, Rotation, blur, or Wiggle intensity.
What is Checkbox Control used for?
It is useful for on/off choices, such as enabling an effect or showing an element.
What is Angle Control used for?
It provides an angular value suitable for Rotation, direction, and angle-based effect properties.
What is Color Control used for?
It stores a color that can drive Fill, Stroke, effect colors, and other color properties.
What is Point Control?
It stores a two-dimensional X/Y coordinate.
What is 3D Point Control?
It stores X, Y, and Z coordinates.
What does Layer Control do?
It lets an expression reference a user-selected layer.
What does Dropdown Menu Control do?
It lets users choose from multiple named options.
Can Expression Controls be keyframed?
Yes.
Can one Slider control several layers?
Yes. Multiple expressions can reference the same control.
Should I put controls on a Null Object?
For complex projects, a dedicated master-control Null is often an excellent organizational approach.
Do Expression Controls require plug-ins?
No. They’re built into After Effects.
Practice Expression Controls in After Effects
Start with a simple exercise.
Create a Shape Layer.
Add:
Slider Control
Rename it:
Rotation Speed
Connect it to Rotation.
Use time to generate the animation.
Then add:
Color Control
Connect it to the Shape Layer’s Fill.
Then add:
Checkbox Control
Use it to show or hide another graphic.
You’ve now built a small user-controlled animation rig.
If you’d like to practice these techniques yourself, you can explore Adobe’s current After Effects options here:
Get Adobe After Effects and start building reusable expression-driven animation rigs
What Should You Learn Next?
Expression Controls make individual animations easier to manage.
The next step is connecting properties together so one layer can automatically follow another.
For example:
- make one layer follow another layer’s Position;
- make Rotation control another Rotation;
- connect Scale values;
- create parent-child expression relationships;
- reference properties in other compositions;
- build master-controller systems.
The next article will therefore be:
How to Link Properties with Expressions in Adobe After Effects.
This is where expressions begin to move from isolated tricks toward complete procedural animation systems.
Final Thoughts
Expression Controls are among the most useful features to learn once you begin working seriously with After Effects expressions.
A basic expression might contain values directly:
wiggle(2,50)
That’s perfectly fine while learning.
But a reusable rig should ideally expose important parameters.
Instead of editing code, you adjust:
Wiggle Frequency
Wiggle Amount
Instead of opening ten layers to change colors, you adjust:
Primary Color
Instead of disabling an expression manually, you click:
Enable Motion
Expression Controls create a clean boundary between:
the technical logic
and:
the creative controls.
That makes your After Effects projects easier to edit, reuse, share, and scale.
Start with Slider Control.
Then learn Checkbox and Color Controls.
Add Point, Angle, Layer, and Dropdown controls as your rigs become more advanced.
Eventually, you’ll stop thinking of expressions as snippets of code attached to individual properties.
You’ll start thinking of them as systems.
And Expression Controls are what make those systems practical.
Explore Adobe After Effects and start creating smarter, reusable animation systems






