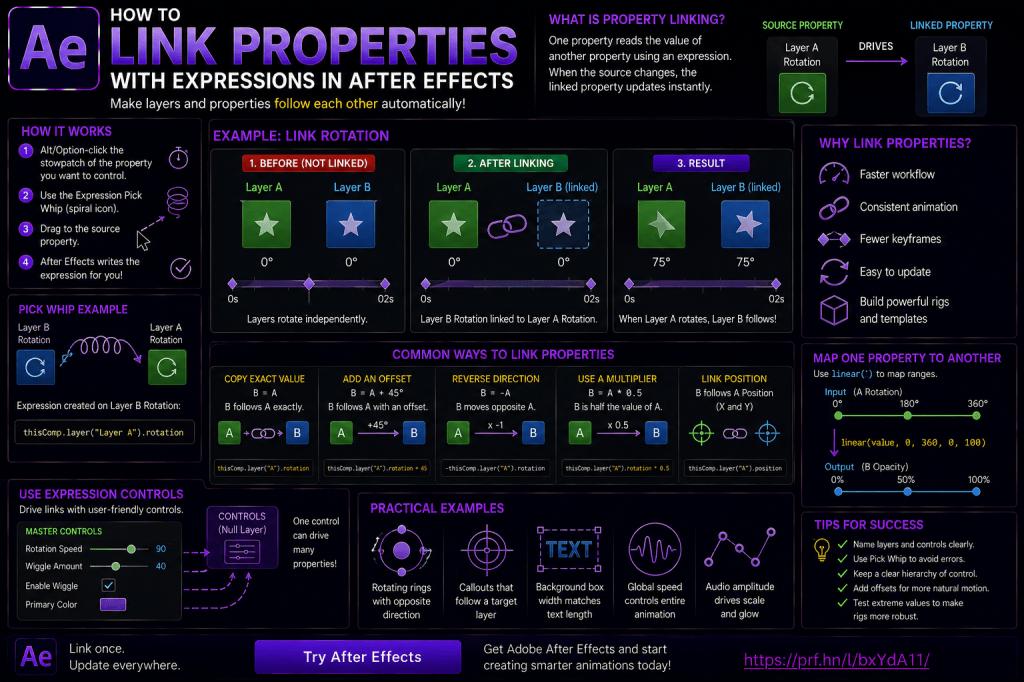
Once you understand basic expressions and Expression Controls, the next major step is learning how to link properties together.
This is where After Effects expressions become much more powerful.
Instead of animating every layer independently, you can create relationships.
For example:
- one layer can follow another layer’s Position;
- several layers can share the same Rotation;
- a Slider can control multiple properties;
- one Scale value can drive another layer’s Opacity;
- a master controller can manage an entire animation system;
- one layer can react automatically when another layer changes.
This approach is the foundation of procedural animation.
Instead of thinking:
“I need to animate ten different properties.”
you begin thinking:
“Which property should control the others?”
That shift can make complex After Effects projects dramatically easier to manage.
In this guide, we’ll look at how to link properties with expressions, use the Expression Pick Whip, reference properties on the same layer and other layers, add offsets, reverse relationships, map one property range to another, and build master-controller systems.
Affiliate disclosure: This article contains affiliate links. If you purchase Adobe After Effects through one of these links, we may earn a commission at no additional cost to you.
What Does It Mean to Link Properties in After Effects?
A property link means one property reads the value of another property through an expression.
For example:
Layer A Rotation
controls:
Layer B Rotation
If Layer A rotates to:
45°
Layer B also becomes:
45°
If Layer A changes to:
120°
Layer B updates automatically.
You no longer need matching keyframes on both layers.
The relationship is live.
Why Property Linking Is Useful
Imagine a project containing ten rotating interface elements.
Without expressions, you might animate all ten separately.
That creates:
- more keyframes;
- more editing;
- more chances for inconsistency.
Instead, choose one master Rotation value.
Link the other elements to it.
Now one change updates the entire system.
This gives you:
- faster editing;
- cleaner timelines;
- reusable systems;
- fewer mistakes;
- easier project handoff.
Expressions vs Parenting
Parenting and expressions can both create relationships between layers.
But they are not the same.
Parenting
A child layer inherits transformations from its parent.
This can include:
- Position;
- Scale;
- Rotation;
- other transform behavior.
Expressions
An expression can link one specific property to another.
For example:
Layer B Rotation follows Layer A Rotation
while Layer B’s Position remains completely independent.
Expressions provide more selective control.
When to Use Parenting
Use parenting when you want a broad transform relationship.
For example:
A label should move, rotate, and scale with a product.
Parent the label to the product or a tracking Null.
When to Use Expressions
Use expressions when you want a more specific relationship.
For example:
A layer should copy another layer’s Rotation but not its Position.
Or:
A layer’s Opacity should depend on another layer’s Scale.
Expressions are much more flexible.
The Expression Pick Whip
The easiest way to create property links is with the Expression Pick Whip.
You don’t need to type complicated property paths manually.
After Effects can generate the reference for you.
How to Link Two Rotation Properties
Let’s start with a basic example.
Step 1: Create Two Layers
Create:
Layer A
and:
Layer B
Use simple Shape Layers.
Step 2: Reveal Rotation
Select both layers.
Press:
R
Step 3: Enable an Expression on Layer B
Alt-click or Option-click the Rotation stopwatch on Layer B.
Step 4: Use the Pick Whip
Drag the expression pick whip from Layer B’s Rotation expression to Layer A’s Rotation property.
After Effects creates the expression reference.
Step 5: Change Layer A
Rotate Layer A.
Layer B follows automatically.
You’ve created a live property link.
If you’d like to practice expressions and procedural animation yourself, you can explore Adobe’s current After Effects options here:
Explore Adobe After Effects and current plans
What Does the Generated Expression Look Like?
After Effects may generate something resembling:
thisComp.layer("Layer A").transform.rotation
This expression tells After Effects:
Look inside:
this composition
Find:
Layer A
Read:
Transform → Rotation
Use that value here.
Understanding thisComp
thisComp
means:
the current composition.
This is useful because expressions frequently reference other layers in the same composition.
For example:
thisComp.layer("Controller")
means:
Find the layer named:
Controller
inside the current composition.
Understanding thisLayer
thisLayer
means:
the layer containing the current expression.
This becomes useful when you want reusable expressions that don’t depend on a specific layer name.
For example, an expression can reference another property on the same layer through thisLayer.
Same-Layer Property Links
Properties don’t need to live on separate layers.
For example, a layer’s Scale could influence its own Rotation.
Or an Effect Control Slider could determine its Opacity.
This is useful when building self-contained rigs.
Link Position to Another Layer
You can link Position in the same way.
Enable an expression on:
Layer B → Position
Pick whip to:
Layer A → Position
Layer B now follows Layer A’s Position.
But unlike parenting, the relationship applies only to Position.
Layer B’s Scale and Rotation can remain independent.
Add an Offset
A direct link makes the properties identical.
But often you want:
follow the other layer, but remain 100 pixels away.
This is where offsets become useful.
For Position, conceptually:
otherPosition + [100,0]
Now Layer B follows Layer A while remaining 100 pixels to the right.
Why Offsets Matter
If every linked layer occupied exactly the same location, property linking would be limited.
Offsets allow you to create:
- labels;
- repeated graphics;
- followers;
- interface components;
- connected systems.
Rotation Offset
Suppose Layer B should follow Layer A’s Rotation but remain 45 degrees ahead.
Conceptually:
otherRotation + 45
If Layer A is:
0°
Layer B becomes:
45°
If Layer A becomes:
90°
Layer B becomes:
135°
The relationship stays intact.
Scale Offset
You can also alter Scale.
For example:
Layer B could be:
80% of Layer A’s Scale
Conceptually:
otherScale * 0.8
Now the layers remain proportional.
Reverse a Relationship
Suppose two elements should rotate in opposite directions.
Use:
-otherRotation
If Layer A rotates:
+45°
Layer B rotates:
-45°
This is useful for:
- gears;
- interface rings;
- mechanical graphics;
- mirrored motion.
Create Opposing Rotating Rings
Build two circular Shape Layers.
Animate or expression-drive the first Rotation.
Link the second Rotation to the first but multiply by:
-1
Now they rotate in opposite directions automatically.
Add a third layer at:
0.5 × master Rotation
and you have a coordinated procedural system.
Link One Property Type to Another
Properties do not need to be the same type.
For example:
Rotation
can control:
Opacity
or:
Scale
can control:
Blur
This is where property linking becomes especially interesting.
Example: Slider Controls Rotation
Create a Slider Control named:
Master Rotation
Link several layer Rotation properties to it.
Now one Slider controls all of them.
This is a classic master-controller setup.
Example: Scale Controls Opacity
Suppose an object should fade in as it grows.
Scale moves from:
0% → 100%
Opacity should move from:
0% → 100%
You could create matching keyframes.
But expressions can derive Opacity from Scale.
This creates a responsive relationship.
Why Direct Linking May Not Work
Scale and Opacity use different value ranges.
Scale may be:
0–100.
Opacity also happens to be 0–100, so that example is easy.
But imagine:
Rotation:
0–360°
should control:
Opacity:
0–100%.
Now you need range mapping.
The linear() Function
The linear() function maps one range to another.
Conceptually:
Input 0–360
becomes:
Output 0–100
This is one of the most useful functions in expression-driven rigs.
Basic linear() Concept
Imagine:
Rotation = 0°
Opacity = 0%
Rotation = 180°
Opacity = 50%
Rotation = 360°
Opacity = 100%
The expression calculates the relationship automatically.
linear() Syntax Concept
The general pattern is:
linear(input, inputMin, inputMax, outputMin, outputMax)
You supply:
- current input;
- start of input range;
- end of input range;
- start of output range;
- end of output range.
After Effects maps the values.
Example: Slider Controls Scale
Create a Slider:
Animation Amount
Range:
0–100.
Map it to Scale:
50–150.
Now:
Slider = 0
Scale = 50%.
Slider = 100
Scale = 150%.
This lets you expose intuitive user controls while the expression handles actual property values.
Example: Rotation Controls Blur
Suppose:
Rotation 0–180°
should drive:
Blur 0–50.
Use linear() to map those ranges.
As the layer rotates, the blur increases automatically.
This creates a relationship that would otherwise require additional keyframes.
The ease() Function
ease() works similarly to linear() but adds smooth interpolation.
Instead of output changing at a constant linear rate, it eases between values.
This can make linked relationships feel more natural.
When to Use ease()
Use it when you want a mapped property to:
- accelerate smoothly;
- slow near boundaries;
- avoid mechanical-looking change.
For responsive UI or motion-design rigs, ease-based mapping can feel more polished.
Clamp Values
One problem with mapped relationships is that the driving property may exceed the expected range.
For example:
Slider expected:
0–100.
But someone enters:
Should the output continue increasing?
Sometimes yes.
Sometimes no.
You may want to constrain the result.
Why Clamping Is Useful
Suppose Opacity should remain between:
0 and 100.
An expression that produces:
140
doesn’t make conceptual sense.
Using range constraints makes rigs more robust.
Link Position Dimensions Separately
Position contains multiple dimensions.
You may want only:
X Position
to follow another layer.
while Y remains independent.
One method is to separate dimensions.
Another is to construct the Position array manually.
Example: Follow Only X
Conceptually:
X = another layer’s X
Y = this layer’s existing Y
This allows one layer to follow horizontal movement while remaining vertically fixed.
Example: Follow Only Y
Likewise:
X = existing X
Y = target Y
This is useful for:
- labels;
- tracking graphics;
- vertical alignment systems.
Link 3D Position
3D Position contains:
- X;
- Y;
- Z.
You can link some or all of these dimensions.
This allows sophisticated 3D rigs where layers share depth, horizontal movement, or vertical alignment selectively.
Link to a Null Object
Null Objects are excellent controllers.
Create a Null:
MASTER CTRL
Animate or control it.
Then link other properties to the Null through expressions.
This gives you a central layer that does not render visually.
Why Null Controllers Are Useful
A Null can hold:
- Expression Controls;
- master Position;
- master Rotation;
- global Scale;
- animation parameters.
The visible artwork remains clean while the control logic lives on the Null.
Master Rotation Rig
Create:
CTRL — Rotation
as a Null.
Add:
Rotation Speed Slider
Then use:
time * speed
to generate master Rotation.
Link several layers to the controller’s Rotation.
Now the complete system is driven from one place.
Master Scale Rig
Create a Slider:
Global Scale
Connect multiple layers to it.
Use multipliers where necessary.
For example:
Main icon:
100% of master.
Secondary ring:
80%.
Accent:
120%.
One Slider updates the entire visual hierarchy.
Link Colors
Property linking is not limited to numbers.
You can link color properties too.
Create:
Primary Color
using Color Control.
Link:
- Fill colors;
- Stroke colors;
- Glow colors.
One control updates the entire visual theme.
Link Effect Properties
Almost any expression-enabled property can participate.
You could link:
- Blur;
- Glow;
- Exposure;
- distortion;
- effect centers;
- evolution;
- color.
This allows one master animation parameter to coordinate several visual effects.
Example: Master Intensity
Create:
Effect Intensity
Slider.
Map it simultaneously to:
- Glow Intensity;
- Blur;
- Scale;
- Opacity.
Increase one Slider.
The entire effect becomes stronger.
This is how complex effects can be simplified into one intuitive control.
Link Text and Graphic Width
More advanced expressions can inspect text dimensions and resize a background shape automatically.
For example:
Text becomes longer
↓
Rectangle becomes wider
This is extremely useful for lower thirds and responsive templates.
sourceRectAtTime()
A commonly used expression function for responsive text layouts is:
sourceRectAtTime()
It can provide information about a text or shape layer’s visible bounds.
This enables expressions to calculate:
- width;
- height;
- top;
- left.
Automatic Text Box Concept
Imagine a name title:
Ben
The background box is short.
Change it to:
Alexander Montgomery
The rectangle automatically expands.
No manual resizing.
This is one of the most practical examples of property-driven responsive design.
Link Shape Size to Text Width
Conceptually:
Rectangle Width = Text Width + Padding
The expression reads the text dimensions and adds extra space.
This makes title templates far more reusable.
Add Padding Controls
Instead of hard-coding:
+ 40 pixels
create a Slider:
Horizontal Padding
Now the user can control how much space appears around the text.
This combines:
- property linking;
- sourceRectAtTime();
- Expression Controls.
Link Layer Positions to Text Size
Once you know the text dimensions, you can also reposition:
- icons;
- lines;
- accent graphics;
- subtitles.
For example:
An icon always sits 20 pixels to the right of the title regardless of title length.
This is responsive motion design.
Connect Layers Across a Layout
Imagine a lower third containing:
Icon
Name
Job title
Background box
Relationships could be:
Name controls box width
Name width controls icon position
Name height controls subtitle position
One text change updates the entire layout.
Link to Layer Controls
Remember Layer Control?
Instead of hard-coding which layer should drive the expression, you can let the user choose.
For example:
Follow Target: [Layer dropdown]
The expression reads Position from the selected layer.
This makes rigs more reusable.
Example: Dynamic Callout
Create:
Target Layer
using Layer Control.
A callout graphic references whichever layer is selected.
Change the target from:
Product
to:
Logo
and the callout updates.
Link Point Controls
Point Controls are useful when you want user-defined positions.
For example:
Start Point
End Point
A line or arrow can connect them.
Move the points.
The graphic updates.
Dynamic Connecting Line
A Shape Layer path can be driven by two Point Controls.
This allows users to reposition the line endpoints without editing path vertices manually.
This is useful for:
- diagrams;
- callouts;
- infographics;
- technical animation.
Link Angle and Direction
Angle Control can drive:
- layer Rotation;
- gradient angle;
- directional effects.
One Angle Control can coordinate all of them.
For example:
Light Direction
could control several highlights and directional effects.
Build a Master Motion Dashboard
Now combine multiple controls:
Global Speed — Slider
Global Scale — Slider
Direction — Angle
Primary Color — Color Control
Enable Motion — Checkbox
Target Layer — Layer Control
This one Null becomes the central interface for your entire animation.
Why This Matters for Client Work
Imagine a client asks:
“Can you make the animation 20% faster and change the brand color?”
Without master controls, you may need to edit many layers.
With a well-built rig:
Animation Speed: 100 → 120
Primary Color: change
Done.
Why This Matters for Templates
Property linking is fundamental to reusable Motion Graphics Templates.
You want users to change:
- text;
- colors;
- speed;
- options.
You don’t want them breaking:
- timing;
- layout;
- relationships.
Expressions enforce those relationships automatically.
Build Systems, Not Isolated Animations
This is the bigger conceptual shift.
A beginner often creates:
Layer 1 animation
Layer 2 animation
Layer 3 animation
An advanced workflow creates:
Master values
↓
relationships
↓
dependent animation
The result is easier to modify and scale.
Avoid Circular References
Be careful when properties reference one another.
For example:
Layer A Position depends on Layer B.
Layer B Position depends on Layer A.
This can create a circular dependency.
After Effects cannot resolve an endless logical loop.
Keep Direction of Control Clear
A good rig has a clear hierarchy.
For example:
MASTER CTRL
↓
Group Controllers
↓
Individual Layers
Avoid relationships that point back upward unnecessarily.
One Source of Truth
Whenever possible, define important values in one place.
For example:
Don’t create three separate Sliders all called:
Animation Speed
Create one:
GLOBAL SPEED
and reference it.
This prevents values from drifting out of sync.
Name Controller Layers Clearly
Useful naming conventions include:
CTRL — MASTER
CTRL — COLORS
CTRL — CAMERA
CTRL — TEXT
This makes complex projects easier to understand.
Keep Expressions Readable
Instead of one long expression, use variables.
For example:
master = thisComp.layer("CTRL — MASTER");
speed = master.effect("Speed")("Slider");
Then use:
time * speed
Readable expressions are easier to maintain.
Comments
JavaScript-style comments can explain expression logic.
For example:
// Global rotation speed
Comments do not affect the calculation.
They’re useful when expressions become complex.
Common Linking Mistake: Wrong Property Type
A single-number Rotation property cannot always directly accept a two-dimensional Position array.
Make sure the value types are compatible.
If necessary, extract one dimension or transform the value.
Common Mistake: Layer Names Change
References depend on layer identities and names.
After Effects handles many renames intelligently, but clear stable naming remains best practice.
Common Mistake: Linking Everything Directly
Sometimes you need an offset.
Without offsets, linked layers may overlap or behave identically.
Common Mistake: No Range Mapping
If a 0–360 Rotation drives Opacity directly, the relationship may not make sense.
Use linear() or ease().
Common Mistake: Too Many Dependencies
A project where every layer depends on five others can become hard to debug.
Keep the control structure logical.
Common Mistake: Expressions Instead of Parenting
If you simply need a child to inherit all transforms, parenting may be easier.
Don’t use expressions solely because you can.
Common Mistake: Parenting Instead of Expressions
Likewise, if only one property needs linking, expression control may be cleaner.
Choose the right technique.
Common Mistake: Hidden Master Values
Put important parameters on a clearly labeled control layer.
Don’t bury them inside random effects on random layers.
Five Property-Linking Exercises
Exercise 1 — Copy Rotation
Link Layer B Rotation to Layer A.
Exercise 2 — Add Offset
Make Layer B Rotation:
Layer A + 45°
Exercise 3 — Opposite Rotation
Make Layer B rotate opposite Layer A.
Exercise 4 — Map Slider to Scale
Use linear() to map:
0–100
to:
50–150%.
Exercise 5 — Master Controller
Create a Null controlling multiple layer properties.
These five exercises teach the core logic behind expression-driven rigs.
Practical Project: Rotating Tech Interface
Create three circular Shape Layers.
Create:
CTRL — MASTER
with a Slider:
Rotation Speed
Outer ring:
master speed
Middle ring:
master speed × -1.5
Inner ring:
master speed × 0.5
One Slider controls the entire system.
Practical Project: Responsive Title
Create a Text Layer and rectangular Shape Layer.
Use text dimensions to drive rectangle width.
Add:
Horizontal Padding
Slider.
Now changing the title text automatically resizes the box.
This is a practical template-ready system.
Practical Project: Product Callout
Create:
Target Layer — Layer Control
Offset X — Slider
Offset Y — Slider
A callout follows whichever product or object layer is selected.
This creates a flexible annotation system.
Practical Project: Brand Theme
Create:
Primary Color
Secondary Color
Accent Color
Link all graphic elements appropriately.
You can now recolor the entire animation from three Color Controls.
Linking Properties Across Pre-Comps
Expressions can also reference layers and properties inside other compositions in more advanced workflows.
This can be useful for centralized project control.
For example:
MASTER SETTINGS composition
could contain global parameters used by several scenes.
Be Careful with Cross-Comp References
They can be powerful, but they make projects more interconnected.
If compositions are duplicated, renamed, or reused elsewhere, references may need attention.
For simpler projects, keep controls within the same comp when practical.
Responsive Design Systems
Property linking is the foundation of responsive design in After Effects.
A responsive animation adjusts automatically when:
- text changes;
- layer dimensions change;
- colors change;
- composition size changes;
- user controls change.
This reduces manual cleanup.
Data-Driven Animation
At a more advanced level, expressions can connect values from:
- text;
- JSON;
- data files;
- controls.
Properties can then update based on changing information.
This enables:
- charts;
- dashboards;
- sports graphics;
- financial graphics;
- automated templates.
The same basic principle still applies:
one value drives another.
Audio-Reactive Relationships
Audio can be converted into amplitude data.
Expressions can then link that data to:
- Scale;
- Glow;
- Position;
- Opacity;
- distortion.
This is another example of property relationships.
Instead of Layer A driving Layer B, audio data becomes the driver.
Motion Tracking Relationships
Tracking data can also drive graphics.
A tracked Null contains Position data.
Other graphics can reference or parent to that Null.
Property linking can add:
- offsets;
- scaling relationships;
- custom reactions.
This demonstrates how expressions fit into broader After Effects workflows.
Expressions Are About Relationships
This is perhaps the most important lesson.
A simple expression isn’t necessarily valuable because it contains code.
It’s valuable because it defines a relationship.
Examples:
time → Rotation
Slider → Wiggle Amount
Text Width → Background Width
Layer Position → Label Position
Audio Amplitude → Scale
Rotation → Blur
Once you start seeing animation as relationships, After Effects becomes much more flexible.
Frequently Asked Questions
What does linking properties mean in After Effects?
It means using expressions so one property’s value is calculated from another property.
How do I link two properties?
Enable an expression on the property you want to control and use the Expression Pick Whip to reference the source property.
Can Position follow another layer?
Yes.
Can Rotation follow another Rotation?
Yes.
Can I add an offset?
Yes. You can mathematically add or subtract values from the linked property.
Can two layers rotate in opposite directions?
Yes. Multiply one Rotation relationship by a negative value.
Can one property control a different type of property?
Yes. For example, Rotation can drive Opacity or Scale.
What is linear()?
It maps an input range to an output range.
What is ease()?
It maps values similarly to linear() but provides eased interpolation.
Can I link colors?
Yes. Color Controls and color properties can be linked.
Can one Slider control multiple properties?
Yes.
Should I use expressions or parenting?
Use parenting for broad transform inheritance and expressions for more selective or customized relationships.
Can I create responsive text boxes?
Yes. Expressions can read text dimensions and resize Shape Layers automatically.
What is sourceRectAtTime()?
It is commonly used to retrieve layer bounds, making it valuable for responsive text and layout expressions.
Can I use a Null as a master controller?
Yes. This is one of the most effective ways to organize complex rigs.
Do property links require plug-ins?
No. Expressions and property links are native After Effects capabilities.
Practice Linking Properties in After Effects
Start with two simple Shape Layers.
Link their Rotations.
Then add:
+45
to one layer.
Then multiply by:
-1
Next, create a Slider Control and make both layers respond to it.
From there, experiment with mapping one property to another.
Once these simple relationships feel natural, responsive motion-design systems become much easier to understand.
If you’d like to practice expressions and build your own procedural rigs, you can explore Adobe’s current After Effects options below:
Get Adobe After Effects and start building linked animation systems
What Should You Learn Next?
We’ve now covered:
- basic expressions;
- Wiggle;
- loopOut;
- Time;
- Bounce and Overshoot;
- Expression Controls;
- Property Linking.
The next powerful application is making graphics respond to audio.
You can convert audio amplitude into animation data and use expressions to drive:
- Scale;
- Glow;
- Opacity;
- Rotation;
- particles;
- visualizer elements.
The next article will therefore be:
How to Create Audio-Reactive Animation in Adobe After Effects.
This will bring the expression concepts together in a practical project and introduce audio amplitude, keyframe conversion, property linking, and visualizer-style animation.
Final Thoughts
Property linking is the point where After Effects expressions begin to feel less like isolated tricks and more like a complete animation system.
Instead of animating every element separately, you define relationships.
One Rotation can drive five layers.
One Slider can control an entire interface.
One Color Control can recolor a complete design.
One Text Layer can resize its own background.
One target position can control a complete callout system.
The key idea is simple:
Create one source of truth, then let other properties respond to it.
Use parenting when layers should inherit transforms broadly.
Use expressions when you need selective or calculated relationships.
Use linear() and ease() when input and output ranges differ.
Use Expression Controls when users need simple, accessible parameters.
Use Null Objects to centralize your logic.
And keep the dependency structure clear.
Once you start building projects this way, editing becomes dramatically easier.
Instead of changing twenty values, you change one.
Instead of fixing ten animations, you fix the relationship.
That’s the real power of property linking in Adobe After Effects.
Explore Adobe After Effects and start building smarter procedural animation systems






