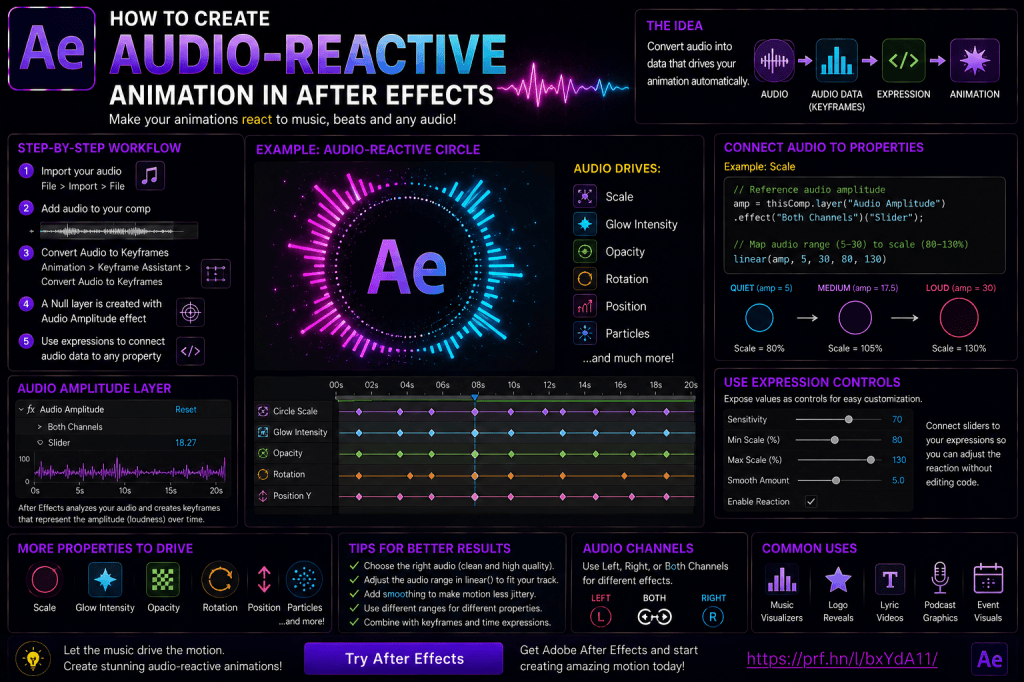
Audio-reactive animation is one of the most satisfying techniques to create in Adobe After Effects.
Instead of manually placing keyframes to match every beat, you can make visual elements respond directly to music, speech, sound effects, or other audio.
A shape can pulse with a kick drum.
A logo can scale with music.
A glow can become brighter when the audio gets louder.
Text can react to a voice.
An entire visualizer can move automatically from the soundtrack.
The key is converting audio into animation data that After Effects can use.
Once that data exists, expressions can connect it to almost any animatable property.
In this guide, you’ll learn how to create audio-reactive animation in Adobe After Effects, convert audio to keyframes, understand the Audio Amplitude layer, connect audio data to Scale and other properties, control sensitivity, smooth the response, and build reusable audio-driven animation systems.
Affiliate disclosure: This article contains affiliate links. If you purchase Adobe After Effects through one of these links, we may earn a commission at no additional cost to you.
What Is Audio-Reactive Animation?
Audio-reactive animation is animation whose visual properties respond automatically to an audio signal.
For example:
Quiet audio → small Scale
Loud audio → large Scale
Or:
Quiet audio → weak Glow
Loud audio → strong Glow
The animation is therefore being driven by audio rather than manually created keyframes.
This can be used for:
- music visualizers;
- podcast graphics;
- lyric videos;
- logo animation;
- social-media content;
- event visuals;
- voice-reactive graphics;
- title sequences;
- promotional videos.
How Audio-Reactive Animation Works in After Effects
The basic workflow is:
Audio
↓
Convert Audio to Keyframes
↓
Audio Amplitude data
↓
Expression
↓
Animated property
After Effects analyzes the audio and generates keyframe values.
You can then use expressions to translate those values into visible animation.
Step 1: Import Your Audio
Start by importing an audio file into After Effects.
Choose:
File → Import → File
Select your audio.
Common formats may include WAV, MP3, and other supported audio formats.
Drag the audio into your composition.
Step 2: Preview the Audio
Before creating animation, listen to the track.
Identify:
- beats;
- loud sections;
- quiet sections;
- vocals;
- impacts;
- transitions.
Understanding the sound helps you decide what should react.
Step 3: Convert Audio to Keyframes
Select the audio layer.
Then choose:
Animation → Keyframe Assistant → Convert Audio to Keyframes
After Effects analyzes the soundtrack.
When processing finishes, a new Null Object appears.
It is usually called:
Audio Amplitude
This layer contains the audio analysis.
Step 4: Open the Audio Amplitude Layer
Expand:
Audio Amplitude
Then:
Effects
You’ll typically see controls representing audio channels, including values such as:
Left Channel
Right Channel
Both Channels
For many projects, Both Channels is the easiest starting point.
Step 5: Inspect the Slider Keyframes
Open:
Both Channels → Slider
You’ll see many automatically generated keyframes.
These values represent changes in audio amplitude over time.
Play the composition.
The Slider value changes according to the soundtrack.
This is the data we’ll use to drive animation.
If you’d like to practice audio-reactive animation yourself, you can explore Adobe’s current After Effects options here:
Explore Adobe After Effects and current plans
Why After Effects Creates a Null
The Audio Amplitude layer doesn’t need to render visually.
Its purpose is to hold animation data.
That’s why a Null Object is ideal.
Think of it as an audio-data controller.
Other layers can reference its Slider values.
Create Your First Audio-Reactive Shape
Let’s create something simple.
Create a Shape Layer containing a circle.
Reveal:
Scale
Now we want the circle to become larger when the music gets louder.
Enable an expression on Scale.
Use the Expression Pick Whip to reference:
Audio Amplitude → Both Channels → Slider
You now have access to the audio amplitude value.
But directly connecting the Slider may not produce the Scale behavior you want.
We need to map the values.
Understanding Audio Amplitude Values
Audio amplitude values generated by After Effects may occupy a relatively small numerical range.
For example, your track might produce values roughly around:
5
to:
30
while Scale values might need to range from:
80%
to:
130%
This is why mapping functions are useful.
Using linear() for Audio Animation
The linear() function can convert one range into another.
Conceptually:
Audio 5–30
maps to:
Scale 80–130
Now quiet sections produce approximately:
80% Scale.
Loud sections approach:
130%.
This creates much more useful animation.
The Basic linear() Structure
The general concept is:
linear(audio, audioMin, audioMax, outputMin, outputMax)
For example, conceptually:
linear(audio, 5, 30, 80, 130)
The exact numbers depend on your soundtrack.
Why You Need to Tune the Range
Different audio files produce different amplitude values.
A quiet voice recording may behave very differently from heavily compressed electronic music.
There is no universal perfect range.
Inspect your audio values and adjust accordingly.
Audio-Reactive Scale
Scale is one of the easiest properties for beginners.
Imagine a circle with a base size of 100%.
The audio can make it pulse between:
100%
and:
130%
This creates a classic music-reactive effect.
Keep X and Y Scale Equal
Scale contains multiple dimensions.
For a 2D layer:
X Scale
and:
Y Scale
If you want uniform scaling, use the same audio-driven value for both.
Conceptually:
[s,s]
where s is the mapped audio value.
The circle grows evenly instead of stretching.
Add Audio to Existing Scale
Sometimes you don’t want the audio to determine the complete Scale value.
You simply want it to add extra movement.
Conceptually:
Base Scale + Audio Reaction
For example:
Base:
100%
Audio adds:
0–20%.
Now the object remains around its intended size but pulses with sound.
Audio-Reactive Rotation
Audio can also control Rotation.
For example:
Quiet → 0°
Loud → 20°
This can create small rhythmic turns.
For most designs, subtle Rotation usually works better than huge jumps.
Audio-Reactive Position
You can use audio to move an object.
For example:
Y Position
could move upward when the audio becomes louder.
This can create:
- bouncing equalizer elements;
- reactive icons;
- rhythmic typography.
Again, map the amplitude into a useful pixel range.
Audio-Reactive Opacity
Audio can drive Opacity.
For example:
Quiet → 20%
Loud → 100%
This can create flashing or pulsing elements.
Be cautious with rapid high-contrast flashing, particularly for content intended for broad audiences.
Audio-Reactive Glow
Glow is an excellent property for audio reaction.
Instead of moving the object dramatically, allow the soundtrack to change:
- Glow Intensity;
- Glow Radius;
- Exposure;
- brightness-related parameters.
This can create energetic motion without making the composition visually unstable.
Example: Pulsing Neon Logo
Create or import a logo.
Add Glow.
Use audio amplitude to control:
Glow Intensity
and perhaps a small amount of:
Scale
Now loud beats make the logo:
- slightly larger;
- brighter;
- more energetic.
This can look much more sophisticated than extreme scaling.
One Audio Source Can Drive Multiple Properties
You don’t need separate audio analysis for every property.
The same:
Both Channels Slider
can control:
- Scale;
- Glow;
- Rotation;
- blur;
- Position.
Use different mappings for each.
For example:
Scale → 100–115
Glow → 0.5–2.5
Rotation → -2° to +2°
One audio signal can therefore create a coordinated visual response.
Don’t Make Everything React Equally
This is a common beginner mistake.
If every property reacts strongly to the same audio, the result can become chaotic.
Instead, establish hierarchy.
For example:
Main reaction: Scale
Secondary reaction: Glow
Very subtle reaction: Rotation
The soundtrack remains visible in the motion without overwhelming the design.
Understanding Audio Sensitivity
Suppose your audio ranges from:
0 to 25
but your expression maps:
0 to 100
The visual reaction may be very weak.
If you instead map:
5 to 20
the response becomes much stronger.
The input range determines sensitivity.
Make the Animation More Sensitive
Narrow the audio input range.
For example:
Instead of:
0–50
map:
5–20
Now smaller changes in audio produce larger visual differences.
Make the Animation Less Sensitive
Use a wider input range or reduce the output range.
For example:
Instead of Scale:
80–150
use:
95–110
The result becomes more restrained.
Inspect the Audio Graph
Look at the generated Slider values over time.
The Graph Editor can help you understand:
- peaks;
- quiet sections;
- overall dynamics.
This makes it easier to choose useful mapping values.
Why Raw Audio Can Look Jittery
Audio amplitude can change very quickly.
If you map it directly to Position or Scale, the visual may shake rapidly.
Sometimes that’s exactly what you want.
Often it isn’t.
This is where smoothing becomes useful.
The smooth() Expression
After Effects expressions can smooth rapidly changing values.
Conceptually, smoothing averages nearby values over a short period.
Instead of:
10 → 25 → 8 → 30 → 12
you get a more gradual response.
This can make audio-reactive motion feel much more polished.
When to Use Smoothing
Use smoothing for:
- logo pulses;
- title Scale;
- camera movement;
- atmospheric effects.
You may want less smoothing for:
- drum hits;
- sharp visualizers;
- impact effects.
The right amount depends on the design.
Smooth vs Responsive
There is always a tradeoff.
More smoothing:
cleaner motion
but:
less immediate reaction
Less smoothing:
more accurate to the beat
but:
potentially jittery
Experiment until the animation feels connected to the audio without becoming visually noisy.
Use ease() Instead of linear()
You can also use ease() to map amplitude values.
This creates a smoother relationship between input and output ranges.
Whether linear() or ease() looks better depends on the effect.
For a direct music visualizer:
linear() may be appropriate.
For polished motion graphics:
ease() may feel softer.
Create a Simple Music Visualizer
Let’s build a basic visualizer.
Create a rectangle.
Duplicate it multiple times.
Arrange the rectangles horizontally.
Use audio amplitude to control their vertical Scale.
At this stage, all bars may react identically.
That’s useful for learning, but we can improve it.
Create Variation Between Bars
If every bar uses exactly the same audio value, the visualizer may look like one repeated pulse.
Add variation using:
- multipliers;
- delayed values;
- different mapping ranges;
- different audio channels.
Now the bars can react differently.
Left and Right Audio Channels
The Audio Amplitude layer may contain:
Left Channel
and:
Right Channel
This allows stereo-based animation.
For example:
Left-side graphics can respond to the left audio channel.
Right-side graphics can respond to the right channel.
This can create a more spatial visualizer.
When to Use Both Channels
Use:
Both Channels
when you want one general amplitude signal representing the soundtrack.
This is usually the simplest option for:
- logo pulses;
- text reaction;
- general Scale animation;
- Glow intensity.
Audio-Reactive Circular Visualizer
Create a circle.
Add repeated bars or shapes around its edge.
Use audio data to control:
- Scale;
- radial movement;
- Glow.
Place:
- a logo;
- album artwork;
- text;
in the center.
This is a popular music-visualizer design.
Audio-Reactive Logo
You don’t need dozens of bars.
A simple logo can react effectively.
Try:
Scale: 100–108%
Glow Intensity: subtle increase
Background brightness: slight increase
Small reactions often look more professional than extreme movement.
Audio-Reactive Text
Text can respond to sound through:
- Scale;
- Tracking;
- Position;
- Rotation;
- Glow;
- blur.
For example, a title could gently expand during louder sections.
Voice-Reactive Animation
Audio reaction isn’t limited to music.
You can use speech.
For example, a podcast graphic could display:
speaker icon
that grows slightly whenever someone speaks.
Or a waveform graphic can become brighter during speech.
Podcast Animation
A simple podcast composition could contain:
Profile image
Speaker name
Audio waveform
Background
Audio amplitude could control:
- waveform Scale;
- ring size;
- Glow;
- subtle profile-image Scale.
This produces continuous movement without manual keyframing.
Audio-Reactive Social Content
For short-form video, audio-reactive graphics can help make static designs more engaging.
Examples:
- animated captions;
- pulsing logos;
- music cards;
- promotional graphics;
- podcast clips.
Keep the reaction subordinate to readability.
Audio-Reactive Backgrounds
Instead of animating foreground elements, use audio to control a background effect.
For example:
- Turbulent Noise Evolution;
- distortion amount;
- Glow;
- blur;
- color intensity.
This can produce subtle environmental response.
Audio-Reactive Fractal Noise
Fractal or Turbulent Noise can become more energetic as audio gets louder.
Use amplitude to control an appropriate effect parameter.
Combined with Glow and color, this can create an energetic abstract background.
Audio-Reactive Particles
Particle systems can also respond to audio.
Depending on the effect or plug-in, amplitude might influence:
- birth rate;
- velocity;
- size;
- spread;
- opacity.
This can create dramatic music-driven visuals.
You don’t necessarily need third-party plug-ins to learn the core audio-reactive workflow.
Audio-Reactive Camera Movement
Audio can control a camera or camera-parent Null.
But be careful.
Strong amplitude-driven Position changes can create unpleasant camera motion.
A better approach may be:
- subtle Scale;
- tiny Position changes;
- small Rotation;
- short reactions to impacts.
Use Audio to Control Wiggle
Remember wiggle()?
Audio can control its amplitude.
Conceptually:
Quiet audio → Wiggle Amount 0
Loud audio → Wiggle Amount 20
Now procedural movement becomes stronger when the soundtrack becomes louder.
This combines two expression techniques.
Audio + Time Expressions
You can also combine audio with continuous animation.
For example:
A ring rotates continuously using:
time
while audio controls:
- Scale;
- Glow;
- distortion.
This produces movement even during quiet sections while still reacting to sound.
Audio + loopOut()
A keyframed animation can loop continuously while audio modifies another property.
For example:
loopOut() → repeating waveform movement
audio amplitude → Glow intensity
Again, expressions can work together rather than replacing one another.
Audio + Expression Controls
You can expose audio sensitivity using a Slider Control.
Create:
Audio Sensitivity
Instead of editing your expression every time, adjust the Slider.
This is excellent for reusable templates because different soundtracks require different sensitivity.
Create an Audio Controller
Create a Null:
AUDIO CONTROLS
Add:
Sensitivity
Minimum Scale
Maximum Scale
Smoothing
You can then reference these controls in your audio-reactive expressions.
Now the system is easier to adjust.
Add an Enable Audio Checkbox
Add:
Enable Audio Reaction
as a Checkbox Control.
When checked:
audio affects the animation.
When unchecked:
the property returns to its normal behavior.
This makes the rig much easier to reuse.
Build a Reusable Audio Rig
A well-organized audio-reactive project might contain:
Audio Amplitude
generated by After Effects.
AUDIO CONTROLS
containing user-facing settings.
Artwork Layers
containing the visible design.
Expressions connect everything together.
This separates:
audio data
from:
controls
from:
visuals.
Use a Master Intensity Slider
One particularly useful control is:
Master Audio Reaction
Suppose several properties react to sound.
Rather than adjusting all of them separately, multiply their reaction by one master amount.
Now:
0%
disables the reaction.
50%
creates subtle movement.
100%
uses full intensity.
This makes creative tuning much faster.
Separate Base Values from Audio Values
A strong expression workflow keeps the design’s normal value separate from its reaction.
Conceptually:
Final Value = Base Value + Audio Influence
For example:
Scale = 100% + Audio Pulse
This is easier to reason about than letting audio determine the entire property.
Avoid Zeroing Out Properties
If your audio drops to zero and your Scale also becomes zero, the layer disappears.
That may not be what you want.
Use a sensible base value.
For example:
Base Scale = 100
and add:
0–20
from the audio.
Audio-Reactive Color
Audio can also influence colors.
You might interpolate between:
dark color
and:
bright color
based on amplitude.
This is more advanced but can create powerful music-driven visuals.
Audio-Reactive Background Brightness
A simpler approach is to map audio to:
- Exposure;
- Glow;
- brightness-related effects.
Loud sections become visually brighter.
Quiet sections become calmer.
This reinforces musical dynamics.
Create Beat-Like Pulses
Raw amplitude isn’t the same thing as beat detection.
This is important.
Convert Audio to Keyframes measures amplitude.
It does not automatically understand:
- kick drum;
- snare;
- tempo;
- musical structure.
A loud vocal may create a larger value than a drum hit.
Audio Amplitude vs Beat Detection
Amplitude asks:
How loud is the audio right now?
Beat detection asks:
Did a musical beat occur?
These are different problems.
For many simple visualizers, amplitude is enough.
For precise beat-driven animation, additional processing or specialized tools may be useful.
Isolate Frequencies Before Conversion
A useful advanced technique is to prepare or filter the audio so specific frequency ranges become more prominent before generating animation data.
For example:
- low frequencies for bass;
- higher frequencies for percussion.
This can create more targeted visual responses.
The workflow becomes more technical, but the principle remains the same.
Bass-Reactive Animation
For a bass-focused reaction, you want the generated data to emphasize low-frequency energy.
Then use that data to drive:
- Scale;
- impact;
- Glow;
- camera pulse.
This can create a much more musical result than reacting to overall loudness.
High-Frequency Reaction
High-frequency information can drive:
- small particles;
- sparkles;
- thin lines;
- rapid details.
Using different frequency characteristics for different visual elements creates richer animation.
Build Visual Hierarchy from Sound
Think about assigning audio characteristics to design elements.
For example:
Bass → large circle
Midrange → secondary ring
High frequencies → small particles
This creates visual hierarchy that reflects the soundtrack.
Common Mistake: Mapping Raw Audio Directly to Scale
The values may be too small or inappropriate.
Use linear() or ease() to map the range.
Common Mistake: Excessive Scale
A logo jumping from:
100%
to:
300%
on every loud sound usually looks uncontrolled.
Start subtle.
Common Mistake: No Smoothing
Raw amplitude can create jitter.
Use smoothing where appropriate.
Common Mistake: Too Much Smoothing
If you smooth too heavily, the animation may no longer feel synchronized.
Balance smoothness with responsiveness.
Common Mistake: Everything Reacts
Choose a few important properties.
Don’t make every layer shake, glow, rotate, and scale simultaneously.
Common Mistake: Ignoring Quiet Sections
Think about what your composition should look like when the audio is quiet.
The design should still work.
Common Mistake: Using the Wrong Input Range
Inspect the actual amplitude values.
Don’t assume every track ranges from 0 to 100.
Common Mistake: Forgetting the Base Value
Keep a stable baseline and add audio influence.
Common Mistake: Confusing Amplitude with Beats
Audio amplitude represents loudness, not musical intelligence.
Common Mistake: No Master Controls
Reusable audio rigs benefit enormously from sensitivity and intensity controls.
Five Audio-Reactive Exercises
Exercise 1 — Pulsing Circle
Convert audio to keyframes.
Use Both Channels to control Scale.
Exercise 2 — Reactive Glow
Connect amplitude to Glow Intensity.
Exercise 3 — Smooth the Reaction
Compare raw amplitude with smoothed values.
Exercise 4 — Master Sensitivity
Create a Slider that adjusts reaction strength.
Exercise 5 — Combine Effects
Use one audio signal to control subtle Scale and Glow simultaneously.
These exercises cover the essential workflow.
Practical Project: Audio-Reactive Logo
Create:
Logo Layer
Background
Audio Amplitude
AUDIO CONTROLS
Use audio to drive:
Logo Scale: subtle
Glow: moderate
Background brightness: very subtle
Add a continuous slow Rotation to a decorative ring using a time expression.
The result feels alive even when the audio is quiet.
Practical Project: Podcast Visualizer
Create:
Speaker portrait
Circular ring
Waveform
Name
Episode title
Use audio to control:
- ring Scale;
- waveform height;
- subtle Glow.
Keep text stable.
This creates professional motion without compromising readability.
Practical Project: Music Visualizer
Build:
- central artwork;
- radial bars;
- background particles;
- Glow.
Use audio data to control the bars.
Use time expressions for continuous rotation.
Use audio amplitude for Glow.
Use Expression Controls for sensitivity.
Now several expression concepts work together.
Audio-Reactive Animation Checklist
Before rendering, ask:
Does the animation visibly respond to the audio?
Is the reaction too strong?
Is it too weak?
Does it need smoothing?
Are quiet sections visually stable?
Are loud sections readable?
Is the audio input range correct?
Does the animation support the soundtrack?
If yes, your system is probably well balanced.
Frequently Asked Questions
How do I make animation react to music in After Effects?
Use Convert Audio to Keyframes to generate amplitude data, then connect that data to animation properties using expressions.
Where is Convert Audio to Keyframes?
Select the audio layer and choose:
Animation → Keyframe Assistant → Convert Audio to Keyframes.
What is the Audio Amplitude layer?
It’s the Null Object After Effects creates to store the generated audio amplitude keyframes.
What does Both Channels mean?
It provides a combined amplitude value from the audio channels and is often the easiest value for general audio-reactive animation.
Can audio control Scale?
Yes.
Can audio control Rotation?
Yes.
Can audio control Glow?
Yes.
Can audio control Position?
Yes.
Can audio control Opacity?
Yes.
Why is my audio animation too weak?
Your mapping range may not match the actual audio amplitude values.
Why is my animation jittery?
Audio amplitude can change rapidly. Smoothing may help.
Can I make a music visualizer without plug-ins?
Yes. After Effects includes native tools for converting audio amplitude to keyframes and using that data in expressions.
Does Convert Audio to Keyframes detect beats?
It primarily converts amplitude or loudness information. That’s not the same as dedicated musical beat detection.
Can I control audio sensitivity?
Yes. Mapping ranges and Expression Controls can make the reaction stronger or weaker.
Can I use one audio track to control several layers?
Yes.
Can I combine audio expressions with wiggle()?
Yes. Audio can even control Wiggle amplitude.
Practice Audio-Reactive Animation in After Effects
Start simple.
Import a song.
Convert the audio to keyframes.
Create one circle.
Make its Scale respond to:
Both Channels.
Then add a mapping function.
Adjust the minimum and maximum values.
Add smoothing.
Once the pulse feels good, connect the same audio to Glow.
This simple exercise teaches nearly the entire foundation of audio-reactive animation.
From there, you can build:
- visualizers;
- logo animations;
- podcast graphics;
- social-media templates;
- music videos.
If you’d like to experiment with these techniques yourself, you can explore Adobe’s current After Effects options here:
Get Adobe After Effects and start creating audio-reactive animation
What Should You Learn Next?
Audio-reactive animation shows how external data can control visual properties.
The next step is learning another highly practical automation technique:
automatically resizing shapes around text.
This is extremely useful for:
- lower thirds;
- captions;
- name tags;
- buttons;
- labels;
- Motion Graphics Templates.
The next article will therefore be:
How to Create Auto-Resizing Text Boxes in Adobe After Effects with Expressions.
We’ll use sourceRectAtTime() to read text dimensions and automatically resize and position Shape Layers around changing text.
Final Thoughts
Audio-reactive animation is a perfect demonstration of why expressions are so useful in After Effects.
You begin with sound.
After Effects converts that sound into numerical data.
Expressions translate those numbers into visual properties.
Suddenly:
music controls Scale.
speech controls a waveform.
a drum hit controls Glow.
audio amplitude controls motion.
And because the relationships are procedural, you don’t need to manually keyframe every beat.
Remember the workflow:
Import audio.
Convert Audio to Keyframes.
Inspect Audio Amplitude.
Reference Both Channels.
Map the values.
Adjust sensitivity.
Smooth when necessary.
Keep the reaction controlled.
Start with one circle and one Scale expression.
Once that works, add Glow.
Then try Position.
Then build a visualizer.
The important skill isn’t creating the most complicated music visualization possible.
It’s understanding how data can drive animation.
Once you understand that principle, many more After Effects automation techniques become possible.
Explore Adobe After Effects and start turning sound into motion






