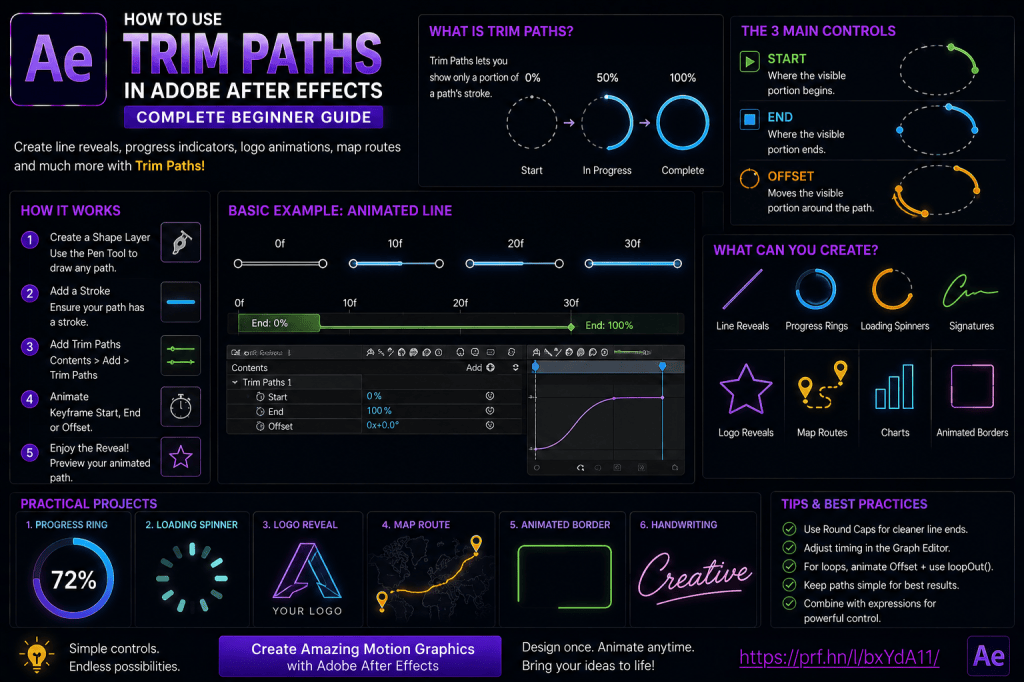
Trim Paths is one of the most useful animation tools inside Adobe After Effects Shape Layers.
It allows you to animate a path as though it is being drawn onto the screen.
A simple line can draw itself from one end to another.
A circle can become an animated progress indicator.
A route can travel across a map.
A logo outline can reveal itself.
A loading spinner can rotate continuously.
And because Trim Paths works directly with vector Shape Layers, you can create many of these animations without manually masking or revealing every element.
In this guide, you’ll learn how Trim Paths works in Adobe After Effects, what Start, End, and Offset actually do, how to animate lines and circles, how to work with multiple paths, and how to use Trim Paths for practical motion-graphics projects.
Affiliate disclosure: This article contains affiliate links. If you purchase Adobe After Effects through one of these links, we may earn a commission at no additional cost to you.
What Is Trim Paths in After Effects?
Trim Paths is a Shape Layer operator that controls how much of a vector path’s stroke is visible.
Imagine drawing a line from left to right.
Normally, the entire line appears immediately.
With Trim Paths, you can begin with:
0% visible
and animate it to:
100% visible.
The result looks as though the line is being drawn across the screen.
This simple concept can produce a huge range of animations.
What Can You Create with Trim Paths?
Common uses include:
- animated lines;
- circles;
- progress rings;
- loading indicators;
- handwriting effects;
- logo reveals;
- route animations;
- maps;
- charts;
- infographic graphics;
- animated borders;
- UI graphics;
- icons;
- technical diagrams.
Once you understand the three primary Trim Paths controls, the technique becomes surprisingly flexible.
The Three Main Trim Paths Controls
Trim Paths gives you three important parameters:
Start
End
Offset
Understanding these is the key to using the effect effectively.
What Does End Do?
End controls where the visible portion of the path finishes.
At:
End = 0%
none of the path may be visible.
At:
End = 50%
roughly half the path is visible.
At:
End = 100%
the full path is visible.
Animating End from:
0 → 100
is the most common Trim Paths animation.
What Does Start Do?
Start controls where the visible portion begins.
If:
Start = 0
and:
End = 100
the entire path is visible.
If:
Start = 50
and:
End = 100
only the latter portion of the path is visible.
Animating Start can make a line disappear from behind.
What Does Offset Do?
Offset moves the visible section around the path.
This is especially useful for closed paths such as:
- circles;
- rectangles;
- loops.
Offset can create:
- rotating loading indicators;
- moving line segments;
- animated borders.
The Basic Trim Paths Formula
Think of it like this:
Start = beginning of visible segment
End = end of visible segment
Offset = moves that segment along the path
Once you understand that relationship, most Trim Paths animations become much easier.
Step 1: Create a Composition
Create a new composition.
For example:
1920 × 1080
Choose your preferred frame rate and duration.
Step 2: Create a Shape Layer
Select the Pen Tool.
Make sure no other layer is selected.
Draw a simple line.
After Effects creates a Shape Layer.
Step 3: Add a Stroke
Inside the Shape Layer, make sure the path has a Stroke.
Increase the Stroke Width so the animation is easy to see.
For example:
10 px
Remove the Fill if you’re working with an open line.
Step 4: Add Trim Paths
Expand the Shape Layer.
Next to:
Contents
choose:
Add → Trim Paths
You’ll now see:
Trim Paths 1
Expand it.
You should find:
Start
End
Offset
If you want to practice Trim Paths and other Shape Layer techniques yourself, you can explore Adobe’s current After Effects options here:
Explore Adobe After Effects and current plans
Step 5: Animate End
Set:
End = 0%
Create a keyframe.
Move forward approximately one second.
Set:
End = 100%.
Preview the composition.
The line draws itself across the screen.
That’s your first Trim Paths animation.
Why This Works
The underlying path isn’t actually changing.
Trim Paths controls which portion of its Stroke is visible.
At the beginning:
nothing is visible.
As End increases:
more of the Stroke appears.
At 100%:
the entire Stroke is displayed.
Add Easy Ease
Select both End keyframes.
Press:
F9
to apply Easy Ease.
Now the drawing begins and ends more smoothly.
Use the Graph Editor
For better control, open the Graph Editor.
You can make the line:
- accelerate quickly;
- slow near the end;
- move almost linearly;
- ease dramatically.
The path geometry stays the same.
Only the reveal timing changes.
Create a Line That Draws at Constant Speed
For route animations or technical diagrams, you may prefer nearly linear movement.
In those situations, strong easing can make the drawing speed feel inconsistent.
Use linear interpolation when a constant drawing rate communicates the motion more clearly.
Rounded Line Ends
Open:
Stroke
and change the line-cap setting to:
Round Cap
This gives the animated line a softer endpoint.
It’s particularly useful for:
- routes;
- UI graphics;
- infographic lines;
- loading indicators.
Project 1: Animated Line
The simplest project is:
one path
one Stroke
one Trim Paths
Animate:
End 0 → 100
This basic technique is the foundation for most of the projects in this guide.
Project 2: Draw a Circle
Create an Ellipse Shape Layer.
Remove Fill.
Add a Stroke.
Then add:
Trim Paths.
Set:
End = 0
and animate it to:
100.
The circle draws around itself.
Change Where the Circle Starts
You may notice the circle starts drawing from a location you don’t want.
A common choice is:
12 o’clock
for progress indicators.
You can adjust:
- Shape Layer Rotation;
- Ellipse group Rotation;
- Trim Paths Offset;
depending on how you want to structure the animation.
Create a Progress Ring
A circle with Trim Paths can represent a percentage.
For example:
End = 75%
creates a ring that is approximately three-quarters complete.
Add:
75%
in the center.
You now have a progress indicator.
Make the Progress Ring Data-Driven
Add:
Slider Control
Rename it:
Progress
Connect:
Trim Paths → End
to the Slider.
Connect the center Text Layer to the same value.
Now:
Progress = 75
produces:
75% ring
and:
75% text.
One value controls both.
Animate the Progress
Animate:
Progress 0 → 75.
The number counts upward while the ring fills.
This is the same technique we used in our animated-infographics tutorial.
Project 3: Loading Spinner
Trim Paths can also create an endlessly rotating loading indicator.
Create a circle with a Stroke.
Add Trim Paths.
Set Start and End so only a small section of the circle is visible.
For example:
Start = 0
End = 20
Now use:
Offset
to move the segment around the circle.
Animate Offset
Create an Offset keyframe.
Move forward one second.
Increase Offset by one complete rotation.
Set the animation to repeat.
The short arc travels continuously around the circle.
Use loopOut()
Instead of manually duplicating keyframes, you can apply:
loopOut()
to the Offset animation.
Now the loading indicator repeats automatically.
Why Trim Paths Is Ideal for Loaders
The geometry remains clean.
You don’t need to rotate multiple separate objects.
A single Shape Layer can create:
- spinner;
- ring;
- rotating arc.
Create Multiple Loading Segments
Duplicate the circle group.
Change:
- Stroke Width;
- Trim amount;
- Offset;
- timing.
You can create layered loading animations.
Project 4: Animated Rectangle Border
Create a Rectangle Shape Layer.
Remove Fill.
Add Stroke.
Add Trim Paths.
Animate:
End 0 → 100.
The border draws around the rectangle.
Use It for Title Cards
Place text inside the rectangle.
Animate:
- Border begins drawing.
- Text fades in.
- Border completes.
This creates a clean title reveal.
Rounded Rectangle Border
Increase the rectangle’s Roundness.
Trim Paths continues to work around the rounded shape.
This is useful for:
- UI panels;
- callouts;
- lower thirds;
- buttons.
Project 5: Animated Underline
Create a simple line beneath a title.
Add Trim Paths.
Animate:
End 0 → 100.
This creates a clean animated underline.
It’s a simple technique, but extremely useful for:
- headings;
- lower thirds;
- presentations;
- educational videos.
Add Overshoot Carefully
Unlike data charts, decorative underline animations can use a little more personality.
You might:
- draw slightly past the text;
- settle into position;
- combine the line reveal with text animation.
Project 6: Handwriting-Style Animation
Trim Paths can simulate handwriting when the text or artwork is represented by stroked paths.
The basic principle is:
path follows the shape of the handwriting
and:
Trim Paths reveals the Stroke.
Important Limitation
Regular filled text isn’t automatically a single handwriting stroke.
For convincing handwriting animation, you need paths that follow the intended pen movement.
This may require:
- manually drawing paths;
- preparing vector artwork;
- converting appropriate artwork into shapes.
Create a Signature Reveal
A signature is a good example.
Draw a path along the signature.
Add a Stroke.
Use Trim Paths to reveal it.
Animate End from:
0 → 100.
The signature appears to be written onto the screen.
Add a Moving Pen
You can even attach a pen graphic to the moving endpoint.
This requires positioning the pen along the animated path.
It’s more advanced, but creates a convincing writing effect.
Project 7: Logo Outline Reveal
Trim Paths works well for logos built from stroked vector paths.
Import or create the vector artwork.
Convert it to Shape Layers when appropriate.
Add Trim Paths.
Animate the outlines.
Illustrator Artwork
If your logo originates in Adobe Illustrator, you can import it into After Effects and, where appropriate, convert vector layers to Shape Layers.
Then you can work with:
- paths;
- strokes;
- fills;
- Trim Paths.
Logo Reveal Strategy
A common sequence is:
Outline draws
↓
Fill appears
↓
Logo settles
For example:
0–1 second:
Stroke draws.
1–1.3 seconds:
Fill fades in.
1.3–1.6 seconds:
Small Scale or Glow animation.
Don’t Overcomplicate Logo Animation
The logo should remain recognizable.
Trim Paths can create elegant reveals without needing:
- dozens of effects;
- excessive distortion;
- constant movement.
Project 8: Route Animation on a Map
This is one of the most useful Trim Paths applications.
Imagine a map showing travel from:
Amsterdam
to:
Paris
to:
Barcelona.
Draw a path along the route.
Add a Stroke.
Add Trim Paths.
Animate:
End 0 → 100.
The route draws across the map.
Add Location Markers
Place markers at:
- starting point;
- destination;
- intermediate locations.
Reveal each marker when the route reaches it.
Add a Vehicle Icon
You can animate:
- airplane;
- car;
- train;
- ship;
along the route.
The icon should follow the leading edge of the Trim Paths animation.
This creates a professional travel-map effect.
Animate an Icon Along a Path
One approach is to use the same underlying path for:
- route Stroke;
- object motion.
Then synchronize the Trim Paths reveal with the object’s Position animation.
Orient Along Path
If you’re moving a vehicle or arrow along a curved route, use:
Layer → Transform → Auto-Orient
and choose the appropriate path-orientation option.
This allows the icon to rotate as the path changes direction.
Project 9: Infographic Connector Lines
Suppose you have:
Central Topic
connected to:
Feature A
Feature B
Feature C
Use Shape Layer lines between them.
Animate the connectors with Trim Paths.
Recommended Timing
Reveal:
Central topic.
Then:
Line A → Feature A.
Line B → Feature B.
Line C → Feature C.
This creates a clear visual explanation.
Project 10: Flowchart Animation
Trim Paths is excellent for:
- process diagrams;
- architecture diagrams;
- workflow animations;
- organizational charts.
Instead of showing the entire diagram immediately, reveal the connections sequentially.
This guides viewers through the process.
Example Workflow
Imagine:
Input
↓
Processing
↓
Analysis
↓
Output
Draw connectors between the boxes.
Animate each connector as the explanation progresses.
Project 11: Animated Checkmark
Create a checkmark using a Shape Layer path.
Add Stroke.
Add Trim Paths.
Animate:
End 0 → 100.
Now the checkmark draws itself.
Combine it with:
- Scale;
- Opacity;
- subtle bounce.
This works well for:
- confirmations;
- completed tasks;
- success screens.
Project 12: Animated X Mark
Use two diagonal paths.
Add Trim Paths.
Animate the first line.
Then the second.
This creates a clean error or rejection icon.
Project 13: Animated Arrow
Create:
- main line;
- arrowhead.
Use Trim Paths on the line.
Reveal the arrowhead as the line reaches the end.
This is useful for:
- tutorials;
- diagrams;
- explainer videos.
Project 14: Animated Chart Line
Create a path representing data over time.
Add Stroke.
Add Trim Paths.
Animate:
End 0 → 100.
The chart draws itself from left to right.
Add Data Points
Place small circles at key positions.
Scale them:
0 → 100%
as the line reaches each point.
Add Numbers
Reveal corresponding values near each data point.
This turns a basic line into a complete animated chart.
Project 15: Circular HUD Animation
Create several circles.
Use different:
- Stroke Widths;
- Start values;
- End values;
- Offset values.
Animate their Offset properties at different speeds.
This creates futuristic HUD-style graphics.
Add Expressions
Use expressions such as:
time
to rotate or change Offset continuously.
Now the interface can animate without many keyframes.
Trim Paths + time
Instead of keyframing Offset, you can drive it continuously.
Conceptually:
time * speed
This creates endless movement.
Add a Speed Slider
Create:
Rotation Speed
Slider Control.
Use it to influence the Offset expression.
Now the animation speed can be changed without editing the expression.
Trim Paths + loopOut()
For a precisely timed repeating animation:
- Keyframe Start, End, or Offset.
- Apply
loopOut().
This works well for:
- loaders;
- repeated line sweeps;
- cycling interface elements.
Trim Paths + Wiggle
You can combine Trim Paths with other expressions, although this is usually more appropriate for stylized designs.
For example:
A drawn line could also have:
- animated Stroke Width;
- slight Position wiggle;
- changing color.
Trim Paths + Gradient Stroke
Depending on your Shape Layer design, a Gradient Stroke can make the moving line more visually interesting.
This works well for:
- technology graphics;
- routes;
- neon effects;
- interface animation.
Create a Neon Line
Start with:
Shape Layer Stroke
Add:
Glow
Animate using Trim Paths.
The glowing line draws itself across the frame.
This is a common technology-style effect.
Multiple Shapes in One Layer
Shape Layers can contain multiple groups.
For example:
Circle 1
Circle 2
Circle 3
Each group can have its own Trim Paths operator.
This gives you independent control.
One Trim Paths for Multiple Shapes
You can also structure the layer so one Trim Paths operator affects multiple shapes.
The behavior depends on:
- group hierarchy;
- operator placement.
Understanding the Contents hierarchy is therefore important.
Trim Paths Hierarchy
Shape Layer operators affect shapes according to where they’re placed in the hierarchy.
If Trim Paths is inside one group:
it generally affects that group.
If it is placed higher:
it may affect multiple shapes.
This is one of the most important Shape Layer concepts to learn.
Trim Multiple Shapes Option
Trim Paths may provide options controlling how multiple paths are processed.
The two conceptual approaches are:
Simultaneously
and:
Individually.
Trim Simultaneously
Multiple paths behave more like parts of one combined system.
The visible percentage is distributed across the overall set.
Trim Individually
Each path receives the Trim amount individually.
This can produce very different animation.
Experiment with both when working with:
- letters;
- icons;
- repeated lines;
- multiple circles.
Path Direction
Sometimes a path draws in the opposite direction from what you want.
You may expect:
left → right
but get:
right → left.
Fixing Direction
Depending on the shape, you can:
- reverse the path direction;
- adjust Start and End;
- rotate the Shape;
- use Offset.
Choose the method that keeps your rig easiest to understand.
Open vs Closed Paths
Trim Paths works with both.
Open Path
Example:
Line.
Route.
Signature.
Closed Path
Example:
Circle.
Rectangle.
Closed paths are particularly useful with Offset because the visible segment can travel continuously around the loop.
Animate Start and End Together
This creates a moving segment.
For example:
Start:
0 → 80
End:
20 → 100
The visible section appears to travel along the path.
Create a Traveling Line Segment
At the beginning:
Start = 0
End = 20
Later:
Start = 80
End = 100
The 20%-length segment moves across the path.
This can create:
- energy pulses;
- scanner lines;
- network animations.
Loop the Segment
Apply repeating keyframes or expressions.
Now the segment travels continuously.
Create a Comet Effect
Add:
- Glow;
- tapered Stroke;
- bright endpoint.
Animate the Trim Paths segment along a curve.
This can resemble:
- comet;
- energy beam;
- light trail.
Animate Stroke Width
Trim Paths controls path visibility.
You can simultaneously animate Stroke Width.
For example:
0 px → 12 px
as the line begins drawing.
This can create a softer reveal.
Animate Stroke Color
You can also animate color while the path is being drawn.
For example:
Purple → Blue.
Use this sparingly when clarity is important.
Add Glow
A Trim Paths reveal combined with Glow is particularly effective for:
- neon logos;
- technology graphics;
- energy lines;
- futuristic interfaces.
Add Motion Blur?
Trim Paths itself changes Stroke visibility rather than physically moving an entire layer.
Motion Blur may therefore behave differently from Transform movement.
For fast moving endpoints, other visual techniques such as Glow or trailing segments may communicate motion better.
Trim Paths and Masks Are Different
This is important.
Trim Paths works with:
Shape Layer paths.
It does not simply animate any arbitrary mask in the same way.
If your artwork is built with masks, you may need a different technique or convert/recreate it as Shape Layer paths.
Trim Paths vs Stroke Effect
After Effects also has other ways to reveal lines and paths.
Trim Paths is especially convenient when your artwork already exists as Shape Layers.
Trim Paths vs Masks
Use Trim Paths when:
- working with vector Shape Layers;
- animating line strokes;
- creating procedural path reveals.
Use masks when:
- revealing raster imagery;
- controlling visibility regions;
- compositing footage.
Trim Paths vs Write-On Effects
For handwriting, specialized Stroke or write-on techniques may sometimes offer additional control.
Trim Paths is ideal when the handwriting is already represented as suitable vector paths.
Keep Your Paths Simple
Extremely complicated paths can be harder to animate and manage.
Use the simplest path that produces the desired visual result.
Simplify Imported Artwork
Illustrator files may contain:
- many groups;
- compound paths;
- unnecessary points.
After converting artwork to Shape Layers, inspect the hierarchy.
Simplifying the artwork can make Trim Paths much easier to control.
Rename Shape Groups
Instead of:
Group 1
Group 2
Group 3
use:
Outer Circle
Inner Circle
Arrow
Route
This becomes essential in complicated animations.
Use Different Trim Paths Operators
If several parts need different timing, give them separate Trim Paths operators.
For example:
Logo Outer Ring
draws first.
Logo Letter
draws second.
Underline
draws last.
Sequence with Layer Timing
You can also place separate Shape Layers at different Timeline positions.
This can sometimes be simpler than building elaborate expressions.
Trim Paths and Expressions
Expressions become useful when you want:
- continuous motion;
- master controls;
- synchronization;
- reusable templates.
Master Progress Slider
Create:
Progress
Slider.
Connect multiple Trim Paths End values to it.
Now one control can draw an entire illustration.
Add Delays
You can offset different path reactions.
For example:
Path 1:
Progress 0–50.
Path 2:
Progress 25–75.
Path 3:
Progress 50–100.
This creates a sequential reveal from one master control.
Use linear() to Map Progress
Suppose:
Master Progress = 0–100.
Path A should animate between:
0–40.
Path B:
30–70.
Path C:
60–100.
linear() can map each range.
This creates sophisticated multi-stage illustrations controlled by one Slider.
Why Master Progress Is Useful
Instead of editing dozens of keyframes, you animate:
one Slider.
The entire graphic follows.
This is particularly useful for:
- diagrams;
- icons;
- complex logos;
- infographic sequences.
Create a Network Animation
Draw several connected lines.
Use a Master Progress Slider to reveal them in sequence.
Add nodes where the lines meet.
Scale each node in when the path reaches it.
This creates a modern network visualization.
Create a Circuit Animation
Use right-angle paths resembling circuit-board traces.
Animate them using Trim Paths.
Add glowing nodes.
This works well for:
- AI;
- technology;
- cloud computing;
- cybersecurity graphics.
Create a Map Route Animation
Draw the route.
Add Trim Paths.
Animate End.
Place an icon at the leading edge.
Add destination markers.
Use a dashed Stroke if appropriate.
This creates a complete travel-route graphic.
Dashed Lines
Shape Layer Strokes can include dashes.
Combine:
Dashed Stroke
with:
Trim Paths
for:
- maps;
- technical diagrams;
- motion paths.
Animate the Dashes
You can also animate the Stroke’s dash Offset.
This creates moving dashed lines.
Combined with Trim Paths, this can produce sophisticated route effects.
Create an Animated Border Around Text
Build a rectangle around a title.
Use Trim Paths to draw the border.
Then reveal the text.
This is an easy way to create polished title cards.
Responsive Border
Combine Trim Paths with:
sourceRectAtTime()
from our responsive-text tutorial.
Now the rectangle can automatically resize around the title.
Trim Paths then animates that dynamically sized border.
Combine Previous Techniques
This is where your After Effects skills start connecting.
You can combine:
sourceRectAtTime()
for responsive sizing.
Trim Paths
for border reveal.
Expression Controls
for padding.
loopOut()
for repeated decorative animation.
time
for continuous Offset.
The techniques are far more powerful together than in isolation.
Create a Responsive Callout
Build:
Label
Responsive Box
Connector Line
Target Point
Use Trim Paths on the connector.
Now the callout line can draw toward the target before the label appears.
Create a Tutorial Pointer
Draw a line from a label toward a feature in your footage.
Animate it with Trim Paths.
Add an arrowhead.
Reveal the explanatory text afterward.
This works particularly well for software tutorials.
Common Mistake: No Stroke
Trim Paths is commonly used to reveal a Stroke.
If you draw a Shape but only have Fill, you may not see the expected line-drawing result.
Common Mistake: Wrong Shape Hierarchy
If Trim Paths doesn’t affect the intended Shape, inspect where it sits inside:
Contents.
Common Mistake: Path Draws Backwards
Reverse the path or adjust the animation setup.
Common Mistake: Too Much Easing
For technical diagrams and routes, heavy easing can make the line feel inconsistent.
Use motion appropriate to the meaning.
Common Mistake: Animating Data Beyond Its Value
For progress rings and charts, avoid overshooting real values.
A ring representing:
75%
shouldn’t temporarily show:
90%.
Common Mistake: Too Many Keyframes
For repeating motion, use:
- loopOut();
- time expressions;
- master controls;
when appropriate.
Common Mistake: Complicated Imported Vectors
Simplify the Shape Layer hierarchy before building the animation.
Common Mistake: No Rounded Caps
For many line animations, Round Caps make the moving endpoint look cleaner.
Common Mistake: Drawing Too Fast
If a complex route draws in a fraction of a second, viewers may not understand it.
Give the path enough time to communicate its direction.
Common Mistake: Drawing Too Slowly
A simple underline doesn’t need five seconds.
Match duration to path complexity.
Trim Paths Quick Reference
End
Controls how far the visible path extends.
Typical reveal:
0 → 100
Start
Controls where the visible path begins.
Useful for removing the path behind the moving endpoint.
Offset
Moves the visible section around the path.
Useful for:
- circles;
- loaders;
- moving segments.
Five Trim Paths Exercises
Exercise 1 — Straight Line
Draw a line.
Animate End:
0 → 100.
Exercise 2 — Circle
Create an outlined circle.
Animate it drawing around the frame.
Exercise 3 — Loader
Show a short circular segment and animate Offset.
Exercise 4 — Map Route
Draw a curved route and reveal it.
Exercise 5 — Animated Border
Create a rectangle around text and draw the border.
These exercises cover the essential Trim Paths workflow.
Practical Project: Animated Technology Diagram
Create three boxes:
User
AI Platform
Database
Draw connecting lines.
Animate:
User → AI Platform.
Then:
AI Platform → Database.
Add small glowing nodes.
Reveal labels as each connection completes.
Trim Paths naturally guides the viewer through the architecture.
Practical Project: Travel Route
Import a map.
Draw:
Amsterdam → Paris → Madrid.
Add:
- route Stroke;
- Trim Paths;
- destination markers;
- moving airplane icon.
Animate the journey in stages.
Practical Project: Circular Loading Animation
Create three concentric circles.
Each uses:
- different Stroke Width;
- different visible segment length;
- different Offset speed.
Loop everything.
This creates a polished loading animation using only Shape Layers.
Practical Project: Logo Reveal
Convert suitable vector logo artwork into Shape Layers.
Animate its outlines.
Reveal Fill afterward.
Add a subtle finishing motion.
Keep the sequence short and focused.
Frequently Asked Questions
What is Trim Paths in After Effects?
Trim Paths is a Shape Layer operator that controls which portion of vector paths is visible.
Where is Trim Paths?
Select a Shape Layer and use:
Contents → Add → Trim Paths.
What does End do?
End controls how far along the path the visible Stroke extends.
What does Start do?
Start controls where the visible portion of the path begins.
What does Offset do?
Offset moves the trimmed section along the path.
Can Trim Paths animate a circle?
Yes.
Can I create loading animations?
Yes. Trim Paths and Offset are excellent for circular loading indicators.
Can I animate a map route?
Yes.
Can Trim Paths create handwriting?
Yes, when the handwriting is represented by suitable stroked vector paths.
Can Trim Paths animate a logo?
Yes, particularly logos built from stroked vector paths.
Can Trim Paths work with Illustrator artwork?
Suitable Illustrator vector artwork can be imported and converted or prepared for Shape Layer workflows.
Can I loop Trim Paths?
Yes. You can use keyframes with loopOut() or expressions for continuous motion.
Can one Slider control multiple Trim Paths?
Yes. A Master Progress Slider can control several path animations.
Can I create a progress ring?
Yes. Connect Trim Paths End to a 0–100 Slider.
Do I need a plug-in?
No. Trim Paths is built into After Effects Shape Layers.
Practice Trim Paths in After Effects
Start with a straight line.
Don’t begin with a complicated logo.
Draw:
one path.
Add:
one Stroke.
Add:
one Trim Paths.
Animate:
End 0 → 100.
Then create a circle.
Experiment with:
Start
End
Offset.
Once you understand those three controls, build:
- loading spinner;
- progress ring;
- route animation;
- animated border.
Within a few small projects, Trim Paths becomes much easier to understand.
If you’d like to practice Trim Paths and other Shape Layer animation techniques yourself, you can explore Adobe’s current After Effects options below:
Get Adobe After Effects and start creating Shape Layer animations
What Should You Learn Next?
Trim Paths gives us a powerful way to animate lines.
The next step is learning how to create another classic motion-graphics technique:
animated handwriting and signature effects.
We’ll combine:
- paths;
- Stroke;
- Trim Paths;
- masks;
- timing;
- optional pen-follow animation.
The next article will therefore be:
How to Create a Handwriting and Signature Animation in Adobe After Effects.
We’ll look at several methods so you can choose the best approach for handwriting, signatures, logos, and drawn illustrations.
Final Thoughts
Trim Paths is one of those After Effects features that seems simple at first but becomes increasingly useful as you learn more motion design.
At its core, it controls three values:
Start
End
Offset.
But those controls can create:
- line reveals;
- loading indicators;
- progress rings;
- animated borders;
- map routes;
- logo outlines;
- handwriting;
- charts;
- diagrams;
- interface graphics.
Start with:
End 0 → 100.
Then experiment with Start.
Then Offset.
After that, combine Trim Paths with:
- expressions;
- Shape Layer controls;
- responsive graphics;
- Glow;
- master Progress Sliders.
The most important lesson is that you don’t need to animate every point of a path manually.
Create the path once.
Then let Trim Paths control how that path appears over time.
That simple workflow is one of the foundations of efficient Shape Layer animation in Adobe After Effects.
Explore Adobe After Effects and start creating animated paths and motion graphics






