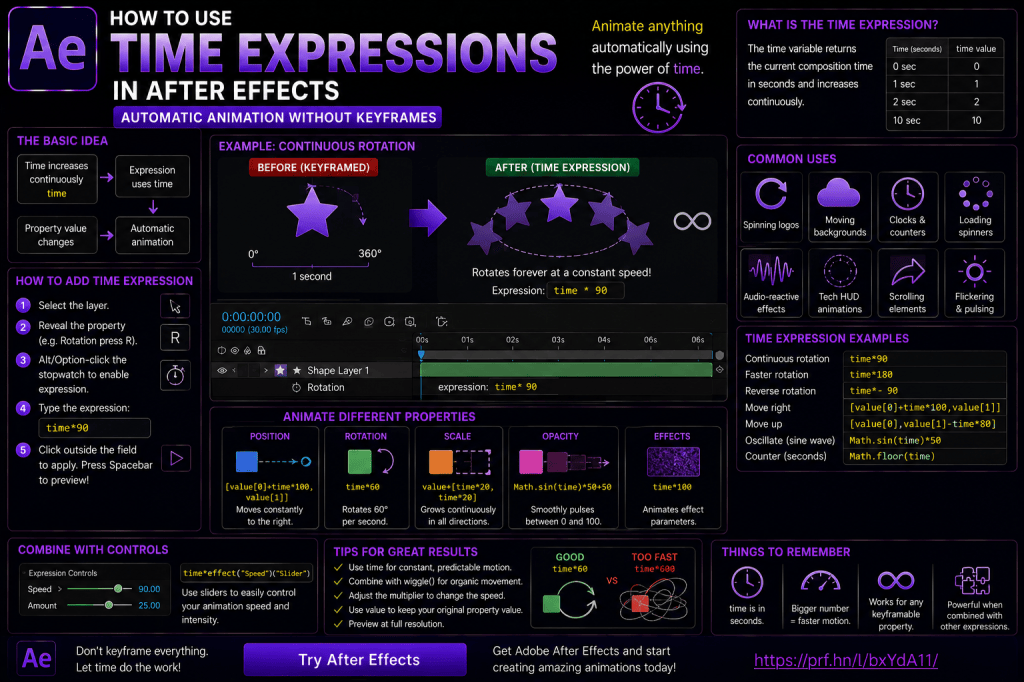
One of the most useful things you can learn in Adobe After Effects is how to create animation that runs automatically.
Normally, animation starts with keyframes.
You create one value at one point in time, move forward in the Timeline, change the value, and After Effects calculates the movement between those keyframes.
But what if you simply want something to:
- rotate continuously;
- move forever;
- increase steadily;
- animate automatically;
- react to composition time;
- keep working when the composition becomes longer?
You don’t necessarily need keyframes.
You can use the After Effects time expression.
A simple expression such as:
time * 90
can make a layer rotate continuously at 90 degrees per second.
No keyframes.
No copying.
No loops.
The animation simply responds to the current composition time.
In this guide, you’ll learn what the time variable means, how to use it for Rotation, Position, Scale, Opacity, effect controls, counters, and continuous motion, and how to combine time-based animation with keyframes and Expression Controls.
Affiliate disclosure: This article contains affiliate links. If you purchase Adobe After Effects through one of these links, we may earn a commission at no additional cost to you.
What Is the time Expression in After Effects?
In After Effects expressions, time represents the current composition time in seconds.
At the beginning of the composition:
time = 0
After one second:
time = 1
After two seconds:
time = 2
After ten seconds:
time = 10
This means you can use time as an automatically increasing number.
For example:
time * 100
produces:
0 seconds → 0
1 second → 100
2 seconds → 200
3 seconds → 300
10 seconds → 1000
If you apply this to Rotation, the layer keeps rotating automatically.
Why Time Expressions Are Useful
Time expressions are particularly good for animation that should continue at a predictable rate.
Examples include:
- rotating wheels;
- spinning logos;
- clocks;
- moving backgrounds;
- scrolling elements;
- animated textures;
- counters;
- mechanical components;
- interface animation.
Instead of defining when the animation starts and ends with keyframes, you define a rule.
After Effects calculates the value continuously.
Keyframes vs Time Expressions
Suppose you want an icon to rotate continuously for 60 seconds.
With keyframes, you could create:
0 seconds → 0°
60 seconds → 5400°
That works.
But if you later change the composition to two minutes, you’ll need to modify the animation.
With:
time * 90
the layer rotates at 90 degrees per second regardless of composition duration.
Extend the composition to:
- 30 seconds;
- 60 seconds;
- five minutes.
The expression continues working.
How to Add a Time Expression
Let’s create a simple example.
Step 1: Create a Composition
Open After Effects and create a new composition.
Step 2: Add a Shape
Create a Shape Layer.
A square, star, or arrow makes the rotation easy to see.
Step 3: Reveal Rotation
Select the layer.
Press:
R
to reveal Rotation.
Step 4: Enable Expressions
On Windows:
Alt-click the Rotation stopwatch.
On macOS:
Option-click the stopwatch.
Step 5: Enter the Expression
Type:
time * 90
Click outside the expression field.
Step 6: Preview
Press Spacebar.
The layer rotates continuously.
You’ve created automatic animation without a single keyframe.
If you’d like to practice time expressions and procedural animation yourself, you can explore Adobe’s current After Effects options here:
Explore Adobe After Effects and current plans
Understanding time * 90
Let’s break the expression down.
time
is the current composition time.
*
means multiply.
90
is the amount added per second.
Therefore:
time * 90
means:
current time × 90
At one second:
1 × 90 = 90°
At two seconds:
2 × 90 = 180°
At four seconds:
4 × 90 = 360°
The result is constant rotation.
Change the Animation Speed
The number after time determines the speed.
For example:
time * 20
creates slow movement.
time * 90
is faster.
time * 360
creates one full 360-degree rotation every second when applied directly to Rotation.
You can change the animation speed simply by changing one number.
Rotate in the Opposite Direction
Use a negative value:
time * -90
Now the layer rotates in the opposite direction.
This is useful when creating mechanical systems where different elements should rotate in opposite directions.
Example: Rotating Logo
Import a logo.
Apply:
time * 30
to Rotation.
The logo rotates slowly.
For many branding applications, you may want a decorative element to rotate rather than the entire logo itself.
Subtle movement is often more effective than aggressive spinning.
Example: Loading Spinner
Create a circular loading icon.
Apply:
time * 180
to Rotation.
The spinner rotates continuously.
No keyframes or loopOut() expression are required.
This raises an important question.
Time vs loopOut()
Both can create continuous rotation.
So which should you use?
Use time
when the animation can be defined by a constant mathematical rate.
For example:
Rotate continuously at 90° per second.
Use loopOut()
when you already have a keyframed animation that should repeat.
For example:
Scale 80% → 120% → 80% with custom easing.
A useful rule is:
Constant continuous change → time
Repeated keyframed motion → loopOut()
Time vs Wiggle
These expressions also solve different problems.
time
creates predictable continuous change.
wiggle()
creates procedural variation.
For example:
Rotating wheel → time
Shaky camera → wiggle
Moving conveyor belt → time
Floating object → wiggle
Choosing the right expression depends on whether the motion should be predictable or random-looking.
Add Time to an Existing Value
Suppose your layer already has a Rotation value.
You might want the time-based animation to begin from that value rather than ignoring it.
Use:
value + time * 50
Now After Effects takes the property’s base value and adds the time-based animation.
This is extremely useful.
Why value Matters
Imagine your Rotation is manually set to:
45°
If you use:
time * 50
the expression calculates Rotation entirely from time.
If you use:
value + time * 50
the 45-degree starting value is preserved.
Conceptually:
Manual value
Automatic animation
This makes expressions much easier to reuse.
Time-Based Position
Position is more complicated because it contains multiple values.
For a 2D layer:
X
and
Y
For example, conceptually:
[time * 100, value[1]]
can make the X Position increase while keeping Y at its existing value.
The object moves horizontally across the composition.
Understanding Arrays
Position is represented by an array.
For 2D Position:
[x, y]
For 3D Position:
[x, y, z]
This is why Position expressions often look different from Rotation expressions.
Rotation might need one number.
Position needs multiple numbers.
Move Horizontally with Time
Suppose you want a layer to move continuously to the right.
Conceptually:
[value[0] + time * 100, value[1]]
Here:
value[0]
represents the original X Position.
value[1]
represents the original Y Position.
The expression adds 100 pixels per second to X.
Y remains unchanged.
Move Vertically with Time
To move vertically instead:
[value[0], value[1] + time * 100]
Now X remains fixed while Y changes continuously.
Depending on the sign, the object can move upward or downward.
Reverse Direction
Use a negative speed.
For example:
[value[0] - time * 100, value[1]]
The layer moves left instead of right.
This makes directional changes very easy.
Create a Scrolling Background
Time-based Position animation is excellent for scrolling backgrounds.
Imagine a wide cloud layer.
Apply continuous horizontal movement.
If the artwork is designed to tile seamlessly, you can create an endless moving background.
This is useful for:
- clouds;
- landscapes;
- game scenes;
- motion-graphics backgrounds;
- abstract patterns.
Time and Shape Layers
Shape Layers contain many properties that can benefit from time expressions.
You can automate:
- Rotation;
- Repeater Offset;
- Trim Paths;
- Position;
- effect parameters.
For example, a repeating geometric background can continuously evolve without any manually created keyframes.
Time and Trim Paths
Trim Paths can create animated line drawing.
Its properties include:
- Start;
- End;
- Offset.
A time expression on Offset can make the path animation move continuously.
This works particularly well for:
- circular loaders;
- animated borders;
- technical graphics;
- HUD designs.
Time-Based Scale
You can technically drive Scale using time.
However, simple expressions such as continually increasing Scale may eventually create enormous values.
For example, if Scale increases forever, your object eventually becomes huge.
Time expressions are most useful when unlimited change actually makes sense or when the result is constrained mathematically.
Time-Based Opacity
Opacity also has practical limits.
A simple:
time * 20
will quickly exceed 100%.
After Effects properties may clamp or interpret such values according to the property.
For controlled fades, keyframes or mapping functions are often more appropriate.
This illustrates an important principle:
Not every property benefits from unlimited time-based growth.
Properties with Natural Cycles
Time works especially well with properties that can naturally continue indefinitely.
Examples:
- Rotation;
- angle;
- offset;
- phase;
- scrolling Position;
- certain effect parameters.
For bounded properties such as Opacity, you’ll often combine time with mathematical functions.
Sine Waves
A more advanced time-based technique uses trigonometric functions such as:
Math.sin(time)
A sine wave oscillates between negative and positive values.
That makes it ideal for repeated smooth motion.
Instead of a value increasing forever, it moves back and forth.
Simple Oscillation
Conceptually:
Math.sin(time) * 50
creates a value that smoothly moves approximately between:
-50
and
+50
over time.
Add it to a base value and you can create smooth procedural oscillation.
Why Use Sine Instead of Pingpong?
loopOut("pingpong") requires keyframes.
A sine expression can generate smooth oscillation without any keyframes.
Use:
Pingpong
when you want to design the exact keyframed motion.
Use:
Sine
when a mathematically smooth repeating wave is sufficient.
Create Floating Motion with Sine
Imagine you want an object to move smoothly up and down.
Instead of Wiggle, use time with a sine wave.
Conceptually:
Base Y + sine wave
The object moves predictably.
This is different from Wiggle.
Wiggle feels random.
Sine feels rhythmic.
Predictable vs Random Motion
Compare:
Wiggle
wiggle(1,20)
Creates organic variation.
Sine-based time animation
Creates smooth repeating oscillation.
Use Wiggle for:
- natural randomness;
- camera shake;
- drifting.
Use sine for:
- floating;
- breathing;
- waves;
- mechanical oscillation.
Time and Expression Controls
Hard-coding a speed such as:
time * 90
is fine while learning.
But what if you want to change the speed frequently?
Add a Slider Control.
Name it:
Rotation Speed
Then use that Slider as the multiplier.
Conceptually:
time * speedControl
Now the animation speed can be adjusted without editing the expression.
Why Slider Controls Are Better
Suppose you build a reusable loading animation.
Instead of asking the next editor to open the expression and change:
90
to:
120
you provide a control:
Rotation Speed: 120
This makes the project:
- easier to understand;
- safer to edit;
- more reusable.
Create a Master Animation Controller
Create a Null Object named:
CONTROLS
Add Slider Controls such as:
- Rotation Speed;
- Scroll Speed;
- Float Amount;
- Animation Speed.
Then connect other layers using expressions.
One control layer can manage an entire motion-graphics system.
This is a major step toward professional After Effects project organization.
Time-Based Counter
The time variable can also help create automatically changing numbers.
For example, you could calculate a number based on elapsed time and display it as text.
This can be useful for:
- timers;
- counters;
- technical graphics;
- data displays;
- HUD interfaces.
Working with Source Text requires additional expression techniques, but the underlying idea is the same.
Example: Seconds Counter
Conceptually:
Displayed value = current time
At:
0 seconds → 0
1 second → 1
2 seconds → 2
3 seconds → 3
You can format and round the result so the text displays clean integer values.
Math.floor()
A useful JavaScript function is:
Math.floor()
It rounds a value down to the nearest integer.
For example:
Math.floor(time)
produces:
0
1
2
3
4
as time progresses.
This is useful when you don’t want decimal values.
Math.round()
Another option is:
Math.round()
This rounds to the nearest integer.
The exact choice depends on how you want your counter to behave.
Create a Countdown
Once you understand time-based counters, you can reverse the logic.
Suppose you start at 10.
Conceptually:
10 – current time
The displayed number decreases.
With appropriate rounding and constraints, this can create a countdown.
Time-Based Clocks
More advanced expressions can convert elapsed time into:
- seconds;
- minutes;
- hours.
You can format those values into a clock display.
This is useful for:
- sports graphics;
- timers;
- presentation graphics;
- interface mockups.
Time and Effects
Time expressions aren’t limited to Transform properties.
You can apply them to many effect controls.
For example:
- Evolution;
- Angle;
- Phase;
- Offset;
- distortion parameters.
This can create animated textures and backgrounds with almost no keyframes.
Fractal Noise Evolution
Fractal Noise is a classic example.
Instead of keyframing Evolution manually, you can drive it using time.
The texture continuously changes.
This can create:
- smoke;
- clouds;
- abstract backgrounds;
- energy;
- atmospheric effects.
Turbulent Noise
Similarly, time-driven animation can make procedural textures evolve automatically.
This is extremely useful because procedural effects often need continuous movement rather than a carefully choreographed start and finish.
Time and Gradient Animation
If an effect exposes animatable positions or angles, time-based expressions can potentially automate their movement.
For example, you might continuously rotate a gradient direction or animate an effect offset.
The exact implementation depends on the property.
Time and Repeater
Shape Layer Repeaters can create repeated geometric elements.
Time expressions can animate:
- Repeater Rotation;
- Offset;
- transformations.
This can produce complex procedural designs from very simple shapes.
Time and 3D Layers
Time expressions also work with 3D properties.
For example:
- X Rotation;
- Y Rotation;
- Z Rotation;
- Position;
- effect controls.
A 3D object or layer can rotate continuously through space without keyframes.
Rotating 3D Product
Imagine a product image or 3D layer.
Apply a time-based expression to Y Rotation.
The product rotates continuously.
This can be useful for:
- product presentations;
- technology graphics;
- logo reveals;
- abstract scenes.
Opposite Rotations
Create two circular elements.
Element A:
time * 30
Element B:
time * -30
They rotate in opposite directions.
Add a third:
time * 15
Now you have a simple mechanical system.
This is useful for:
- HUD graphics;
- technology interfaces;
- rotating rings;
- abstract backgrounds.
Create an Animated Tech Interface
Build several Shape Layer rings.
Apply different time multipliers:
Ring 1 → 20
Ring 2 → -35
Ring 3 → 10
Each ring rotates automatically.
Add:
- Trim Paths;
- Glow;
- text;
- grids.
You can create sophisticated interface motion with very few keyframes.
Layer Index and Time
More advanced procedural systems can combine:
time
with:
index
Remember that index represents a layer’s position in the layer stack.
Different layers can therefore receive different speeds based on their index.
This is useful for generating variation across duplicated layers.
Example Concept
Imagine ten rotating circles.
Instead of manually giving each one a different speed, the expression can calculate speed using the layer index.
Layer 1 rotates slowly.
Layer 10 rotates faster.
Duplicate a layer and its behavior changes automatically.
That’s procedural motion design.
Time and Delay
You can offset time mathematically.
For example:
time - 1
represents time delayed by one second in certain calculations.
Time offsets become useful when creating staggered animation systems.
Staggering Multiple Layers
Imagine five layers that should perform similar procedural animation but begin at slightly different moments.
Instead of manually keyframing each layer, you can create time offsets based on:
- layer index;
- Slider Controls;
- fixed delay values.
This allows large animation systems to remain compact.
Time and Layer Start Time
Advanced expressions can reference layer timing so an animation responds to when the layer begins rather than absolute composition time.
This becomes important for reusable templates.
You may want an animation to start at:
0 seconds relative to the layer
regardless of where that layer sits in the composition.
Why Absolute Time Can Cause Problems
Suppose your expression is:
time * 90
At 10 seconds, the value is already:
If you move the layer so it begins at 10 seconds, it doesn’t necessarily behave as though its local animation is beginning at zero.
For reusable systems, you may instead calculate time relative to the layer’s start.
Relative Time Concept
Conceptually:
current composition time – layer start time
This gives you time measured from the layer’s own beginning.
That allows animation to behave consistently when the layer is moved in the Timeline.
This is an important concept for template development.
Time and Markers
More advanced expression rigs can use markers to trigger or control animation.
For example:
- marker starts animation;
- marker changes speed;
- marker triggers a transition.
This can make reusable projects easier for editors to control.
We’ll cover marker-driven animation in a later advanced expressions tutorial.
Time and Conditions
Time can also be used inside conditional statements.
For example:
Before 2 seconds → value A
After 2 seconds → value B
Conceptually:
if (time < 2)
do one thing.
Otherwise:
do something else.
This allows expressions to change behavior at specific moments.
Start Rotation After Two Seconds
Imagine an object that should remain stationary initially.
After two seconds, it starts rotating.
A time condition can control this behavior.
This avoids manually creating hold keyframes.
However, for simple animations, keyframes may still be easier.
Use expressions when they improve the workflow.
Stop Animation After a Certain Time
Likewise, you can constrain a time expression so it stops changing after a certain point.
This requires mathematical or conditional logic.
For example:
0–5 seconds → animate
after 5 seconds → hold final value
This is useful for procedural animations that need a defined duration.
Linear Mapping and Time
The linear() function can map time to another range.
Conceptually:
Time 0–2 seconds
maps to:
Scale 0–100
This creates automatic animation over a defined time range.
Unlike unlimited time * value, mapped time can produce controlled start and end values.
Ease and Time
The ease() function can do something similar while producing smoother acceleration and deceleration.
Conceptually:
0 seconds → 0
2 seconds → 100
with easing between them.
This means expressions can reproduce many behaviors normally created with keyframes.
Should You Replace Keyframes with Time Expressions?
No.
Keyframes remain one of the most important tools in After Effects.
Use keyframes when you need:
- specific timing;
- artistic easing;
- precise choreography;
- custom animation paths.
Use time expressions when:
- animation should continue automatically;
- motion follows a mathematical rule;
- you need reusable systems;
- manually extending animation would be repetitive.
Time Expressions and the Graph Editor
The Graph Editor is primarily associated with keyframed animation.
A simple time expression doesn’t create normal editable keyframe velocity curves.
If you need carefully art-directed acceleration, keyframes may be better.
Again, choose the tool that fits the animation.
Time Expressions and loopOut()
You can often solve the same visual result in different ways.
For continuous Rotation:
Option 1
Create Rotation keyframes and use:
loopOut("cycle")
Option 2
Use:
time * speed
Which is better?
If the rotation speed is constant:
time is simpler.
If the rotation contains custom acceleration or multiple keyframes:
loopOut may be better.
Time Expressions and Wiggle
You can also combine time-based motion with Wiggle.
For example:
Main movement → time
Secondary variation → wiggle
Imagine a spacecraft moving continuously across the screen while slightly vibrating.
Time controls the overall travel.
Wiggle creates engine vibration.
This combination can produce sophisticated procedural movement.
Time Expressions and Motion Blur
Fast automatic movement may require motion blur.
If something rotates rapidly but remains perfectly sharp, it can look unnatural.
Enable Motion Blur where appropriate.
As always, motion blur should support the visual result rather than simply be enabled everywhere.
Performance Considerations
Simple time expressions are generally lightweight.
However, very large projects can contain:
- hundreds of expression-driven layers;
- complex calculations;
- nested references.
At that scale, expressions can affect performance.
For beginner and moderate projects, a simple time * speed expression usually isn’t something to worry about.
Common Time Expression Mistakes
Mistake 1: Forgetting That Time Is in Seconds
time * 100 means 100 units per second.
Mistake 2: Using Unlimited Growth on Bounded Properties
Opacity doesn’t need to reach 5,000%.
Mistake 3: Forgetting the Original Value
Use value when you want to preserve the manually set property value.
Mistake 4: Treating Position Like a Single Number
2D Position contains X and Y values.
Mistake 5: Using Time When Keyframes Are Easier
Expressions should simplify the project.
Mistake 6: Hard-Coding Every Speed
Slider Controls make reusable rigs easier to edit.
Mistake 7: Forgetting Layer Timing
Absolute composition time and layer-relative time aren’t always the same thing.
Mistake 8: Ignoring Motion Blur
Fast procedural movement may need appropriate blur.
Mistake 9: Never Testing Negative Values
Negative multipliers can reverse direction instantly.
Mistake 10: Building Complex Expressions Too Soon
Master simple time multiplication first.
Time Expression Cheat Sheet
Continuous Rotation
time * 90
Slower Rotation
time * 20
Reverse Rotation
time * -90
Preserve Existing Rotation
value + time * 90
Integer Time Counter
Math.floor(time)
Smooth Oscillation Concept
Math.sin(time)
These simple concepts can become the foundation for much more advanced procedural animation.
Five Time Expression Exercises
Exercise 1 — Rotating Square
Apply:
time * 90
to Rotation.
Exercise 2 — Reverse Rotation
Change it to:
time * -90
Observe the direction.
Exercise 3 — Preserve Starting Rotation
Set Rotation manually and use:
value + time * 90
Exercise 4 — Scrolling Layer
Use time to increase one Position dimension continuously.
Exercise 5 — Rotating Rings
Create three Shape Layers with different positive and negative time multipliers.
These exercises teach most of the fundamental ideas.
A Practical Mini Project: Animated Tech Dashboard
Create three circular Shape Layers.
Use:
Outer Ring
slow clockwise rotation.
Middle Ring
faster counterclockwise rotation.
Inner Ring
very slow clockwise rotation.
Add Trim Paths.
Create small dots and lines.
Add text in the center.
Now you have a continuously animated technology interface.
And because the motion is driven by time expressions, it keeps running regardless of composition length.
A Practical Mini Project: Endless Background
Create a wide repeating background.
Use time-based Position to move it continuously.
Duplicate or tile the artwork so the transition remains seamless.
Add foreground text.
You now have a reusable animated background for:
- YouTube videos;
- presentations;
- social media;
- advertisements.
A Practical Mini Project: Rotating Product Graphic
Create a product image surrounded by several circular graphics.
Keep the product relatively stable.
Rotate surrounding design elements at different speeds using time expressions.
This creates motion without distracting from the product itself.
Time Expressions for Motion Graphics Templates
Time expressions are particularly useful in templates because the animation doesn’t depend on fixed keyframe positions.
An editor can make the composition longer.
The background still moves.
The rings still rotate.
The pattern still evolves.
This makes templates more adaptable.
Do You Need to Know JavaScript?
Not for basic time expressions.
You can achieve a lot with:
time * 50
and simple arithmetic.
As you progress, learning JavaScript concepts such as:
- variables;
- arrays;
- functions;
- conditions;
will make your expressions more powerful.
But don’t let programming terminology prevent you from starting.
Do You Need Plug-Ins?
No.
The time variable is part of After Effects’ native expression system.
You can create sophisticated automatic animation without third-party plug-ins.
Is the Time Expression Worth Learning?
Absolutely.
Together, these three concepts cover a remarkable amount of procedural animation:
Wiggle → random variation
loopOut → repeated keyframed motion
Time → continuous mathematical motion
If you understand those three, you’re already capable of building much cleaner and more automated After Effects projects.
Frequently Asked Questions
What does time mean in After Effects expressions?
time represents the current composition time in seconds.
What does time * 100 do?
It creates a value that increases by 100 for every second of composition time.
How do I continuously rotate a layer?
Apply a time-based expression such as time * 90 to Rotation.
How do I reverse the rotation?
Use a negative multiplier such as time * -90.
Can I use time without keyframes?
Yes. That’s one of its main advantages.
Can I combine time with keyframes?
Yes. Using value and other expression techniques allows time-based behavior to build on existing property values.
Can time animate Position?
Yes, but Position contains multiple dimensions, so you’ll need to account for X and Y—and Z for 3D layers.
Can time animate Scale?
Yes, although continuously increasing Scale may not be useful indefinitely.
Can time animate effects?
Yes. Many numerical effect properties can be driven by expressions.
What is the difference between time and loopOut?
Time generates animation mathematically based on elapsed time. loopOut() repeats or extends existing keyframed animation.
What is the difference between time and wiggle?
Time usually creates predictable mathematical change, while Wiggle creates procedural random-looking variation.
Can time create a counter?
Yes. Time can be converted and formatted into changing numerical displays.
Can I control time-expression speed with a Slider?
Yes. A Slider Control can provide the speed multiplier.
Is time measured in frames?
The standard time value represents seconds. Frame-based calculations can also be created when needed.
Does the time expression require a plug-in?
No. It’s built into After Effects.
Practice Automatic Animation in After Effects
The best way to understand time expressions is to experiment.
Create a shape.
Apply:
time * 30
to Rotation.
Then change it to:
time * 360
Then:
time * -90
Then:
value + time * 45
In just a few minutes, you’ll understand how time becomes an animation source.
After that, try using the same concept on:
- Position;
- Trim Paths;
- effect angles;
- procedural textures.
If you’d like to explore After Effects expressions and automatic animation yourself, you can check Adobe’s current options below:
Get Adobe After Effects and start creating automatic animation
What Should You Learn Next?
Wiggle gave us random procedural movement.
loopOut() gave us repeating animation.
time gave us continuous mathematical animation.
The next step is making motion feel more physical.
A layer can move into position and:
- bounce;
- overshoot;
- settle;
- spring;
- react as though it has momentum.
You could create all of this manually with keyframes and the Graph Editor.
But expressions can automate much of the behavior.
The next article will therefore be:
How to Create Bounce and Overshoot Expressions in Adobe After Effects.
We’ll look at the difference between bounce and overshoot, how expression-driven motion works, how to control amplitude and decay, when to use keyframes instead, and how to create reusable spring-style animation.
Final Thoughts
The time variable is one of the simplest ideas in After Effects expressions.
But it fundamentally changes how you can think about animation.
Instead of telling After Effects:
“At frame 0, use this value.”
and:
“At frame 60, use that value.”
you can tell it:
“Calculate this property from the current time.”
The result becomes automatic.
A wheel can rotate forever.
A background can keep moving.
A procedural texture can continue evolving.
A counter can keep increasing.
A set of interface rings can rotate at different speeds.
And if you make the composition longer, the animation simply continues.
Remember the three expression tools we’ve covered so far:
wiggle()
for variation,
loopOut()
for repetition,
and:
time
for continuous change.
Those three techniques alone can remove enormous amounts of repetitive keyframing from your After Effects projects.
Learn them individually.
Then start combining them.
That’s when expressions stop feeling like isolated pieces of code and start becoming a practical motion-design system.
Explore Adobe After Effects and start building automatic animations with expressions






