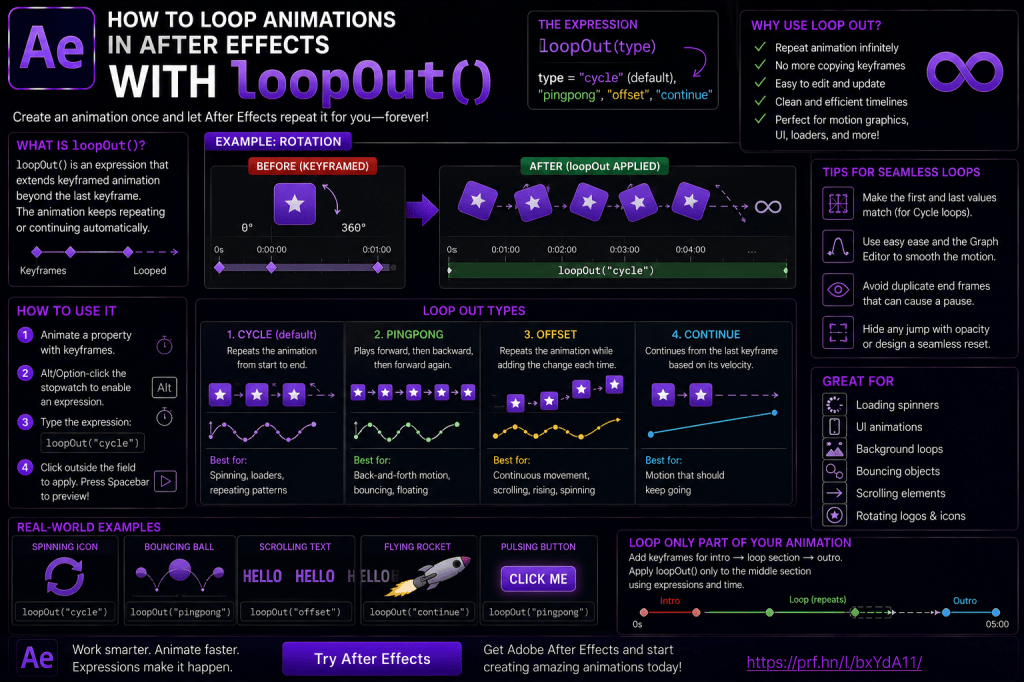
Repeating animation is one of the most common tasks in Adobe After Effects.
A loading icon spins continuously. A button pulses. A background pattern moves forever. A character bounces repeatedly. An arrow moves from left to right again and again.
You could copy and paste the same keyframes dozens of times.
But there’s a much better way.
After Effects expressions let you repeat an animation automatically with the loopOut() expression.
A simple expression such as:
loopOut()
can take a short keyframed animation and repeat it for as long as your composition lasts.
That makes loopOut() one of the most useful expressions for beginners.
In this guide, we’ll look at how loopOut() works, how to create Cycle, Pingpong, Offset, and Continue loops, how to make loops seamless, how to repeat only part of an animation, and how to use looping expressions in real motion-graphics projects.
Affiliate disclosure: This article contains affiliate links. If you purchase Adobe After Effects through one of these links, we may earn a commission at no additional cost to you.
What Is loopOut() in After Effects?
loopOut() is an After Effects expression that extends keyframed animation beyond its final keyframe.
Instead of copying your keyframes repeatedly, you create the animation once.
After Effects then repeats or extends it automatically.
The basic workflow is:
Create keyframes
↓
Add loopOut()
↓
Animation continues automatically
For example, imagine you animate a wheel from:
0° → 360°
over one second.
Add:
loopOut()
and the wheel continues rotating.
No additional keyframes are required.
Why Use loopOut()?
There are several advantages.
Fewer Keyframes
You only create the original animation.
Easier Editing
Change the original keyframes and the entire repeated animation updates.
Cleaner Timeline
You avoid hundreds of duplicated keyframes.
Unlimited Duration
The loop continues as long as the layer or composition requires.
Reusable Motion
Looping animations are ideal for templates, UI elements, backgrounds, and motion graphics.
How to Add the loopOut() Expression
Let’s create a basic looping animation.
Step 1: Create a Composition
Open After Effects.
Create a new composition.
Add a shape layer.
Step 2: Create Rotation Keyframes
Select the layer.
Press:
R
to reveal Rotation.
At the beginning:
Rotation = 0°
Create a keyframe.
Move forward one second.
Set:
Rotation = 360°
You now have one full rotation.
Step 3: Add the Expression
On Windows:
Alt-click the Rotation stopwatch.
On macOS:
Option-click the stopwatch.
Enter:
loopOut()
Click outside the expression field.
Step 4: Preview
Play the composition.
The rotation repeats continuously.
You have created your first expression-driven animation loop.
If you want to practice expressions and looping animation yourself, you can check Adobe’s current After Effects options here:
Explore Adobe After Effects and current plans
The Default loopOut() Behavior
The default loopOut() behavior is typically equivalent to a Cycle-style repetition.
Your original animation repeats from beginning to end.
Suppose Position changes:
100 px → 500 px
The loop behaves like:
100 → 500
then:
100 → 500
then:
100 → 500
This can be perfect for some animations.
But it can also create visible jumps.
That’s why After Effects provides several loop types.
The Four Important loopOut() Types
The main loop types beginners should understand are:
- Cycle
- Pingpong
- Offset
- Continue
Each produces a different result.
1. loopOut(“cycle”)
Use:
loopOut("cycle")
This repeats the keyframed animation exactly.
For example:
Scale: 0% → 100%
becomes:
0 → 100
0 → 100
0 → 100
This is useful when the end of the animation naturally connects back to the beginning.
When to Use Cycle
Cycle works well for:
- spinning wheels;
- loading graphics;
- moving patterns;
- repeating icon animations;
- rotating backgrounds;
- recurring motion.
The main challenge is making the first and last state connect seamlessly.
Create a Rotating Wheel
Create a circle or wheel graphic.
Animate Rotation:
0° at frame 0
360° at frame 30
Add:
loopOut("cycle")
The wheel repeats continuously.
Because 0° and 360° are visually identical, the loop is seamless.
This is an ideal use case.
Create a Loading Spinner
Create a simple shape animation.
For example:
Rotate a partial circle.
Add:
loopOut("cycle")
Now the loading spinner continues indefinitely.
You can change the original animation speed by moving the second keyframe.
The entire loop updates automatically.
Why Some Cycle Loops Jump
Suppose Position goes from:
100 → 500
When the cycle restarts, the layer jumps from 500 back to 100.
That’s expected.
The final state does not visually match the starting state.
You have several options:
- design the animation so the states match;
- use Pingpong;
- use Offset;
- use a different technique.
2. loopOut(“pingpong”)
Use:
loopOut("pingpong")
This plays your keyframes forward, then backward.
For example:
Left → Right
becomes:
Left → Right → Left → Right → Left
There is no sudden jump back to the first position.
When to Use Pingpong
Pingpong is ideal for:
- bouncing UI elements;
- pendulums;
- floating graphics;
- pulsing Scale;
- back-and-forth movement;
- breathing animations.
Create a Floating Icon
Create an icon.
Animate Position vertically:
Y = 500
to:
Y = 470
Apply Easy Ease.
Add:
loopOut("pingpong")
The icon moves upward and downward continuously.
This creates a simple floating animation.
Create a Pulsing Button
Animate Scale:
100% → 105%
Add:
loopOut("pingpong")
The button gently grows and shrinks.
Add easing to make the movement softer.
This works well for:
- calls to action;
- interface mockups;
- notification graphics.
Pingpong and Easing
The original keyframe easing affects the loop.
If your first animation feels good, Pingpong inherits that motion.
This means you can refine the motion once using the Graph Editor.
Then the loop continues automatically.
3. loopOut(“offset”)
Use:
loopOut("offset")
Offset repeats the animation but adds the difference between the first and final keyframe each time.
This is extremely powerful.
Imagine Position changes:
100 → 300
The difference is:
+200
The next cycle becomes approximately:
300 → 500
Then:
500 → 700
The animation keeps progressing rather than jumping back.
When to Use Offset
Offset is excellent for:
- endless scrolling;
- objects moving continuously;
- repeated rising motion;
- expanding systems;
- cumulative rotations;
- conveyor-style movement.
Create Endless Upward Movement
Animate a layer’s Y Position:
800 → 600
Add:
loopOut("offset")
The next cycle continues upward.
Then the next.
Instead of snapping back, the animation keeps traveling.
This can be useful for:
- scrolling text;
- rising particles;
- background objects.
Offset with Rotation
Suppose Rotation goes:
0° → 90°
With Offset:
first cycle:
0 → 90
second:
90 → 180
third:
180 → 270
and so on.
This allows cumulative motion based on your original keyframes.
Offset vs Cycle
Remember:
Cycle
repeats the original values.
Offset
adds the change to every new cycle.
For movement that should continue through space, Offset is often more useful.
4. loopOut(“continue”)
Use:
loopOut("continue")
Continue doesn’t repeat the entire keyframe pattern.
Instead, After Effects continues the property based on the velocity at the final keyframe.
Suppose an object is moving quickly to the right when its last keyframe occurs.
With Continue, it keeps moving in that direction.
When to Use Continue
This is useful when:
- movement should continue beyond your keyframes;
- an object exits the frame;
- rotation should continue;
- a value should maintain its final velocity.
Example: Object Flying Off Screen
Animate Position across one second.
Create easing so the object accelerates toward the end.
Add:
loopOut("continue")
After the final keyframe, it keeps traveling according to its final velocity.
This can be much cleaner than manually adding another distant Position keyframe.
Continue Depends on Velocity
If the last keyframe has almost no velocity, Continue may produce very little additional movement.
This is important.
The final animation curve determines how the property continues.
The Graph Editor therefore becomes particularly relevant.
cycle vs pingpong vs offset vs continue
A simple way to remember the four types:
Cycle
Repeat exactly.
Pingpong
Forward and backward.
Offset
Repeat while accumulating the difference.
Continue
Keep moving with the final velocity.
Once you understand these distinctions, you can solve many looping problems quickly.
loopIn()
After Effects also provides:
loopIn()
This behaves similarly but operates before the first keyframe.
For example, imagine your animation begins at five seconds.
Add:
loopIn("cycle")
The animation can repeat backward toward the beginning of the layer.
When Is loopIn() Useful?
It can be useful for:
- animations positioned later in a composition;
- transitions;
- repeated movement before the main keyframes;
- template systems.
Beginners will probably use loopOut() more frequently, but understanding both makes the system more flexible.
Loop Only Certain Keyframes
What if a property contains more than two keyframes?
You might not want to repeat all of them.
After Effects allows additional parameters that specify how many keyframes participate in the loop.
This becomes useful when you have:
- intro animation;
- repeating middle section;
- outro animation.
Instead of looping the entire property, you can focus the expression on a particular range.
Intro + Loop Pattern
Imagine an icon animation.
First:
Icon enters
Then:
Icon pulses repeatedly
You don’t want the entrance to repeat.
A common workflow is:
- Create entry keyframes.
- Create the repeating pulse later.
- Configure the looping expression around the relevant keyframe section.
This allows an animation to have a unique beginning followed by a loop.
Looping Part of an Animation
Suppose Scale has four keyframes:
- 0%
- 100%
- 95%
- 100%
The first keyframe creates an entrance.
The last several create a pulse.
You may want only the pulse portion to repeat.
This requires controlling which keyframes the loop references.
It’s a slightly more advanced use of the expression, but extremely valuable for polished motion graphics.
Seamless Animation Loops
A technically repeating animation isn’t necessarily a seamless loop.
A seamless loop should make it difficult to identify where one cycle ends and the next begins.
This requires careful design.
Match Beginning and End States
For a Cycle loop, the end should visually connect to the beginning.
Rotation:
0° → 360°
works because both states look identical.
Opacity:
0% → 100%
does not.
It will suddenly jump back to 0%.
For that kind of animation, Pingpong may work better.
Avoid Duplicate End Frames
This is a common looping problem.
Suppose you animate Rotation:
Frame 0:
0°
Frame 30:
360°
If both frame 0 and frame 30 are displayed in a cycle, you may effectively show the same visual state twice.
Depending on your animation and output, this can create a tiny pause.
For certain seamless loops, you may want the animation duration and final keyframe placement to avoid duplicated visual frames.
Always preview carefully.
Use the Graph Editor
Loop expressions don’t automatically make animation look smooth.
They repeat whatever keyframes you’ve created.
If the original motion is mechanical, the repeated motion will remain mechanical.
Use:
- Easy Ease;
- Graph Editor;
- velocity control;
before applying the loop.
Design the original cycle well.
Then let the expression repeat it.
Create a Bouncing Ball Loop
Animate a ball:
Top → floor → top
Refine timing to simulate gravity.
Add:
loopOut("cycle")
The bounce repeats.
However, physical motion may look artificial if every bounce has exactly the same height.
For an endlessly looping graphic, that’s fine.
For realistic physics, you may need a different approach.
Create a Pendulum
Animate Rotation:
-30° → 30°
Apply appropriate easing.
Use:
loopOut("pingpong")
The layer swings continuously.
This can create:
- clock pendulum;
- hanging sign;
- suspended light;
- decorative icon.
Create Endless Horizontal Scrolling
Suppose you have a repeating background texture.
Animate it horizontally from one repeating position to the next.
Add:
loopOut("cycle")
If the texture is designed to tile perfectly, the animation becomes seamless.
This is useful for:
- clouds;
- landscapes;
- patterned backgrounds;
- game-style movement.
Scrolling Backgrounds
A common motion-design trick is to create a wide repeating graphic.
Move it across the screen.
When one copy exits, an identical region enters.
If the artwork tiles correctly, the viewer never sees the seam.
The loop expression handles the repetition.
Looping Shape Animation
Shape layers work extremely well with expressions.
You can loop:
- Trim Paths;
- Rotation;
- Scale;
- Position;
- Repeater properties.
For example, create a circular loading animation with Trim Paths.
Add a repeating expression to the animated property.
The graphic can run indefinitely.
Loop Trim Paths
Create a circle.
Add:
Stroke
and
Trim Paths
Animate Offset or End.
Then loop the animation.
This can create:
- loading indicators;
- animated rings;
- progress-style motion.
Looping Text Animation
Text animations can also repeat.
You might animate:
- tracking;
- Position;
- Scale;
- Opacity.
Then loop the property or related animator values.
However, repeated text animation can become distracting.
Use loops where they support readability.
Typewriter Loop
A typewriter reveal can technically be looped.
But ask whether the repeated disappearing/reappearing behavior fits the design.
Expression automation should support the creative goal rather than exist simply because it’s possible.
Looping Camera Movement
Camera properties can also be looped.
For example, create a subtle back-and-forth camera move.
Use Pingpong.
This can create:
- environmental motion;
- presentation backgrounds;
- looping 3D scenes.
Be cautious with camera loops because obvious repeated movement can feel artificial.
Looping 3D Objects
You can repeat:
- 3D Rotation;
- Position;
- Scale;
- camera-relative movement.
An object can spin indefinitely or float repeatedly through space.
This is useful for product animation and abstract motion graphics.
Expressions vs Repeating Keyframes
Why not simply copy keyframes?
For a three-second animation, copying may be fine.
But imagine you need to:
- change timing;
- update amplitude;
- extend composition from 30 seconds to 90 seconds.
With duplicated keyframes, every change becomes tedious.
With an expression, edit the original animation once.
Everything updates.
That’s the real advantage.
Expressions vs Time Remapping
For looping entire video clips or pre-compositions, Time Remapping can be another useful technique.
You can enable Time Remapping and use expressions to repeat the footage.
This is different from looping an individual Transform property, but the same automation principles apply.
Looping a Pre-Composition
Suppose you created a five-second animated scene inside a pre-comp.
You want that complete scene to repeat for 60 seconds.
One approach is to use Time Remapping on the pre-comp and apply an appropriate loop expression.
This can be much cleaner than duplicating the pre-comp repeatedly.
Time Remapping Basics
When Time Remapping is enabled, After Effects creates keyframes representing playback time.
Expressions can then repeat that time range.
This makes looping:
- animations;
- video clips;
- animated pre-comps;
much easier.
Be Careful with the Last Frame
A classic Time Remapping loop problem occurs because After Effects may include an extra final frame where the source animation has already ended.
This can create:
- blank frame;
- frozen frame;
- tiny pause.
A common solution involves adjusting the final Time Remapping keyframe so the loop ends on the last actual animation frame rather than after it.
Preview closely.
Looping GIF-Style Animations
If you’re creating short repeating content for:
- websites;
- social media;
- presentations;
- digital signage;
expression-driven loops are ideal.
Design a short clean cycle.
Then repeat it automatically.
This keeps your project compact and editable.
Looping Social-Media Backgrounds
A subtle repeating background can make short-form content feel more dynamic.
Examples:
- slowly moving gradient;
- floating icons;
- repeating shapes;
- animated lines.
Build a two- or three-second cycle and loop it.
You don’t need to animate the entire 30-second video manually.
Looping YouTube Graphics
Expressions are useful for persistent graphics such as:
- subscribe animations;
- lower-thirds accents;
- background patterns;
- loading indicators;
- decorative elements.
Create reusable looping elements once.
Then use them across multiple videos.
Looping UI Animation
UI mockups often contain repeated motion:
- loading spinner;
- notification pulse;
- cursor indicator;
- animated button;
- status light.
loopOut() is perfect for these types of elements.
Looping Logos
A logo could contain a subtle repeated animation.
For example:
Scale: 100 → 103
with:
loopOut("pingpong")
or a rotating decorative icon with Cycle.
Keep brand animation deliberate and restrained.
Looping Background Particles
You can create small keyframed motion patterns and repeat them.
However, if you want truly randomized particle behavior, expressions such as Wiggle or a particle system may be more suitable.
This illustrates an important distinction:
LoopOut = repeat known animation
Wiggle = generate procedural variation
loopOut() vs wiggle()
These two expressions solve very different problems.
Use:
loopOut()
when you want something to repeat predictably.
Use:
wiggle()
when you want continuous variation.
Examples:
Spinning wheel → loopOut
Random floating icon → wiggle
Pulsing button → loopOut(“pingpong”)
Camera shake → wiggle
Choose based on the motion you want.
Combine loopOut() and Other Expressions
As your expression skills improve, different techniques can be combined.
For example:
A logo animation loops.
A subtle Wiggle adds organic motion.
Or:
A repeating animation is controlled by a Slider.
Expressions allow you to build increasingly sophisticated systems.
Common Loop Mistake: Jump at the Seam
Your loop repeats, but there’s a visible jump.
Check:
- first value;
- final value;
- loop type;
- easing;
- duplicated frames.
The problem is often in the original animation rather than the expression itself.
Common Loop Mistake: Pause at the End
If the animation seems to pause before restarting, inspect:
- keyframe timing;
- identical first/last frames;
- Time Remapping endpoints;
- easing.
A perfect loop requires both technical repetition and visually continuous timing.
Common Loop Mistake: Wrong Loop Type
If your Position animation jumps back suddenly, perhaps Cycle isn’t appropriate.
Try:
loopOut("pingpong")
or:
loopOut("offset")
Choose the type based on how the motion should behave at the transition.
Common Loop Mistake: Animation Stops
Check that:
- the expression is enabled;
- the layer continues beyond the keyframes;
- there are enough keyframes to define the animation;
- the syntax is correct.
Expression errors may also appear if the property configuration isn’t appropriate.
Common Loop Mistake: Moving Keyframes Breaks the Loop
Expressions depend on your original keyframes.
If you drastically change the keyframe structure, review the resulting loop.
Automation reduces work but doesn’t eliminate the need to preview.
Common Loop Mistake: Too Much Repetition
A technically perfect loop can still become visually boring.
If viewers can immediately identify the repeated motion, consider adding:
- secondary variation;
- longer cycle;
- multiple offset elements;
- subtle Wiggle.
The goal depends on the design.
A loading spinner should obviously repeat.
A cinematic background may need less obvious repetition.
Offset Multiple Loops in Time
Suppose you have three identical icons.
Each uses the same loop.
If they all start simultaneously, the animation may feel mechanical.
Offset their layers or keyframes in time.
Now:
Icon 1 begins.
Then Icon 2.
Then Icon 3.
Each still loops, but the combined system feels more dynamic.
Staggered Repeating Animation
This technique works beautifully for:
- loading dots;
- equalizer graphics;
- interface indicators;
- bouncing icons.
Create one looping animation.
Duplicate the layer.
Offset each copy slightly.
You get a coordinated repeating system.
Example: Three Loading Dots
Create three circles.
Animate Scale on the first:
80% → 120% → 80%
Loop it.
Duplicate twice.
Offset each layer by several frames.
The dots pulse sequentially.
This is a classic UI loading animation.
Create a Repeating Arrow
Animate an arrow from left to right.
Fade it in and out.
Loop the movement.
This works well for:
- tutorials;
- calls to action;
- swipe indicators;
- navigation graphics.
Design the beginning and end so the reset is hidden by the Opacity animation.
Hide Loop Seams with Opacity
This is a useful technique.
If an object’s Position needs to jump back to the start, make it invisible during the reset.
For example:
Opacity = 0
at the start.
Fade in.
Move across.
Fade out.
Then the Cycle restarts while the object is invisible.
The viewer never sees the position jump.
Loop a Rising Particle
Animate a small circle:
Bottom → Top
Opacity:
0 → 100 → 0
Use Cycle.
The particle disappears before the loop resets.
Duplicate the layer with different timing.
You now have a simple repeating particle background.
Build Reusable Loops
Once you create a good loop, consider saving it as:
- animation preset;
- pre-comp;
- project template;
- Motion Graphics element.
Looping expressions are especially valuable when you reuse the same types of graphics across multiple projects.
A Better Looping Workflow
Use this sequence:
1. Design one complete cycle
Don’t think about repetition yet.
2. Preview the original keyframes
Make sure the motion works.
3. Refine easing
Use the Graph Editor.
4. Decide what happens after the last keyframe
Restart, reverse, continue, or accumulate?
5. Choose the loop type
Cycle, Pingpong, Offset, or Continue.
6. Add the expression
Keep the Timeline clean.
7. Preview the seam
Look carefully for jumps or pauses.
8. Adjust the original cycle
Don’t patch every repeated instance.
9. Test the full composition
Long loops may reveal repetition.
10. Save reusable setups
Build your own expression toolkit.
Five loopOut() Exercises
Exercise 1 — Spinning Icon
Animate Rotation:
0° → 360°
Use Cycle.
Exercise 2 — Floating Shape
Animate Position upward.
Use Pingpong.
Exercise 3 — Endless Scroll
Animate Position.
Use Offset.
Exercise 4 — Flying Object
Animate Position with final velocity.
Use Continue.
Exercise 5 — Loading Dots
Create one Scale animation, loop it, duplicate it, and stagger the copies.
Complete these five and you’ll understand the major loop types.
loopOut() Cheat Sheet
Repeat Normally
loopOut("cycle")
Forward and Backward
loopOut("pingpong")
Continue with Increasing Offset
loopOut("offset")
Continue Final Motion
loopOut("continue")
Default Loop
loopOut()
For many uses, the default behaves like Cycle.
Which loopOut() Type Should You Use?
Ask one question:
What should happen after the final keyframe?
If the answer is:
Start again
use Cycle.
If:
Reverse
use Pingpong.
If:
Repeat but keep moving farther
use Offset.
If:
Keep moving at the same final velocity
use Continue.
That single decision solves most beginner loop questions.
Is loopOut() Better Than Copying Keyframes?
For short one-off animation, either may work.
For repeated production work, loopOut() is usually much easier to maintain.
The larger your project becomes, the more valuable expressions become.
Do You Need Plug-Ins?
No.
loopOut() is part of After Effects’ native expression system.
No third-party tool is required.
Is loopOut() Difficult to Learn?
Not at all.
The basic version is:
loopOut()
That’s one line.
The more important skill is designing a good original animation to repeat.
Expressions automate repetition.
They don’t replace good motion design.
Practice Looping Animation in After Effects
Create a square.
Animate Rotation from:
0° → 360°
Add:
loopOut("cycle")
Then create a second square.
Animate its Position.
Use:
loopOut("pingpong")
Then a third.
Use:
loopOut("offset")
Watching the three side by side makes the differences immediately clear.
If you’d like to practice loop expressions and other procedural animation techniques, you can check Adobe’s current After Effects options here:
Get Adobe After Effects and start creating automated animation loops
Frequently Asked Questions
What does loopOut() do in After Effects?
It extends keyframed animation beyond the final keyframe using a specified looping behavior.
What is loopOut(“cycle”)?
It repeats the original animation.
What is loopOut(“pingpong”)?
It repeats the animation forward and then backward.
What is loopOut(“offset”)?
It repeats the animation while adding the difference between the first and final values to each new cycle.
What is loopOut(“continue”)?
It extends the property based on the velocity at its final keyframe.
Does loopOut() require keyframes?
Yes, the expression generally relies on existing keyframed animation to determine the repeated behavior.
Can I loop Position?
Yes.
Can I loop Rotation?
Yes.
Can I loop Scale?
Yes.
Can I loop Opacity?
Yes.
Can I loop effect properties?
Many keyframable effect properties can be used with expression-based looping.
Can I loop a pre-composition?
Yes, often through Time Remapping and an appropriate loop expression.
Why does my loop jump?
The final animation state may not connect naturally with the first state, or the wrong loop type may be selected.
How do I make a seamless loop?
Design the original animation so its endpoint connects to the beginning, choose the correct loop type, and inspect the transition at normal playback speed.
Is loopOut() included with After Effects?
Yes. It is a native expression function.
What Should You Learn Next?
Once you understand Wiggle and loopOut(), another extremely useful expression concept is time-based animation.
Using the time variable, you can create motion that automatically continues as the composition runs.
For example:
time*100
can generate continuous Rotation without any keyframes.
Time expressions are particularly useful for:
- continuous rotation;
- moving backgrounds;
- counters;
- procedural animation;
- automated motion systems.
The next article in this series will therefore be:
How to Use Time Expressions in Adobe After Effects: Automatic Animation Without Keyframes.
Final Thoughts
The loopOut() expression solves a simple problem that appears constantly in After Effects:
How do I make this animation repeat?
Instead of:
Copy → Paste → Copy → Paste → Copy → Paste
you create one good animation and tell After Effects what should happen next.
Use:
loopOut("cycle")
when the animation should restart.
Use:
loopOut("pingpong")
when it should reverse.
Use:
loopOut("offset")
when every cycle should continue farther.
Use:
loopOut("continue")
when the final motion should keep going.
Then concentrate on what really matters:
Timing.
Easing.
Seamless transitions.
Visual rhythm.
Expressions handle the repetition.
You handle the motion design.
Once you begin using looping expressions regularly, you’ll find it difficult to imagine returning to timelines filled with hundreds of duplicated keyframes.
Explore Adobe After Effects and start building cleaner, smarter looping animations






