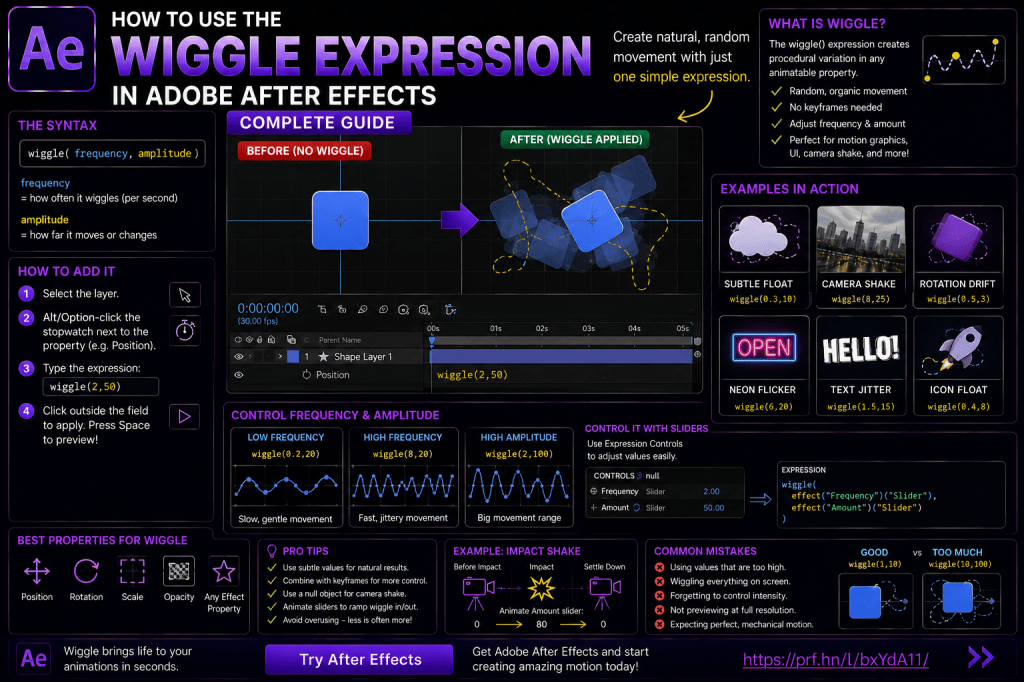
The wiggle() expression is one of the most useful expressions you can learn in Adobe After Effects.
With a single short line of code, you can create:
- camera shake;
- floating objects;
- flickering lights;
- random movement;
- subtle text motion;
- handheld-style animation;
- organic rotation;
- animated interface elements.
Without expressions, many of these effects would require dozens or even hundreds of manually created keyframes.
With wiggle(), After Effects generates the variation automatically.
The basic expression looks like this:
wiggle(2,50)
Those two numbers control how often the movement changes and how far the value can vary.
In this complete guide, we’ll look at exactly how the Wiggle expression works, how frequency and amplitude affect the animation, how to create subtle movement, camera shake, rotation, opacity flicker, controlled wiggle, Slider Controls, and several practical examples you can use in real projects.
Affiliate disclosure: This article contains affiliate links. If you purchase Adobe After Effects through one of these links, we may earn a commission at no additional cost to you.
What Is the Wiggle Expression?
The wiggle() expression creates procedural variation in an animatable property.
Instead of manually deciding every movement with keyframes, After Effects automatically generates changing values.
For example, apply this to Position:
wiggle(2,50)
After Effects continuously varies the Position.
The layer moves unpredictably around its normal location.
The movement is generated automatically for as long as the composition runs.
Wiggle Syntax
The basic syntax is:
wiggle(frequency, amplitude)
The two main values are:
Frequency
How frequently the property changes.
Amplitude
How far the value can vary.
Understanding these two controls gives you most of what you need to begin using Wiggle effectively.
What Does Frequency Mean?
The first value controls approximately how many wiggles occur per second.
For example:
wiggle(1,50)
means roughly one variation per second.
wiggle(5,50)
creates much faster movement.
Compare:
wiggle(0.5,50)
with:
wiggle(10,50)
The amplitude is identical.
Only the frequency changes.
The first feels slow and drifting.
The second feels nervous and energetic.
What Does Amplitude Mean?
The second number controls the amount of variation.
For a Position property:
wiggle(2,10)
creates relatively small movement.
wiggle(2,200)
creates much larger movement.
The frequency remains the same.
Only the distance changes.
A useful way to remember it is:
wiggle(speed, amount)
That isn’t the formal terminology, but it’s easy for beginners to remember.
How to Add Wiggle to a Layer
Let’s create your first Wiggle expression.
Step 1: Create a Composition
Open After Effects and create a composition.
Add a simple shape, text layer, logo, or image.
Step 2: Select the Layer
Select the layer in the Timeline.
Step 3: Reveal Position
Press:
P
to reveal Position.
Step 4: Enable an Expression
On Windows:
Alt-click the Position stopwatch.
On macOS:
Option-click the stopwatch.
An expression field appears.
Step 5: Enter Wiggle
Type:
wiggle(2,50)
Click outside the expression field.
Step 6: Preview
Play the composition.
The object moves automatically.
You haven’t created a single Position keyframe.
That’s the power of expressions.
Subtle Floating Motion
Large Wiggle values often look chaotic.
For many motion-design projects, subtle movement works much better.
Try:
wiggle(0.3,15)
The low frequency creates slow movement.
The small amplitude keeps the object near its starting point.
This works well for:
- logos;
- floating icons;
- title cards;
- illustrations;
- background elements.
Create a Floating Logo
Place a logo in the center of the composition.
Apply:
wiggle(0.4,10)
to Position.
Then apply a subtle Rotation wiggle:
wiggle(0.2,1)
The logo now drifts gently instead of remaining completely static.
This type of movement can make a static graphic feel more alive without becoming distracting.
Wiggle Position
Position is probably the property where beginners first discover Wiggle.
Example:
wiggle(3,40)
The layer changes position several times per second with up to roughly 40 pixels of variation.
This can simulate:
- camera shake;
- handheld movement;
- floating graphics;
- random icon motion.
Wiggle Rotation
Wiggle can also be applied to Rotation.
Press:
R
Enable an expression.
Try:
wiggle(2,5)
The layer rotates randomly within a relatively small range.
This works well for:
- stickers;
- hand-drawn graphics;
- playful typography;
- icons;
- floating objects.
Combine Position and Rotation
Try:
Position
wiggle(1,20)
and:
Rotation
wiggle(0.8,2)
Together, these create much more organic movement than either property alone.
Subtle combinations often look better than extreme single-property animation.
Wiggle Scale
You can apply Wiggle to Scale.
For example:
wiggle(1,5)
This creates slight random scaling.
Be careful.
Large Scale variations can make an object appear to pulse aggressively.
Small amounts can work well for:
- breathing effects;
- organic graphics;
- stylized animation.
Wiggle Opacity
Opacity can also be controlled procedurally.
Try:
wiggle(5,20)
on Opacity.
This can create flickering.
However, Opacity must remain within a meaningful range.
Depending on the base value and expression, extreme variations may produce undesirable results.
For flickering effects, you may eventually want to clamp or control the output more precisely.
Create a Flickering Light
Create a light, glow layer, or bright shape.
Apply a Wiggle expression to Opacity or an effect intensity property.
For example:
wiggle(8,20)
The light fluctuates.
This can simulate:
- fluorescent flicker;
- electrical instability;
- candle variation;
- faulty signs;
- sci-fi interfaces.
Adjust the values until the behavior fits the scene.
Create Camera Shake
One of the most popular uses of Wiggle is camera shake.
Create or select a camera, Null Object, or footage layer depending on your setup.
Apply a Position Wiggle such as:
wiggle(8,15)
This produces rapid small movement.
For a stronger impact effect, increase the amplitude.
For example:
wiggle(12,40)
The right values depend on:
- composition resolution;
- shot scale;
- desired intensity.
Subtle Handheld Camera Look
For gentle handheld movement, try something closer to:
wiggle(1.5,8)
This creates slower, smaller variation.
Add a tiny Rotation Wiggle:
wiggle(1,0.5)
The combination can simulate mild handheld movement.
Use this carefully.
Artificial camera shake becomes obvious when exaggerated.
Camera Shake vs Warp Stabilizer
It’s useful to distinguish these tools.
Warp Stabilizer
removes unwanted camera shake.
Wiggle
can create camera shake.
One smooths motion.
The other introduces procedural motion.
Depending on the creative goal, you may use either technique—or even stabilize footage first and then add a controlled amount of intentional movement.
Use Wiggle on a Null Object
Instead of applying Wiggle separately to multiple layers, create a Null Object.
Parent several layers to the Null.
Then apply Wiggle to the Null.
Now all child layers inherit the movement.
This is especially useful for:
- camera shake;
- groups of graphics;
- interface panels;
- title compositions.
Conceptually:
Wiggle Null
↓
Text
Shapes
Icons
Logo
Everything moves together.
Why This Is Better
Suppose you have ten layers.
Without the Null, you’d need to apply an expression to each one.
With the Null, you create the motion once.
This makes your composition:
- cleaner;
- easier to edit;
- easier to reuse.
Wiggle and Existing Position
Wiggle generally varies around the property’s underlying value.
That means you can place a layer normally and then add Wiggle.
For example:
Position your text exactly where it belongs.
Apply:
wiggle(0.5,10)
The text remains centered around that chosen position while drifting slightly.
You don’t have to calculate a new base location.
Wiggle and Keyframes
Wiggle can also work with keyframed animation.
Suppose a title moves from left to right using keyframes.
Add Wiggle to Position.
Now the title follows the keyframed movement while also receiving procedural variation.
Conceptually:
Keyframes = main movement
Wiggle = secondary movement
This is an extremely useful combination.
Example: Flying Object
Animate an icon traveling across the screen.
Use keyframes for its overall path.
Then add a small Wiggle.
The object now follows the planned path while moving more organically.
This can work well for:
- flying icons;
- particles;
- vehicles;
- cartoon elements.
Control Wiggle with a Slider
Hard-coding values inside an expression works well when learning.
But what if you want to adjust the Wiggle without editing code?
Use an Expression Control.
Add a Slider Control to the layer or a Null Object.
Name it:
Wiggle Amount
Then reference that Slider in the expression.
Conceptually:
wiggle(2, sliderValue)
Now the Slider controls the amplitude.
This makes the effect much easier to adjust.
Why Slider Controls Matter
Imagine you create a camera shake rig.
Instead of opening the expression whenever you want stronger or weaker shake, you simply adjust:
Shake Amount
This is cleaner and safer.
It’s also how reusable After Effects rigs and templates are commonly structured.
Create Frequency and Amount Controls
You can go further.
Create two Slider Controls:
Wiggle Frequency
and
Wiggle Amount
Then use both inside the expression.
Conceptually:
wiggle(frequencyControl, amountControl)
Now the user can control the full behavior without touching the expression itself.
This is an excellent beginner exercise in building expression rigs.
Separate X and Y Wiggle
Sometimes you don’t want equal movement in every direction.
For example, you may want horizontal movement but almost no vertical movement.
This requires controlling dimensions separately.
Position is normally represented by multiple values:
X
and
Y
for 2D layers.
By separating the dimensions or building the output manually, you can apply Wiggle selectively.
Why Separate Dimensions?
Imagine a train moving horizontally.
You want slight horizontal shake but don’t want it randomly moving vertically.
Or perhaps you’re animating floating text that should move mostly up and down.
Separate control gives you more intentional procedural motion.
Separate Position Dimensions
After Effects allows Position dimensions to be separated into:
- X Position;
- Y Position.
Once separated, you can apply Wiggle to one dimension while leaving the other unchanged.
For example:
X Position
normal or keyframed.
Y Position
small Wiggle.
This creates a subtle vertical bounce while the horizontal motion remains controlled.
Wiggle Only on X
If you want only horizontal variation, use an appropriate separated-dimension workflow or construct a multi-dimensional expression that preserves the Y value.
The conceptual result is:
X = Wiggle
Y = Original value
This gives you much more precise control than letting the layer wander randomly in every direction.
Wiggle Only on Y
Likewise:
X = Original value
Y = Wiggle
This can be useful for:
- hovering objects;
- floating titles;
- breathing interface elements.
Wiggle in 3D
A 3D Position property contains:
- X;
- Y;
- Z.
Applying Wiggle can introduce movement through three-dimensional space.
This can create:
- floating 3D text;
- drifting objects;
- camera movement;
- environmental particles.
Be especially careful with Z movement because even small values can create noticeable scale and perspective changes depending on camera setup.
Stop Wiggle After a Certain Time
A common question is:
How do I make Wiggle stop?
One approach is to use conditional expressions.
Conceptually:
If time is before 3 seconds → Wiggle
After 3 seconds → normal value
This introduces one of the most important expression concepts:
conditions.
You don’t need advanced programming knowledge to begin using them.
Conditional Logic
A condition allows After Effects to choose between different behaviors.
Conceptually:
if (condition) { behavior A } else { behavior B }
For example:
Before 2 seconds:
Wiggle.
After 2 seconds:
Stop.
This can create effects such as:
- camera shake during impact;
- light flicker before stabilizing;
- object vibration before launch.
Fade Wiggle In and Out
An abrupt start or stop can look unnatural.
A better approach is often to gradually change Wiggle amplitude.
For example:
0 seconds → amplitude 0
1 second → amplitude 50
2 seconds → amplitude 0
You can control this with:
- keyframed Slider Controls;
- mathematical interpolation;
- expression functions.
The Wiggle becomes an effect you can animate.
Keyframe the Wiggle Amount
This is probably the easiest beginner method.
Create a Slider Control named:
Wiggle Amount
Keyframe it:
0 → 0
10 frames → 50
30 frames → 50
40 frames → 0
Use the Slider as the Wiggle amplitude.
Now the procedural motion gradually appears and disappears.
Camera Impact Shake
This technique is excellent for impact effects.
Imagine something explodes at two seconds.
Before the explosion:
Shake Amount = 0
At impact:
Shake Amount = 40
Then rapidly reduce:
40 → 0
The camera shake appears only around the impact.
This looks much more purposeful than continuous random movement.
Explosion Shake Example
Build a camera or Null setup.
Use moderate-to-high frequency.
Animate the amplitude Slider:
Frame before explosion: 0
Impact frame: 50
15 frames later: 0
The result is a short burst of procedural shake.
Adjust frequency and amplitude based on the shot.
Wiggle and Motion Blur
Fast Wiggle movement can benefit from motion blur.
If an object changes position rapidly but remains perfectly sharp, the motion may look artificial.
Enable motion blur where appropriate.
However, extremely aggressive Wiggle combined with heavy blur can become visually messy.
Balance the settings.
Wiggle and Posterize Time
Wiggle normally creates relatively fluid variation.
But what if you want stepped, stop-motion-style movement?
Combine it with:
posterizeTime()
For example:
posterizeTime(8);wiggle(3,30)
After Effects updates the expression at a reduced temporal rate.
The movement feels deliberately choppy.
When to Use Posterized Wiggle
This works well for:
- handmade animation;
- cut-paper styles;
- stop-motion graphics;
- sketch animation;
- playful typography;
- retro motion design.
The same Wiggle behaves completely differently when time is quantized.
Wiggle for Text
Apply subtle Wiggle to text layers.
For example:
Position
wiggle(0.5,8)
Rotation
wiggle(0.4,1)
This can create gentle organic typography.
For energetic content, use stronger values.
But readability should remain the priority.
Wiggle for Individual Characters
After Effects Text Animators can also create per-character procedural behavior.
This is more advanced than applying Wiggle to the entire text layer.
You can create typography where characters:
- jitter;
- move independently;
- rotate randomly;
- flicker.
This can work well for:
- horror titles;
- glitch effects;
- music videos;
- energetic advertising.
Wiggle for Shape Layers
Shape layers are ideal for procedural motion.
Create several circles.
Apply different Wiggle settings.
You can create:
- floating particles;
- abstract backgrounds;
- animated bubbles;
- decorative elements.
Combine this with:
- Repeaters;
- Trim Paths;
- opacity variation.
A few simple shapes can generate a sophisticated animated background.
Wiggle for Glitches
Wiggle can contribute to glitch-style effects.
For example, apply short bursts of Position Wiggle to a text layer.
Combine with:
- RGB separation;
- distortion;
- opacity changes;
- posterized time.
The random movement helps create visual instability.
Wiggle for Flickering Neon
Create a neon sign effect.
Use a Wiggle expression on:
- Opacity;
- Glow Intensity;
- Exposure;
- brightness.
High-frequency small variation can create electrical flicker.
Then occasionally create larger drops for malfunctioning-light effects.
Wiggle for Candlelight
A much subtler version can simulate candlelight.
Apply gentle procedural variation to:
- light intensity;
- color;
- glow.
Use low-to-moderate frequency and relatively small amplitude.
The effect should feel organic rather than chaotic.
Wiggle for Floating UI Elements
Modern interface and technology animations often use subtle constant motion.
For example:
Cards or icons may drift by a few pixels.
Use:
wiggle(0.2,5)
This creates almost imperceptible movement that prevents the design from feeling frozen.
Wiggle for Background Elements
Foreground content should usually remain readable and controlled.
Background elements can tolerate more procedural variation.
For example:
- dots;
- particles;
- icons;
- abstract shapes.
Use different Wiggle settings to prevent everything from moving identically.
Avoid Identical Wiggle Everywhere
If 20 objects all use exactly:
wiggle(1,20)
they may still behave differently due to expression evaluation, but the overall animation can feel mechanically similar.
Variation can help.
Use slightly different:
- frequencies;
- amplitudes;
- starting positions.
This creates a richer procedural system.
Seed Randomness
Advanced Wiggle workflows can control randomness more deliberately using functions such as seedRandom().
This becomes useful when you need predictable or layer-specific random behavior.
You don’t need it for basic Wiggle animation, but it’s worth knowing that more precise control is possible.
Wiggle vs Random
Beginners sometimes confuse these.
random()
generates random values.
wiggle()
creates continuously varying procedural animation.
If your goal is:
natural movement over time
Wiggle is usually easier.
If your goal is:
generate a random parameter or value
random may be more appropriate.
Wiggle vs Keyframes
Use Wiggle when movement should be unpredictable or repetitive.
Use keyframes when you need deliberate control.
For example:
Character walks to door
Use keyframes.
Camera shakes during explosion
Use Wiggle.
Logo gently floats
Use Wiggle.
Logo enters at a precise moment
Use keyframes.
The best animation often combines both.
Wiggle vs Noise Effects
Noise effects modify image appearance.
Wiggle changes property values procedurally.
However, both rely on variation and randomness conceptually.
You can combine them for more sophisticated organic effects.
A Better Wiggle Workflow
Use this sequence:
1. Decide what should feel random
Position? Rotation? Light intensity?
2. Start with small values
Avoid extreme motion.
3. Adjust frequency
How fast should behavior change?
4. Adjust amplitude
How large should variation be?
5. Combine properties carefully
Position plus Rotation can feel more natural.
6. Use controls
Add Sliders when you need easy adjustment.
7. Animate the amount
Don’t assume Wiggle needs to run constantly.
8. Add motion blur if needed
Fast movement may require it.
9. Preview at normal speed
Procedural motion must be judged in motion.
10. Simplify
Remove Wiggle if it distracts from the design.
Five Wiggle Exercises
Exercise 1 — Floating Logo
Position:
wiggle(0.3,10)
Add a very subtle Rotation Wiggle.
Exercise 2 — Camera Shake
Use a higher-frequency Position Wiggle.
Compare mild and aggressive settings.
Exercise 3 — Flickering Light
Apply Wiggle to intensity or Opacity.
Exercise 4 — Stop-Motion Text
Combine posterizeTime() and Wiggle.
Exercise 5 — Controlled Impact
Use a Slider Control to animate the Wiggle amplitude from zero to strong and back to zero.
These exercises demonstrate most of the important beginner concepts.
Common Wiggle Mistakes
Mistake 1: Values Are Too Large
Procedural motion quickly becomes distracting.
Mistake 2: Frequency Is Too High
The animation can become visually noisy.
Mistake 3: Everything Wiggles
Not every layer needs random movement.
Mistake 4: No Creative Purpose
Wiggle should support the design or effect.
Mistake 5: No Motion Blur
Fast movement can look unnaturally sharp.
Mistake 6: Hard-Coding Everything
Use Slider Controls when adjustments need to remain accessible.
Mistake 7: Ignoring Separate Dimensions
You may not want random movement on every axis.
Mistake 8: Continuous Shake
Camera shake often looks better when triggered by specific events.
Mistake 9: Using Wiggle Instead of Better Keyframes
Randomness isn’t a replacement for deliberate animation.
Mistake 10: Never Previewing at Full Speed
The expression’s numbers matter less than what the viewer sees.
Wiggle Settings Cheat Sheet
Here are some useful starting points.
Gentle Floating
wiggle(0.2,10)
Slow and subtle.
Mild Organic Motion
wiggle(1,15)
Useful for simple graphic elements.
Handheld Style
wiggle(1.5,8)
Small movement with moderate frequency.
Energetic Shake
wiggle(8,20)
Useful as a starting point for stronger shake.
Extreme Impact
wiggle(12,50)
Use briefly and carefully.
Slow Rotation Drift
wiggle(0.3,2)
Good for floating graphics.
These aren’t universal presets.
Composition size and subject scale matter.
Treat them as starting points.
Resolution Matters
An amplitude of 20 pixels looks different in:
1920 × 1080
than in:
3840 × 2160
It also looks different on a small icon compared with a full-frame camera layer.
Always judge the visual result rather than blindly copying numbers from tutorials.
Can Wiggle Create Realistic Camera Shake?
Yes, particularly for stylized effects and impact animation.
But real handheld motion contains complex physical characteristics.
Simple Wiggle can sometimes feel too random.
More advanced setups may combine:
- multiple frequencies;
- separate Position and Rotation variation;
- keyframed intensity;
- motion blur.
The goal is not mathematical randomness.
The goal is believable movement.
Can Wiggle Loop Perfectly?
Basic Wiggle is procedural and doesn’t automatically create a perfectly seamless loop over a specified duration.
If you’re creating looping backgrounds for GIFs, social content, or repeating animations, more specialized techniques may be required.
For ordinary compositions, this usually isn’t a problem.
Can Wiggle Work with Effects?
Yes.
Any suitable animatable property may potentially be controlled with expressions.
Examples include:
- Blur Amount;
- Glow Intensity;
- Exposure;
- Distortion;
- effect positions;
- color-related controls.
This is where Wiggle moves beyond simple movement and becomes a general procedural-animation tool.
Can Wiggle Control Audio?
Wiggle itself doesn’t directly analyze audio.
But you can combine expressions with audio-derived values.
For example:
Audio amplitude
could influence:
Wiggle amplitude.
Louder music could create stronger procedural movement.
This allows complex audio-reactive animation.
Can You Save Wiggle Presets?
Yes.
Once you create a useful expression setup, you can save animation presets or reusable project components depending on your workflow.
For example, you might create:
- subtle float preset;
- impact shake preset;
- neon flicker preset;
- handheld motion rig.
Build your own library over time.
Wiggle and Motion Graphics Templates
Expression-driven Wiggle controls can also be incorporated into reusable template systems.
Instead of editing code, users can adjust:
- frequency;
- intensity;
- enable/disable state.
This makes procedural motion easier for editors who don’t need to understand the underlying expression.
Do You Need Plug-Ins?
No.
wiggle() is built directly into After Effects’ expression engine.
You can create sophisticated procedural movement without any third-party tools.
Some plug-ins simplify camera shake and random motion, but understanding Wiggle gives you much more control over what they’re automating.
Is Wiggle Worth Learning?
Absolutely.
If you learn only a few After Effects expressions, Wiggle should be one of them.
The syntax is simple.
The concept is intuitive.
And it solves many real animation problems.
You can start using it in minutes.
But mastering it involves learning restraint and control.
The best Wiggle often isn’t the most noticeable Wiggle.
It simply makes the animation feel more alive.
Practice Wiggle in Adobe After Effects
Create one square.
Apply:
wiggle(2,50)
Watch it.
Then change it to:
wiggle(0.2,5)
Watch again.
You’ve changed only two numbers, but the animation now has a completely different personality.
Then try the expression on:
- Rotation;
- Scale;
- Opacity.
Add a Slider Control.
Animate the amount.
Within one short practice session, you’ll understand why Wiggle has remained one of the most popular After Effects expressions.
If you’d like to experiment with expressions and procedural animation yourself, you can explore Adobe’s current After Effects options below:
Get Adobe After Effects and start creating procedural animation
Frequently Asked Questions
What does Wiggle do in After Effects?
The wiggle() expression generates changing procedural values that create random-looking animation.
What does wiggle(2,50) mean?
The first number controls frequency and the second controls amplitude. On Position, this roughly means two variations per second with around 50 pixels of movement.
Can Wiggle animate Position?
Yes. Position is one of the most common uses.
Can Wiggle animate Rotation?
Yes.
Can Wiggle control Opacity?
Yes, though you should ensure the resulting values remain visually appropriate.
Can Wiggle create camera shake?
Yes. High-frequency, moderate-amplitude Wiggle can be used to create camera-shake effects.
Can I use Wiggle with keyframes?
Yes. Wiggle can add procedural variation on top of keyframed motion.
Can I control Wiggle with a Slider?
Yes. Expression Controls are an excellent way to expose Wiggle frequency or amplitude as adjustable parameters.
Can Wiggle affect only X or Y?
Yes. You can separate Position dimensions or construct an expression that modifies only the desired axis.
Can I stop Wiggle?
Yes. Conditional expressions or an animated amplitude control can make Wiggle start and stop.
Can I fade camera shake out?
Yes. Animate a Slider controlling the Wiggle amplitude from a high value down to zero.
Does Wiggle require a plug-in?
No. It is a native After Effects expression function.
Is Wiggle random every frame?
Wiggle generates procedural variation over time rather than simply choosing an unrelated random value every frame.
What Should You Learn Next?
The next expression to master is loopOut().
Wiggle creates automatic procedural movement.
loopOut() solves a different repetitive problem:
repeating keyframed animation.
You create an animation once.
Then After Effects repeats it automatically.
This is invaluable for:
- spinning icons;
- moving backgrounds;
- repeating UI animations;
- loading graphics;
- bouncing objects;
- endless cycles.
The next tutorial will therefore be:
How to Loop Animations in Adobe After Effects with loopOut().
We’ll cover Cycle, Pingpong, Offset, Continue, looping only part of an animation, and the common mistakes that prevent loops from appearing seamless.
Final Thoughts
The Wiggle expression is a perfect introduction to the power of After Effects expressions.
One simple line:
wiggle(2,50)
can replace a large collection of manually created keyframes.
But the real skill is learning how to control the randomness.
Use:
Frequency
to control how quickly the movement changes.
Use:
Amplitude
to control how strong the movement becomes.
Use:
Slider Controls
to make the behavior easy to adjust.
Use:
keyframes
to control when the Wiggle becomes active.
Use:
separate dimensions
when you only want movement along one axis.
And use:
restraint
to keep the animation intentional.
Start with gentle floating motion.
Then create camera shake.
Then try flickering lights.
Then animate the Wiggle intensity.
Once you understand those techniques, you’ll have moved beyond simply copying an expression.
You’ll understand how to use procedural randomness as a deliberate motion-design tool.
Explore Adobe After Effects and start experimenting with the Wiggle expression






