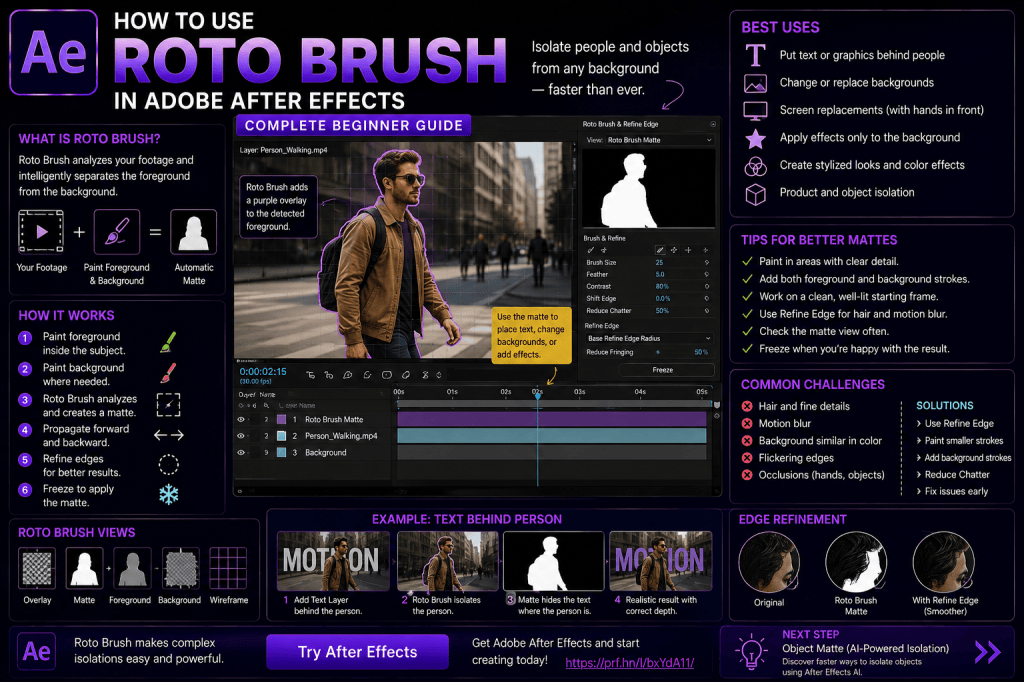
Removing a person from the background used to mean hours of manually drawing and animating masks.
Adobe After Effects makes this process considerably easier with Roto Brush.
Roto Brush lets you identify the foreground subject in a video and then helps propagate that selection through neighboring frames. Instead of manually tracing every edge on every frame, you give After Effects information about what should be foreground and what should be background.
This makes Roto Brush extremely useful for:
- isolating people;
- separating foreground objects;
- putting text behind a subject;
- replacing backgrounds;
- creating selective effects;
- fixing screen replacements;
- building composites;
- creating stylized social-media effects.
In this beginner guide, we’ll look at how Roto Brush works, how to create your first selection, propagate it through a shot, correct mistakes, refine difficult edges, use Refine Edge, freeze the result, and integrate the isolated subject into a finished composition.
Affiliate disclosure: This article contains affiliate links. If you purchase Adobe After Effects through one of these links, we may earn a commission at no additional cost to you.
What Is Rotoscoping?
Rotoscoping is the process of separating an object or person from the rest of an image sequence.
Imagine footage of someone walking through a city.
You want to place large typography behind the person but in front of the buildings.
The original footage is essentially one flat image.
After Effects doesn’t automatically see:
Person
Buildings
Street
It sees pixels.
To put something behind the person, you first need a foreground version containing the isolated subject.
Traditionally, artists accomplished this by manually drawing masks around the subject and adjusting those masks as the person moved.
That’s rotoscoping.
What Is Roto Brush?
Roto Brush is an assisted rotoscoping tool in Adobe After Effects.
Instead of manually tracing a complete mask around the subject on every frame, you indicate which image regions belong to the foreground.
After Effects then analyzes the image and attempts to determine the subject boundary.
It propagates that segmentation through additional frames.
The basic workflow is:
Choose subject → Create selection → Propagate → Correct → Refine → Freeze
The software handles much of the repetitive work.
You remain responsible for evaluating and correcting the result.
Why Learn Roto Brush?
Even with newer AI-assisted segmentation technologies, understanding Roto Brush remains valuable because subject isolation appears constantly in visual-effects and motion-design work.
You might want to:
- place text behind someone;
- change a background;
- color-correct only a person;
- apply effects behind a subject;
- insert graphics between foreground and background;
- create clones;
- isolate a product;
- preserve fingers over a replaced phone screen.
Roto Brush provides a practical bridge between simple masking and more advanced compositing.
Roto Brush vs Masks
Masks and Roto Brush can both isolate objects.
But they work differently.
Masks
You manually define paths around the object.
This works particularly well for:
- geometric objects;
- simple boundaries;
- short shots;
- predictable movement.
Roto Brush
You identify foreground regions and let After Effects help determine the boundary.
This can be much more practical for:
- people;
- clothing;
- irregular objects;
- hair;
- organic shapes.
Professional workflows may combine both.
Roto Brush vs Motion Tracking
Motion tracking follows movement.
Roto Brush isolates image regions.
These solve different problems.
Suppose someone walks through the frame.
Motion tracking might tell you where their head moves.
Roto Brush can help separate their entire body from the background.
You might use both techniques in the same composition.
Roto Brush and Screen Replacement
In our previous tutorial, we replaced a screen using Mocha AE.
One common problem was a person’s hand covering part of the display.
Your replacement layer may accidentally appear over the fingers.
Roto Brush can help isolate the hand.
Then you can create a layer structure like:
Foreground hand
Replacement screen
Original footage
Now the fingers correctly appear in front of the replacement.
This is an excellent example of multiple After Effects techniques working together.
Before You Start
For your first Roto Brush project, choose easy footage.
Look for a subject with:
- clear separation from the background;
- reasonably sharp edges;
- limited motion blur;
- consistent lighting;
- moderate movement.
Avoid starting with blowing hair against a complicated background.
You can tackle that later.
If you want to practice the techniques in this guide yourself, you can check Adobe’s current After Effects options here:
Explore Adobe After Effects and current plans
Step 1: Import Your Footage
Import your video into After Effects.
Create a composition.
Place the footage in the Timeline.
For learning purposes, choose a short section.
Five to ten seconds is plenty.
Rotoscoping longer footage requires more processing and more opportunities for errors.
Step 2: Duplicate the Footage
It’s often useful to keep an untouched copy of the original footage.
Duplicate the layer.
You can then use:
Top layer → isolated foreground
Bottom layer → original footage
This makes it easier to create depth effects later.
Step 3: Open the Layer Panel
Roto Brush work is performed in the Layer panel, not simply by painting directly in the normal Composition panel.
Double-click the footage layer.
The Layer panel opens.
Make sure you’re working on the correct layer.
Step 4: Select the Roto Brush Tool
Choose the Roto Brush Tool from the toolbar.
Move to a frame where your subject is clearly visible.
This becomes an important starting point for the segmentation.
Choose a frame where:
- the subject is easy to identify;
- important body parts are visible;
- edges are relatively clear.
Step 5: Paint Inside the Subject
Instead of carefully tracing around the edge, paint a stroke inside the foreground subject.
For example, if you’re isolating a person, draw a stroke through their torso.
After Effects analyzes the region and attempts to identify the subject.
A boundary appears around what it believes belongs to the foreground.
This is your initial segmentation.
You Don’t Need to Paint the Entire Subject
A common beginner mistake is trying to color in the entire person.
That’s not the purpose of the Roto Brush stroke.
You’re providing examples.
You’re essentially telling After Effects:
“Pixels like these belong to my foreground.”
Use enough strokes to identify the subject, but don’t unnecessarily paint every pixel.
Adding Foreground Areas
Suppose After Effects correctly selects the person’s torso but misses an arm.
Add another foreground stroke inside the missing arm.
After Effects updates the segmentation.
Continue until the major foreground regions are correctly identified.
Removing Background Areas
Sometimes After Effects includes part of the background.
For example, the subject stands beside a chair and part of the chair becomes selected.
Use the Roto Brush subtraction behavior to tell After Effects:
“This region is background.”
Paint over the incorrectly included region.
The selection updates.
This process of adding and subtracting information is fundamental to Roto Brush.
Think in Terms of Training Examples
A useful way to understand Roto Brush is:
You’re giving After Effects examples of:
Foreground
and
Background
The better your examples, the better the segmentation can become.
You don’t need thousands of strokes.
You need strategically useful corrections.
Step 6: Inspect the Boundary
Zoom in.
Look carefully around:
- head;
- shoulders;
- arms;
- hands;
- legs;
- clothing.
Don’t worry about individual hairs yet.
First make sure the main body shape is correct.
If large regions are wrong, correct them before moving forward.
Step 7: Propagate Through the Footage
Once the starting frame looks good, move forward through the clip.
After Effects attempts to propagate the foreground segmentation from frame to frame.
Watch what happens.
The selection should continue following the subject.
But don’t assume every frame will be correct.
This is where your supervision becomes important.
What Is Propagation?
Propagation means After Effects uses information from previous frames to predict the subject boundary on subsequent frames.
For example:
Frame 1:
You identify the person.
Frame 2:
After Effects predicts where that person is.
Frame 3:
It continues.
And so on.
The goal is to reduce the amount of manual work required.
Correct Mistakes Early
Suppose the selection is good for 20 frames.
At frame 21, part of the person’s arm disappears from the selection.
Correct it immediately.
Add a foreground stroke.
Then continue.
Don’t allow a mistake to propagate through another hundred frames.
Errors can compound.
A useful rule is:
Correct problems near the frame where they begin.
Work in Short Sections
For difficult footage, don’t attempt to propagate through an entire long shot without checking.
Work progressively.
For example:
- Process a short section.
- Inspect it.
- Correct errors.
- Continue.
This gives you much more control.
The Roto Brush Span
After Effects uses a span of frames over which the Roto Brush segmentation is propagated.
Understanding this range helps you manage the rotoscoping process.
Your initial frame provides the base segmentation.
Propagation extends away from that frame.
For complex shots, you may need to work strategically rather than expecting one initial selection to solve everything.
Choose Good Base Frames
If the subject changes dramatically during a shot, one base frame may not provide ideal information for every moment.
For example:
At the beginning, the person faces the camera.
Later, they turn sideways.
Their silhouette changes substantially.
You may need additional corrections as the shot progresses.
This is normal.
Motion Blur
Motion blur is one of the major challenges in rotoscoping.
When a hand moves quickly, its edge isn’t clearly defined.
Instead, it becomes a blurred transition.
A perfectly hard matte would look unnatural.
Your final matte needs to preserve the visual character of that motion.
This is where edge-refinement tools become important.
Hair
Hair is another difficult area.
Individual strands can be:
- thin;
- semi-transparent;
- moving;
- similar in color to the background.
Don’t expect the basic Roto Brush boundary alone to solve every strand perfectly.
After Effects provides additional refinement tools designed for challenging edges.
Refine Edge Tool
The Refine Edge Tool can help with complex semi-transparent or detailed boundaries such as:
- hair;
- fur;
- motion-blurred edges.
Instead of treating every pixel as completely foreground or completely background, edge refinement can help preserve more nuanced transparency.
This can produce much more natural results.
When Should You Use Refine Edge?
Use it where you genuinely need complex edge detail.
Good examples include:
- hair;
- fur;
- blurred hands;
- soft fabric edges.
Don’t automatically paint Refine Edge around every part of the subject.
Clean, well-defined edges may already be handled adequately.
Use the right tool for the right region.
Viewing the Matte
When rotoscoping, it’s important to inspect the actual matte—not only the normal image.
A matte can be thought of as a grayscale representation of transparency.
Conceptually:
White = foreground
Black = background
Gray = partial transparency
Viewing the matte helps reveal problems that aren’t obvious against the original background.
Look for Holes
A common segmentation problem is unwanted holes inside the subject.
For example:
- part of a dark shirt becomes transparent;
- shadows on clothing disappear;
- space between fingers is interpreted incorrectly.
Inspect the matte carefully.
Correct important errors.
Look for Background Contamination
The opposite problem can also occur.
Small pieces of the background may remain attached to the subject.
This creates visible halos or chunks when you place the subject over a new background.
Zoom in and inspect difficult regions.
Roto Brush Matte Controls
After the basic segmentation is established, After Effects provides controls that can help refine the matte.
Depending on the current version and workflow, useful concepts can include:
- Feather;
- Contrast;
- Shift Edge;
- Reduce Chatter;
- motion-blur-related refinement;
- edge decontamination.
These controls can improve the final isolation.
Feather
Feather softens the matte boundary.
A small amount may help blend the subject naturally.
Too much creates a blurry halo.
Use feathering carefully.
Contrast
Contrast can make the matte boundary more defined.
Increasing it can produce a harder edge.
Whether that’s useful depends on the footage.
A sharp product may benefit from a more defined boundary.
Hair probably shouldn’t become a hard cutout.
Shift Edge
Shift Edge moves the matte boundary inward or outward.
This is extremely useful for removing small background halos.
If the matte extends slightly beyond the subject, shift the edge inward.
Be careful not to cut into important foreground detail.
Reduce Chatter
One of the most distracting rotoscoping problems is an edge that changes shape slightly from frame to frame.
This creates flickering or crawling around the subject.
This is sometimes called chatter.
Reduction controls can help stabilize the edge over time.
Again, don’t overprocess.
The subject’s real boundary may genuinely change.
Edge Color Contamination
Suppose a person was filmed against a green background.
Even after removing the background, their hair may contain green color spill.
Edge decontamination tools can help reduce unwanted background coloration along semi-transparent boundaries.
This can improve composites significantly.
Step 8: Preview the Entire Roto
Once you’ve propagated through the required range, preview the shot.
Watch it at normal speed.
Don’t judge only individual frames.
Look for:
- flickering;
- missing limbs;
- jumping edges;
- holes;
- background contamination;
- disappearing hair;
- sudden matte changes.
Make corrections where viewers are likely to notice them.
Don’t Chase Perfection at 800% Zoom
Rotoscoping can become an endless task.
You can always find another tiny edge imperfection when zoomed in extremely far.
Ask:
Will this problem actually be visible in the final output?
Consider:
- final resolution;
- playback speed;
- background;
- motion blur;
- duration.
Spend time where it improves the finished composite.
Step 9: Freeze the Roto Brush Result
Once you’re satisfied with the propagated segmentation, Freeze the result.
This is an important part of the workflow.
Freezing stores the Roto Brush propagation so After Effects doesn’t need to continually recalculate the entire segmentation while you’re working.
Depending on the shot, freezing can take some time.
Let it complete.
Why Freeze?
Before freezing, After Effects may need to recalculate Roto Brush information as you move through the project.
That can slow down the workflow.
Once you’ve finished refining the roto, freezing makes the result more stable for subsequent compositing work.
Think of Freeze as:
“I’m satisfied with this segmentation. Preserve it.”
Don’t Freeze Too Early
If you freeze before reviewing the entire shot, you may later discover mistakes.
You can modify the workflow again if necessary, but it’s more efficient to:
- create segmentation;
- propagate;
- correct;
- refine;
- preview;
- freeze.
Step 10: Return to the Composition
Now return to the main Composition panel.
Your layer should contain the isolated foreground subject.
If you kept an original footage layer underneath, the image may initially look unchanged.
Hide the original background layer.
You should see your isolated subject against transparency.
Put Text Behind a Person
Now let’s create one of the most popular Roto Brush effects.
Your layer structure:
Isolated person
Text
Original footage
Create large text.
For example:
MOTION
Place it behind the isolated foreground layer but above the original footage.
The text now appears behind the person.
As they move, the typography remains correctly occluded.
This effect is widely used in:
- social media;
- advertisements;
- music videos;
- sports content;
- title sequences.
Animate the Text
Don’t stop with static text.
Animate:
- Position;
- Scale;
- Tracking;
- Opacity.
For example, let the text move slowly across the scene while the person passes in front of it.
The foreground isolation creates convincing visual depth.
Replace the Background
Another common use is background replacement.
Your structure becomes:
Isolated subject
New background
The background might be:
- another video;
- photograph;
- gradient;
- motion graphic;
- 3D scene.
But successful background replacement requires more than just isolation.
You also need to match the new environment.
Match Lighting
If the subject was filmed under warm indoor lighting but the replacement background is a cold blue outdoor scene, the composite may look wrong.
Consider:
- exposure;
- contrast;
- color temperature;
- light direction.
Color correction can help integrate the subject.
Match Depth of Field
Suppose the original subject is sharply focused.
The replacement background should have an appropriate amount of blur based on the intended camera characteristics.
A perfectly sharp distant background can make the composite look artificial.
Match Grain
The subject footage may contain sensor noise or grain.
A digitally generated background may be perfectly clean.
Add compatible texture where appropriate.
Consistency helps sell the composite.
Add Contact Shadows
If the subject is standing on a replacement floor, they need visual contact with that surface.
Without shadows, they may appear to float.
Create appropriate:
- contact shadow;
- ambient darkening;
- directional shadow.
This is often more important than people expect.
Roto Brush for Selective Color Effects
You don’t need to remove the background completely.
You can use the isolated subject to apply different treatments to foreground and background.
For example:
Subject = full color
Background = black and white
Duplicate the footage.
Use Roto Brush on the upper layer.
Desaturate the lower layer.
Now the person remains colorful while everything else becomes monochrome.
Blur the Background
Another simple effect:
Top layer → isolated subject
Bottom layer → blurred original footage
Apply blur to the background layer.
The subject remains sharp.
This can simulate a stronger depth-of-field effect.
Use it subtly.
Put Effects Behind the Subject
Once the foreground is isolated, you can insert almost anything behind it:
- particles;
- light streaks;
- animated shapes;
- typography;
- fire;
- smoke;
- interface graphics.
The roto layer automatically provides foreground occlusion.
This is one reason subject isolation is such an important compositing skill.
Roto Brush and 3D Camera Tracking
These two tools work particularly well together.
Imagine a camera moving through a street while a person walks in the foreground.
You want 3D text attached to a building but partially hidden behind the person.
You could:
- use 3D Camera Tracker to position the text;
- use Roto Brush to isolate the person;
- place the isolated person above the tracked text.
Layer structure:
Rotoscoped person
3D tracked text
Original footage
Now the text feels embedded in the real scene.
Roto Brush and Mocha AE
The same principle applies to screen replacement.
Mocha AE tracks the screen.
Roto Brush isolates foreground fingers.
Layer structure:
Rotoscoped fingers
Mocha-tracked replacement
Original footage
This combination can produce convincing device composites.
Roto Brush and Track Mattes
Your isolated foreground can also become useful matte information.
For example, you could use the subject silhouette to control the visibility of:
- textures;
- effects;
- graphics.
Once you understand mattes, masks, and Roto Brush, these workflows become increasingly interconnected.
Roto Brush for Product Isolation
Roto Brush isn’t only for people.
You can experiment with isolating:
- cars;
- furniture;
- clothing;
- consumer products;
- animals.
Success depends on the footage.
Objects with clear boundaries and contrast are generally easier.
Common Roto Brush Problems
Problem 1: Selection Keeps Expanding Into Background
Add carefully placed background subtraction strokes.
Problem 2: Parts of Subject Disappear
Add foreground strokes on the first frame where the error appears.
Problem 3: Hair Looks Terrible
Use edge refinement where appropriate and inspect the matte.
Problem 4: Edge Flickers
Review propagation and experiment with chatter-reduction/refinement controls.
Problem 5: Background Halo
Adjust edge position, feathering, and contamination controls.
Problem 6: Processing Is Slow
Work only on the footage range you actually need and freeze once finished.
Common Beginner Mistakes
Mistake 1: Painting the Entire Subject
Roto Brush strokes are guidance, not coloring.
Mistake 2: Using Too Many Strokes Immediately
Start with minimal useful information.
Mistake 3: Ignoring the First Bad Frame
Correct errors when they begin.
Mistake 4: Starting with Extremely Difficult Footage
Learn on clean footage first.
Mistake 5: Refining Hair Before Fixing the Main Body
Solve the large segmentation first.
Mistake 6: Never Viewing the Matte
Inspect transparency directly.
Mistake 7: Over-Feathering
This creates visible halos.
Mistake 8: Freezing Too Early
Review the entire required span first.
Mistake 9: Expecting Automatic Perfection
Roto Brush assists the process; it doesn’t eliminate supervision.
Mistake 10: Ignoring the Final Composite
A technically good matte can still look wrong if lighting, color, grain, and depth don’t match.
A Better Roto Brush Workflow
Use this sequence:
1. Trim the shot
Only process frames you need.
2. Find a strong base frame
Choose a clear view of the subject.
3. Add a simple foreground stroke
Let After Effects estimate the subject.
4. Correct large errors
Add or subtract regions.
5. Propagate gradually
Inspect as you move.
6. Correct problems early
Don’t allow errors to compound.
7. Refine difficult edges
Hair, fur, motion blur.
8. Inspect the matte
Look for holes and contamination.
9. Preview at normal speed
Evaluate temporal stability.
10. Freeze
Lock the result.
11. Composite
Add backgrounds, text, effects, or screen replacements.
12. Match the image
Color, blur, grain, lighting, and shadows.
Five Roto Brush Exercises
Exercise 1 — Simple Person
Isolate someone standing against a relatively plain background.
Exercise 2 — Walking Person
Use footage with moderate movement.
Practice propagation corrections.
Exercise 3 — Text Behind Subject
Create the popular foreground-text effect.
Exercise 4 — Background Replacement
Place the isolated person into another environment.
Exercise 5 — Hand Over Phone
Combine Roto Brush with a screen replacement.
These exercises progressively introduce more realistic compositing problems.
How Long Does Rotoscoping Take?
There is no single answer.
A clean five-second shot may be relatively straightforward.
A shot containing:
- flying hair;
- fast hands;
- motion blur;
- overlapping people;
- changing lighting;
- complex backgrounds;
can require substantially more work.
The goal of Roto Brush is not to make every roto instant.
It’s to reduce the amount of manual labor required compared with purely frame-by-frame masking.
Can Roto Brush Replace Manual Masks?
Sometimes.
But not always.
Masks remain useful for:
- cleanup;
- simple objects;
- garbage mattes;
- geometric regions;
- corrections.
A practical workflow may use Roto Brush for the subject and masks for additional cleanup.
Don’t think in terms of:
Roto Brush OR Masks
Think:
Which combination solves this shot efficiently?
Roto Brush and Modern AI Workflows
Adobe continues developing more intelligent selection and object-isolation capabilities in After Effects.
These newer tools can significantly reduce the amount of manual work involved in certain segmentation tasks.
But the underlying compositing problem remains the same:
Separate foreground from background accurately over time.
Understanding Roto Brush teaches you how to evaluate:
- matte quality;
- edge behavior;
- temporal consistency;
- occlusion;
- motion blur.
Those skills remain useful regardless of which segmentation technology generates the first result.
Is Roto Brush Worth Learning in 2026?
Yes.
Even as AI-assisted isolation improves, Roto Brush remains valuable for understanding and controlling subject segmentation.
More importantly, learning rotoscoping teaches you how to think like a compositor.
You begin noticing:
- edges;
- transparency;
- depth;
- foreground;
- background;
- occlusion;
- motion blur.
These concepts are fundamental to visual effects.
Do You Need Plug-Ins?
No.
You can learn and perform Roto Brush workflows using the tools available within Adobe After Effects.
Specialized third-party rotoscoping and compositing tools exist, but they’re not necessary for learning the core process.
If you want to practice Roto Brush and other After Effects compositing tools yourself, you can check Adobe’s current options below:
Get Adobe After Effects and start practicing Roto Brush
Frequently Asked Questions
What is Roto Brush in After Effects?
Roto Brush is an assisted rotoscoping tool that helps separate foreground subjects from backgrounds across multiple video frames.
What is rotoscoping?
Rotoscoping is the process of isolating objects or subjects from video footage over time.
Is Roto Brush automatic?
It automates much of the segmentation and propagation process, but user input and corrections are often still required.
Can Roto Brush remove backgrounds?
It can help isolate the foreground subject so the original background can be hidden or replaced.
Can Roto Brush isolate hair?
Yes, particularly when combined with appropriate edge-refinement techniques, although complex hair can still require careful work.
What does Freeze do?
Freeze stores the propagated Roto Brush result so After Effects doesn’t continually recalculate it during subsequent work.
Can Roto Brush isolate hands?
Yes. This is useful for screen replacement when fingers pass in front of a phone or tablet.
Is Roto Brush better than masks?
Neither is universally better. Roto Brush is often more efficient for complex organic subjects, while masks can be preferable for simple or geometric boundaries.
Can I put text behind a person with Roto Brush?
Yes. Isolate the person on an upper layer, place text beneath that layer, and keep the original footage at the bottom.
Can Roto Brush work with 3D Camera Tracker?
Yes. Roto Brush can provide foreground occlusion while 3D Camera Tracker positions graphics within the scene.
Can Roto Brush work with Mocha AE?
Yes. A common example is using Mocha to track a device screen and Roto Brush to isolate fingers passing in front of it.
What Should You Learn Next?
Roto Brush introduces us directly to one of the biggest changes happening in modern After Effects:
AI-assisted object isolation.
Adobe has been developing tools designed to make it faster to identify and separate objects without traditional frame-by-frame rotoscoping.
That makes the next article in this series:
Adobe After Effects Object Matte: How AI-Powered Object Isolation Works.
We’ll examine how AI-assisted object isolation differs from traditional masks and Roto Brush, where it can save time, where manual cleanup may still be necessary, and how it fits into a modern compositing workflow.
Final Thoughts
Roto Brush is one of the tools that can dramatically change your After Effects workflow.
Before learning it, isolating a moving person may sound like:
“I need to manually trace every frame.”
After learning Roto Brush, the workflow becomes:
Identify.
Propagate.
Correct.
Refine.
Freeze.
That doesn’t mean rotoscoping becomes effortless.
Complex footage still requires patience and judgment.
But Roto Brush gives you a much more efficient starting point.
Begin with simple footage.
Isolate a person.
Put text behind them.
Then replace the background.
Next, try hair.
Then try a hand passing over a phone screen.
Finally, combine Roto Brush with motion tracking, Mocha AE, track mattes, and 3D Camera Tracking.
At that point, you’re no longer learning isolated After Effects features.
You’re learning how a real compositing workflow is assembled from multiple tools.
And that’s where After Effects becomes considerably more powerful.
Explore Adobe After Effects and start creating your own compositing effects






