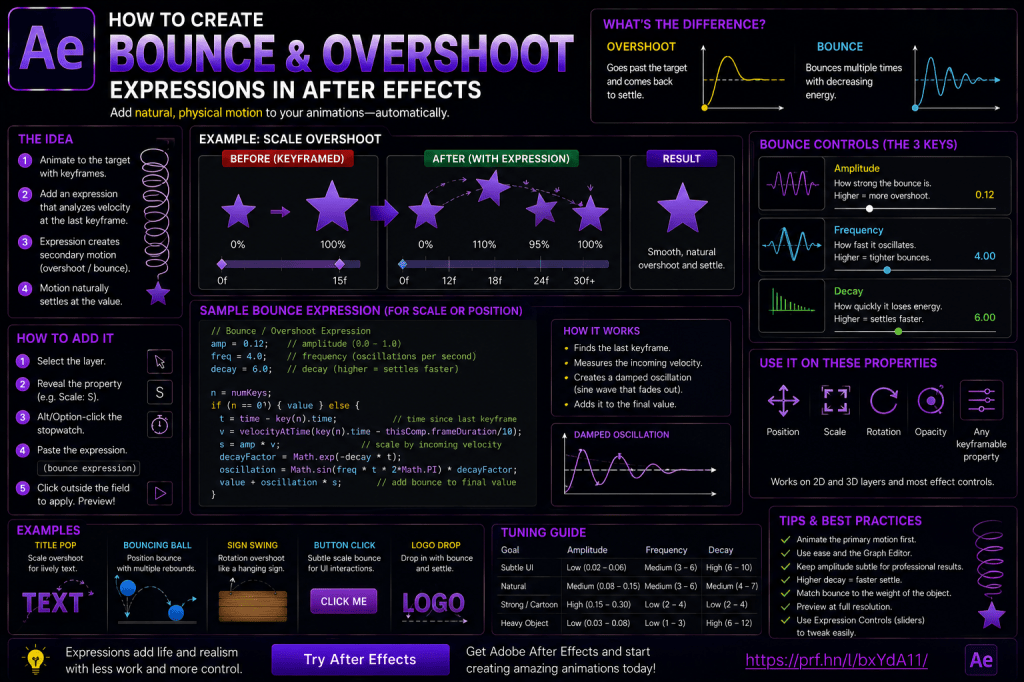
Smooth animation is important in Adobe After Effects, but perfectly smooth movement isn’t always realistic.
When a physical object moves quickly and stops, it often doesn’t simply reach its final position and become completely motionless.
It may:
- overshoot;
- bounce;
- spring back;
- wobble;
- settle gradually.
Motion designers frequently recreate this behavior to make animation feel more natural and energetic.
You can build bounce manually with keyframes and the Graph Editor, but After Effects expressions can automate much of the process.
A bounce or overshoot expression can take a relatively simple keyframed movement and generate secondary motion automatically.
In this guide, we’ll explore how bounce and overshoot work, the difference between them, how amplitude, frequency, and decay affect the result, how to apply these techniques to Position, Scale, and Rotation, and when expressions are preferable to manually animated keyframes.
Affiliate disclosure: This article contains affiliate links. If you purchase Adobe After Effects through one of these links, we may earn a commission at no additional cost to you.
What Is an Overshoot Animation?
Overshoot happens when an animated property moves beyond its intended destination before returning to the final value.
Imagine a title moving into position.
Instead of:
Start → Final Position → Stop
it behaves more like:
Start → Past Final Position → Back → Settle
That extra movement creates a sense of momentum.
Overshoot is common in:
- logo animation;
- typography;
- UI animation;
- product graphics;
- character motion;
- motion-design transitions.
What Is Bounce Animation?
Bounce is related to overshoot but generally creates more obvious repeated movement after the primary animation.
Think of a ball hitting the floor.
It doesn’t simply stop.
Instead:
Impact
↓
Bounce
↓
Smaller bounce
↓
Even smaller bounce
↓
Rest
A bounce expression attempts to generate this diminishing secondary motion automatically.
Bounce vs Overshoot
The terms are sometimes used loosely, but it helps to distinguish them.
Overshoot
The animation passes beyond its target and settles back.
Bounce
The animation creates one or more noticeable rebounds.
Spring
The property oscillates around its final value while gradually losing energy.
All three are related to the same general principle:
motion has momentum.
Why Use Expressions?
You can absolutely create bounce manually.
For example, animate Scale:
0%
↓
115%
↓
95%
↓
103%
↓
100%
This works.
But expressions offer several advantages.
They can automatically calculate secondary movement from your existing keyframes.
This means you can adjust the primary animation without manually rebuilding every bounce.
Manual Bounce vs Expression Bounce
Manual keyframes give you:
- precise artistic control;
- direct Graph Editor access;
- predictable timing;
- custom poses.
Expressions give you:
- automatic secondary motion;
- reusable setups;
- fewer keyframes;
- faster iteration;
- parameter-driven control.
Neither method is universally better.
Professional motion designers often use both.
Before Learning Bounce Expressions
You should already understand:
- keyframes;
- Easy Ease;
- the Graph Editor;
- basic expressions;
value;- simple variables.
You don’t need to be a programmer.
But bounce expressions are more complex than:
wiggle()
or:
time * 90
That’s normal.
You don’t need to memorize the code immediately.
Instead, learn what each part controls.
If you’re learning After Effects and want to experiment with expressions yourself, you can explore Adobe’s current After Effects options here:
Explore Adobe After Effects and current plans
The Basic Bounce Concept
Most bounce expressions follow the same conceptual process.
After Effects determines:
- where the most recent keyframe occurred;
- how fast the property was moving;
- how much time has passed;
- how strong the bounce should be;
- how quickly the bounce should decay.
The expression then adds secondary movement to the property’s normal value.
Conceptually:
Original animation
decaying oscillation
=
bounce
Understanding Velocity
Velocity is extremely important.
If an object reaches its destination slowly, you probably don’t want an enormous bounce.
If it arrives quickly, stronger secondary motion may make sense.
Many bounce expressions therefore examine the property’s velocity near the final keyframe.
This allows the bounce to respond to the animation rather than using an arbitrary fixed movement.
Understanding Amplitude
Amplitude controls how large the secondary movement becomes.
Think:
Higher amplitude = stronger bounce
Lower amplitude = subtler bounce
For professional motion graphics, small amplitude values often work better than exaggerated ones.
Understanding Frequency
Frequency controls how quickly the oscillation occurs.
Higher frequency produces:
fast, tight bouncing
Lower frequency produces:
slower, broader movement
Different objects suggest different frequencies.
A small UI button might respond quickly.
A large heavy sign might move more slowly.
Understanding Decay
Decay determines how quickly the secondary movement disappears.
High decay:
bounce stops quickly
Low decay:
bounce continues longer
This is one of the most important parameters.
Without sufficient decay, the object may continue wobbling for too long.
The Three Core Bounce Controls
When working with many bounce or overshoot expressions, remember:
Amplitude
How far?
Frequency
How fast?
Decay
How long?
Those three ideas appear repeatedly in procedural animation.
Create a Basic Scale Overshoot
Let’s begin without expressions.
Create a Shape Layer.
Animate Scale:
Frame 0 → 0%
Frame 15 → 100%
Preview.
The object simply grows and stops.
Now add an overshoot keyframe:
Frame 12 → 110%
Frame 18 → 97%
Frame 24 → 100%
The object now feels more energetic.
This manual example helps you understand what an expression is trying to automate.
Why Scale Overshoot Works
When something appears quickly, a slight overshoot suggests elasticity.
This is common in:
- pop-up graphics;
- notification icons;
- logos;
- titles;
- interface elements.
But avoid excessive bounce.
A professional corporate title probably shouldn’t behave like a rubber ball unless that’s intentionally part of the style.
Create Position Overshoot
Animate an object moving from left to center.
Without overshoot:
Left → Center → Stop
With overshoot:
Left → Slightly past center → Back → Center
This creates momentum.
It can make simple title animation feel much more polished.
Create Rotation Overshoot
Imagine a sign rotating into place.
Instead of:
-90° → 0°
use:
-90° → 8° → -3° → 0°
The sign rotates past its final orientation and settles.
An expression can generate similar secondary rotation automatically.
The Expression Approach
A typical bounce expression may contain:
- variables;
- keyframe references;
- velocity calculations;
- sine functions;
- exponential decay.
That sounds complicated.
But the underlying logic is simple:
Find the final keyframe.
Measure the incoming movement.
Generate oscillation.
Reduce that oscillation over time.
A Common Overshoot Expression Structure
A reusable overshoot expression often follows a pattern similar to:
amp = 0.05;
freq = 4.0;
decay = 5.0;
followed by calculations that use keyframe velocity and elapsed time to create a damped oscillation.
The exact implementation can vary.
What’s important initially is understanding those parameters.
Amp
A variable such as:
amp
typically represents amplitude.
Increase it and the overshoot becomes stronger.
Decrease it and the motion becomes subtler.
Freq
A variable such as:
freq
usually controls oscillation frequency.
Higher values make the spring move back and forth more rapidly.
Decay
A variable such as:
decay
usually determines how rapidly the oscillation loses energy.
Increase decay and the movement settles faster.
Why Variables Are Useful
Instead of burying numbers inside a long formula, variables make expressions easier to understand.
Compare a complicated formula full of unexplained numbers with:
amp = 0.05;
freq = 4;
decay = 6;
You immediately know which values to experiment with.
Don’t Memorize the Entire Expression
This is worth emphasizing.
You don’t need to memorize a complete bounce formula.
Even experienced After Effects users frequently:
- save expressions;
- reuse them;
- adapt them;
- reference documentation.
Your goal is to understand:
what the expression does
and:
which parameters you should change.
Add Bounce to Scale
A common workflow is:
- Create two Scale keyframes.
- Animate from small to full size.
- Apply easing.
- Add the bounce expression.
- Adjust amplitude.
- Adjust frequency.
- Adjust decay.
The expression then creates secondary Scale motion after the final keyframe.
Example: Pop-Up Icon
Create a circle.
Animate Scale:
0% → 100%
over approximately 10–15 frames.
Apply Easy Ease.
Then add subtle overshoot.
The icon can grow beyond 100%, contract slightly, and settle.
This is useful for:
- notification graphics;
- app demonstrations;
- explainer videos;
- social-media animation.
Bounce Position
Bounce expressions can also work with Position.
Imagine a title dropping downward.
Primary animation:
Above screen → Final Position
Secondary animation:
Slightly below target → Up → Down → Settle
This creates a sense of weight.
Direction Matters
A good bounce should generally relate to the incoming motion.
If an object travels downward, the initial rebound should make physical and visual sense.
Expressions that derive motion from velocity can help because they know how the property was moving when it reached the keyframe.
Bounce Rotation
Rotation overshoot is excellent for:
- hanging signs;
- logos;
- icons;
- pointers;
- interface switches.
For example:
-60° → 0°
followed by:
+8° → -3° → 0°
A procedural expression can calculate the diminishing oscillation.
Bounce Text
Apply bounce to a text layer’s:
- Position;
- Scale;
- Rotation.
A title can slide in, overshoot, and settle.
This works particularly well for:
- YouTube graphics;
- advertising;
- social content;
- playful branding.
Bounce Individual Characters
After Effects Text Animators allow much more advanced typography.
Individual characters can:
- bounce into position;
- scale with overshoot;
- rotate;
- appear sequentially.
This can produce highly dynamic title animation.
However, don’t sacrifice readability for movement.
Bounce Shape Layers
Shape Layers are excellent for practicing bounce expressions because their simple geometry makes motion easy to evaluate.
Try bouncing:
- circles;
- squares;
- icons;
- arrows.
Once you understand the effect, apply it to more complex designs.
Bounce UI Elements
UI animation frequently uses subtle spring behavior.
Examples include:
- buttons;
- toggles;
- notification cards;
- menus;
- icons.
The movement is usually restrained.
Modern interface animation often benefits from small overshoot rather than cartoon-like bouncing.
Bounce Logo Animation
A logo reveal may benefit from Scale overshoot.
For example:
0% → 105% → 100%
An expression can create additional settling.
But branding matters.
A financial-services logo might require very controlled motion.
A gaming brand may tolerate much stronger elasticity.
Heavy vs Light Objects
Different objects should appear to have different physical properties.
A heavy object generally suggests:
- slower motion;
- lower frequency;
- restrained bounce.
A lightweight object can tolerate:
- faster motion;
- greater overshoot;
- more elasticity.
Use expression parameters to reinforce perceived weight.
Rubber vs Metal
Imagine two objects hitting the same position.
Rubber ball
Large bounce.
Slower decay.
Several rebounds.
Metal block
Very small bounce.
Fast decay.
Little elasticity.
The animation should communicate material.
Expressions provide the controls, but you provide the physical interpretation.
Expression Controls
Instead of editing:
amp = ...
freq = ...
decay = ...
inside the expression every time, you can connect them to Slider Controls.
Create:
Bounce Amount
Bounce Frequency
Bounce Decay
Now the animation can be adjusted directly from the Effect Controls panel.
Why This Is Better
Slider Controls make the rig:
- easier to adjust;
- easier to understand;
- safer for other editors;
- suitable for templates.
This is an important progression in your After Effects expression skills.
Create a Bounce Controller
Create a Null Object named:
BOUNCE CONTROLS
Add three sliders:
Amplitude
Frequency
Decay
Connect multiple layers to those controls.
Now one controller can change the bounce behavior across several animated elements.
Per-Layer Controls
Alternatively, each layer can have its own controls.
This works better when different objects require different physical characteristics.
For example:
Heavy title
small amplitude.
Notification icon
larger amplitude.
Decorative shape
faster frequency.
Bounce and the Graph Editor
Expressions don’t make the Graph Editor obsolete.
Your initial keyframed motion still matters.
If the object approaches its destination poorly, the bounce may also feel poor.
Refine the main motion first.
Then add secondary movement.
Think:
Graph Editor = primary motion
Bounce expression = secondary response
Animate the Main Motion First
A useful workflow is:
- Ignore the bounce.
- Make the primary animation look good.
- Adjust timing.
- Adjust easing.
- Add the expression.
- Tune secondary movement.
This prevents bounce from hiding weak animation.
Bounce Isn’t a Fix for Bad Timing
Adding a spring expression to everything won’t automatically make your animation professional.
Good motion still depends on:
- timing;
- spacing;
- hierarchy;
- rhythm;
- visual intent.
Expressions are tools.
They aren’t substitutes for animation principles.
Overshoot Without Multiple Bounces
Sometimes you want just one subtle overshoot.
For example:
100 → 105 → 100
without continued oscillation.
In that case, manual keyframes may actually be easier.
Not every overshoot needs an expression.
When Expressions Make More Sense
Expressions become particularly valuable when:
- many layers use similar behavior;
- animation timing frequently changes;
- you need reusable templates;
- secondary motion should react automatically to velocity;
- you want adjustable controls.
When Manual Keyframes Make More Sense
Use manual animation when:
- the movement is unique;
- you need exact poses;
- the bounce needs artistic irregularity;
- only one or two layers are involved.
Choose based on workflow efficiency, not ideology.
Damped Oscillation
The mathematical idea behind many spring animations is damped oscillation.
Oscillation means:
movement back and forth.
Damping means:
the movement gradually loses energy.
Together:
large movement → smaller movement → smaller movement → rest
That’s exactly what we perceive as a spring settling.
Sine Waves and Bounce
Many procedural spring expressions use sine waves.
A sine wave naturally moves back and forth.
But an ordinary sine wave continues forever.
That’s where decay enters.
Add Decay
Conceptually:
Sine wave
×
decreasing amplitude
=
settling spring
At first, the movement is large.
Then the multiplier gets smaller.
Eventually the oscillation becomes visually negligible.
Why Exponential Decay Is Useful
Exponential decay reduces values quickly at first and increasingly slowly afterward.
This often produces natural-looking settling motion.
That’s why functions involving exponential decay appear frequently in spring and bounce expressions.
Bounce vs Elastic Easing
You may encounter animation tools or presets described as:
- elastic;
- spring;
- bounce;
- overshoot.
These terms overlap.
Elastic animation often stretches beyond the target multiple times.
Bounce animation often implies impacts or rebounds.
Overshoot usually means passing beyond a target before settling.
The exact terminology varies between tools.
Focus on the visual behavior.
Bounce Presets
After Effects includes animation presets, and third-party tools may also provide bounce and spring controls.
Presets can be useful.
But understanding expressions gives you greater flexibility.
You’ll know why the animation behaves the way it does and how to modify it.
Do You Need a Plug-In?
No.
You can create bounce and overshoot using:
- keyframes;
- Graph Editor;
- expressions;
- Expression Controls.
Third-party plug-ins can simplify the workflow, but they’re not required.
Motion Blur
Fast bounce animation can benefit from motion blur.
Enable Motion Blur for rapidly moving elements where appropriate.
This helps the secondary motion feel integrated rather than digitally sharp.
Anchor Point Matters
Scale and Rotation occur around the Anchor Point.
If your object bounces or rotates strangely, inspect the Anchor Point.
For example:
A button scaling from its center should usually have a centered Anchor Point.
A hanging sign rotating from its top should have the Anchor Point near the suspension point.
Expression behavior can be correct while the visual result is wrong because the Anchor Point is misplaced.
Parent Before or After Bounce?
Parenting can affect how transformations combine.
For complicated setups, consider whether the bounce belongs on:
- the child layer;
- a parent Null;
- a pre-composition.
Using a separate Null can make the animation easier to manage.
Separate Primary and Secondary Motion
A useful professional technique is to separate animation responsibilities.
For example:
Layer
contains the artwork.
Parent Null 1
controls main Position animation.
Parent Null 2
controls secondary bounce or rotation.
This makes complex movement easier to troubleshoot.
Example: Bouncing Title
Create a title.
Parent it to a Null.
Animate the Null from above the frame into position.
Use the Graph Editor for a strong entrance.
Then add secondary overshoot to the appropriate property.
The text maintains clean design structure while the motion system remains modular.
Example: Notification Pop
Create a notification card.
Animate:
Scale 0 → 100
and:
Opacity 0 → 100
Add subtle Scale overshoot.
The notification appears quickly and settles.
This is a common interface-animation pattern.
Example: Logo Drop
Place a logo above the frame.
Animate it downward.
Add Position bounce.
The logo passes slightly beyond its final point and rebounds.
Add Motion Blur.
This creates a much more physical entrance.
Example: Rotating Sign
Set the Anchor Point at the top.
Animate Rotation from:
-70° → 0°
Add spring-style overshoot.
The sign swings past zero and gradually settles.
This is an excellent demonstration of damped oscillation.
Example: Button Click
A button interaction can use a tiny Scale animation.
On click:
100% → 95% → 102% → 100%
You can build this manually or procedurally.
Small spring motion makes digital interfaces feel responsive.
Don’t Overdo UI Bounce
Interface animation should usually be quick.
If every button bounces for two seconds after a click, the UI feels slow.
Use:
- small amplitude;
- relatively high decay;
- appropriate frequency.
Motion should support usability.
Common Bounce Mistake: Too Much Amplitude
Large amplitude can make objects look rubbery.
Unless that style is intentional, reduce the amount.
A small overshoot may be all you need.
Common Bounce Mistake: Too Many Oscillations
If an element keeps wobbling, increase decay.
Most motion-design elements should settle relatively quickly.
Common Bounce Mistake: Wrong Frequency
Very fast oscillation can look like vibration.
Very slow oscillation can make the animation feel loose.
Match frequency to the perceived weight and material.
Common Bounce Mistake: Every Layer Uses the Same Settings
Different elements should not necessarily behave identically.
Vary:
- amplitude;
- frequency;
- decay.
This creates a more believable hierarchy.
Common Bounce Mistake: Bad Main Animation
Fix the primary movement first.
Then add bounce.
Common Bounce Mistake: Ignoring the Anchor Point
Especially with Scale and Rotation.
Common Bounce Mistake: Applying Bounce Everywhere
Secondary motion becomes meaningless when everything bounces.
Use it selectively.
Common Bounce Mistake: Copying Expressions Blindly
Understand which variables control the result.
You don’t need to understand every mathematical detail, but you should know how to tune the expression.
Common Bounce Mistake: Forgetting Expression Errors
Longer expressions are easier to break accidentally.
Watch for:
- missing semicolons;
- incorrect brackets;
- misspelled variables;
- invalid property references.
Read After Effects’ expression error messages carefully.
Building an Expression Library
Bounce expressions are excellent candidates for your personal expression library.
Create categories such as:
Bounce
Overshoot
Spring
Rotation
Scale
Position
Save tested versions.
Include notes describing:
- which property they’re designed for;
- useful parameter ranges;
- required controls.
Save Presets
Once your expression is connected to controls and working correctly, consider saving it as an Animation Preset.
Then you can reuse the setup in future projects.
This is much faster than rebuilding it every time.
Create Different Bounce Presets
For example:
Subtle UI Spring
small amplitude, quick decay.
Cartoon Bounce
larger amplitude, slower decay.
Heavy Object
low frequency, minimal rebound.
Logo Pop
moderate Scale overshoot.
Now you have practical starting points.
Five Bounce Exercises
Exercise 1 — Manual Scale Overshoot
Create:
0 → 110 → 95 → 100
Understand the movement before automating it.
Exercise 2 — Position Bounce
Drop a circle onto a baseline and create diminishing rebounds.
Exercise 3 — Rotation Spring
Animate a sign into place and add oscillation.
Exercise 4 — Expression-Controlled Bounce
Connect amplitude, frequency, and decay to Sliders.
Exercise 5 — Compare Heavy and Light Motion
Duplicate an object.
Make one feel heavy.
Make the other feel elastic.
These exercises teach both technical and animation principles.
A Practical Bounce Checklist
Before finalizing your animation, ask:
Does the main movement already look good?
Is the bounce direction logical?
Is the amplitude appropriate?
Does the frequency match the object’s weight?
Does it settle quickly enough?
Is Motion Blur needed?
Is the Anchor Point correct?
Does the bounce support the design?
If the answer to all eight is yes, you’re probably close.
Bounce Expressions for Beginners
Don’t worry if your first bounce expression looks intimidating.
You started expressions with something as simple as:
wiggle(2,50)
Then you learned:
loopOut()
Then:
time * 90
Bounce is simply the next step.
It introduces:
- variables;
- velocity;
- oscillation;
- decay.
These concepts will appear repeatedly as you learn more advanced expressions.
Why Bounce Expressions Are Worth Learning
They teach more than one visual effect.
They introduce the idea that expressions can react to animation.
The expression isn’t simply saying:
“Move randomly.”
or:
“Repeat this.”
It can analyze the property’s motion and generate new movement from it.
That’s a major step toward procedural animation.
Frequently Asked Questions
What is bounce animation in After Effects?
Bounce animation creates secondary movement after an object reaches or interacts with a target position.
What is overshoot?
Overshoot occurs when a property moves beyond its final value before returning and settling.
Are bounce and overshoot the same?
They’re related but not identical. Overshoot usually describes passing beyond a target, while bounce typically implies one or more rebounds.
Can I create bounce without expressions?
Yes. You can create it manually using keyframes and the Graph Editor.
Why use a bounce expression?
Expressions can automatically generate secondary motion and make animations easier to reuse and modify.
What does amplitude control?
The strength or size of the bounce.
What does frequency control?
How quickly the animation oscillates.
What does decay control?
How quickly the secondary motion disappears.
Can I bounce Position?
Yes.
Can I bounce Scale?
Yes.
Can I bounce Rotation?
Yes.
Can I use bounce on text?
Yes.
Do I need a plug-in?
No.
Should every animation have bounce?
No. Use it when secondary motion supports the design and physical character of the object.
Can I control bounce with Sliders?
Yes. Expression Controls are an excellent way to expose amplitude, frequency, and decay.
Practice Bounce Animation in After Effects
Start with something simple.
Create a circle.
Animate Scale from:
0% → 100%
Make the keyframed animation look good.
Then add a small amount of overshoot.
Experiment with:
Amplitude
Frequency
Decay
Observe what happens when each value changes.
Then repeat the exercise with Position.
Then Rotation.
The goal isn’t to memorize a complicated formula.
The goal is to understand how secondary motion behaves.
If you’d like to practice these animation techniques yourself, you can explore Adobe’s current After Effects options here:
Get Adobe After Effects and start experimenting with bounce and overshoot animation
What Should You Learn Next?
We’ve now covered several core expression concepts:
Wiggle
for procedural variation.
loopOut
for repeating keyframes.
Time
for continuous automatic animation.
Bounce and overshoot
for procedural secondary motion.
The next logical step is learning how to control these expressions without constantly editing code.
That’s where Expression Controls become essential.
Using:
- Slider Control;
- Angle Control;
- Checkbox Control;
- Color Control;
- Point Control;
you can build easy-to-use animation rigs.
The next article will therefore be:
Adobe After Effects Expression Controls: Slider, Checkbox, Angle, Color, and Point Controls Explained.
Final Thoughts
Bounce and overshoot can transform simple animation.
Compare:
Move → Stop
with:
Move → Overshoot → Settle.
That small difference can make motion feel much more physical.
Expressions make it possible to automate this secondary movement.
Remember the three most important parameters:
Amplitude = how much
Frequency = how fast
Decay = how long
But don’t let the expression determine your creative decisions.
A heavy object shouldn’t bounce like rubber.
A professional interface shouldn’t wobble endlessly.
A subtle logo animation may need only a tiny amount of overshoot.
The expression provides the physics-inspired behavior.
Your job is to decide how much of that behavior the design needs.
Learn to control bounce rather than simply adding it.
That’s when expression-driven animation begins to feel intentional rather than automatic.
Explore Adobe After Effects and start creating more natural motion with expressions






