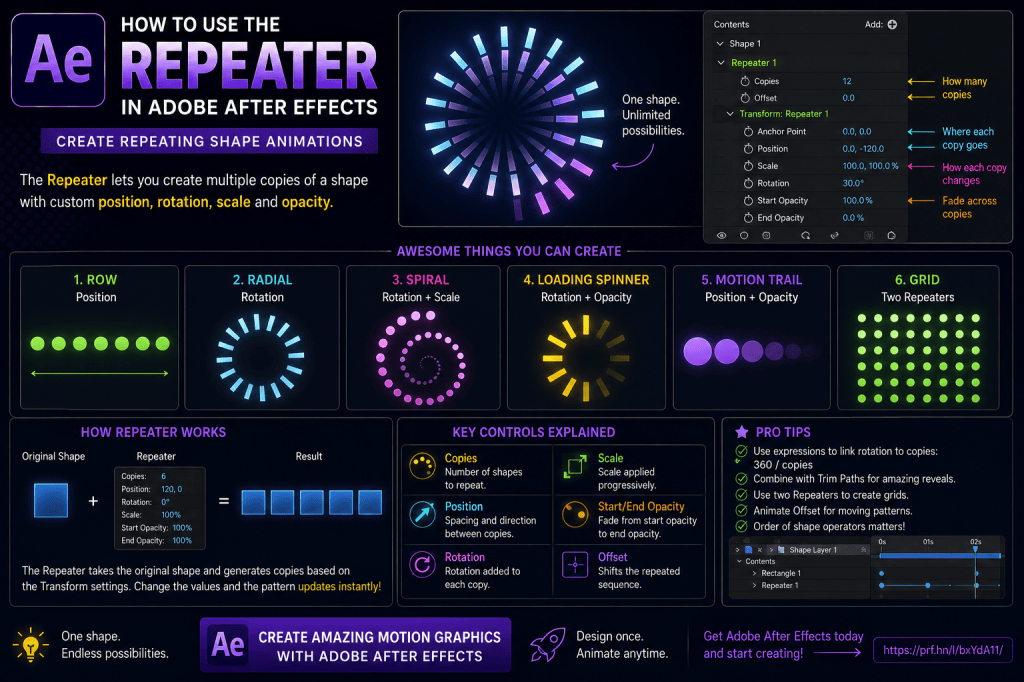
The Repeater is one of the most powerful tools hidden inside Adobe After Effects Shape Layers.
Instead of manually duplicating the same shape 10, 20, or 100 times, the Repeater can generate those copies automatically.
Even better, each copy can progressively change its:
- position;
- rotation;
- scale;
- opacity.
That makes the Repeater useful for far more than simple duplication.
You can use it to create:
- repeating patterns;
- radial animations;
- geometric designs;
- loading indicators;
- spirals;
- motion trails;
- animated backgrounds;
- interface graphics;
- abstract motion graphics;
- infographic elements.
In this guide, we’ll explore how the After Effects Repeater works, what its main controls do, and how to combine it with Shape Layers, keyframes, expressions, Trim Paths, and other tools to build reusable motion graphics.
Affiliate disclosure: This article contains affiliate links. If you purchase Adobe After Effects through one of these links, we may earn a commission at no additional cost to you.
What Is the Repeater in After Effects?
The Repeater is a Shape Layer operator that creates multiple copies of one or more shapes.
Imagine creating a small circle.
Without the Repeater, creating ten circles might mean duplicating the circle manually ten times.
With the Repeater, you create:
one circle
and tell After Effects:
Copies = 10
After Effects generates the other nine automatically.
The real power comes from Transform: Repeater, which determines how each successive copy differs from the previous one.
For example, each copy could move:
100 pixels to the right.
The result becomes a row of evenly spaced circles.
Or each copy could rotate:
30 degrees.
The result becomes a radial pattern.
Or each copy could become:
90% the size of the previous copy.
The result becomes a spiral-like sequence.
Why Use the Repeater?
The Repeater provides three major advantages.
Speed
You don’t need to duplicate and position dozens of layers manually.
Consistency
Spacing, rotation, and scaling are mathematically consistent.
Flexibility
Change the number of copies or spacing once and the entire design updates.
This makes Repeater-based graphics particularly useful for reusable motion-design systems.
Where Is the Repeater?
The Repeater exists inside Shape Layers.
Select a Shape Layer.
Open:
Contents
Then choose:
Add → Repeater
After Effects adds:
Repeater 1
to the Shape Layer.
Expand it to see the main controls.
Repeater Controls
The most important properties are:
Copies
Offset
Transform: Repeater
Inside Transform: Repeater you’ll find properties such as:
Anchor Point
Position
Scale
Rotation
Start Opacity
End Opacity
Understanding these controls opens up a huge range of designs.
Copies
Copies determines how many versions of the original Shape are generated.
For example:
Copies = 1
shows the original.
Copies = 5
creates five instances.
Copies = 20
creates twenty.
You can animate Copies, although fractional values may produce transitional behavior depending on the design.
Offset
Offset determines which part of the repeated sequence is used.
For beginners, it’s easiest to start with:
Offset = 0
and first understand Position, Rotation, and Scale.
Later, Offset becomes useful for animating the repeated sequence.
Transform: Repeater
This is where most of the interesting behavior happens.
The Transform controls don’t simply transform the entire Shape Layer.
Instead, they describe the transformation applied progressively between copies.
That’s the key concept.
Repeater Position
Suppose you create a circle and set:
Copies = 5
Then set Repeater Position to:
100, 0
Each new circle appears 100 pixels farther to the right.
You get:
● ● ● ● ●
Change Position to:
0, 100
and the circles form a vertical column.
Repeater Rotation
Set:
Rotation = 20°
and each copy rotates 20 degrees relative to the previous copy.
With the correct Anchor Point, this can produce circular and radial patterns.
Repeater Scale
Set Scale to:
90%
and every new copy becomes smaller.
This is useful for:
- spirals;
- trails;
- recursive patterns;
- abstract graphics.
Start and End Opacity
These properties let copies gradually fade.
For example:
Start Opacity:
100%
End Opacity:
0%
creates a repeated sequence that fades toward the end.
This is extremely useful for motion trails.
Your First Repeater Animation
Let’s create a basic row of circles.
Step 1: Create a Composition
Create a new composition.
For example:
1920 × 1080
with your preferred frame rate and duration.
Step 2: Create a Circle
Deselect all layers.
Select the Ellipse Tool.
Draw a small circle.
After Effects creates a Shape Layer.
Rename it:
REPEATER CIRCLES
Step 3: Add the Repeater
Expand:
Contents
Choose:
Add → Repeater
Open:
Repeater 1.
Step 4: Increase Copies
Set:
Copies = 8
You’ll see multiple copies.
Depending on the default Position setting, they may already appear spaced horizontally.
Step 5: Adjust Position
Open:
Transform: Repeater 1
Find:
Position
Adjust the X value.
For example:
120, 0
Now the circles form a clean horizontal sequence.
If you’d like to practice Shape Layers and Repeater animation yourself, you can explore Adobe’s current After Effects options here:
Explore Adobe After Effects and current plans
Create a Vertical Repeater
Change Position to:
0, 120
The same setup now creates a vertical stack.
One shape.
One Repeater.
Multiple copies.
Animate the Spacing
Position itself can be animated.
Start:
0, 0
End:
120, 0
Initially all copies overlap.
As the Position value increases, they spread apart.
This creates a simple but effective procedural animation.
Animate the Number of Copies
You can also animate Copies.
For example:
1 → 10
The pattern grows as additional copies appear.
This is useful for:
- interface animations;
- loading graphics;
- decorative transitions.
Project 1: Repeating Dots
Create a small circle.
Set:
Copies = 12
Position:
80, 0
Now you have a row of dots.
Animate:
- Scale;
- opacity;
- spacing.
This simple structure can become:
- progress indicator;
- decorative divider;
- loading animation.
Project 2: Repeating Lines
Create a short vertical line.
Add Repeater.
Set:
Copies = 20
Position:
50, 0
You now have a field of evenly spaced lines.
Animate the line length or spacing to create a modern motion-graphics background.
Combine with Trim Paths
Because the original line is a Shape Layer path, you can add Trim Paths.
Now every repeated line can inherit the Trim Paths animation.
This is where Shape Layer operators become especially powerful.
Operator Order Matters
The order of:
Trim Paths
Repeater
and other Shape Layer operators can change the result.
If an animation behaves unexpectedly, inspect the hierarchy inside:
Contents.
After Effects evaluates Shape Layer operators according to their position in that hierarchy.
Project 3: Radial Pattern
This is one of the classic Repeater techniques.
Create a small rectangle or line.
Place it away from the center.
Add a Repeater.
Set:
Copies = 12
Set Position in Transform: Repeater to:
0, 0
Then set:
Rotation = 30°
because:
360 ÷ 12 = 30.
With the Anchor Point positioned correctly, the copies form a complete circle.
Radial Repeater Formula
For an evenly spaced radial pattern:
Rotation per copy = 360 ÷ number of copies
Examples:
6 copies:
60°
8 copies:
45°
10 copies:
36°
12 copies:
30°
24 copies:
15°
This formula is extremely useful.
Use an Expression for Automatic Rotation
Instead of manually calculating the rotation, you can connect it to Copies.
Conceptually:
360 / copies
Now if you change:
Copies = 12
the angle becomes:
30°.
Change Copies to:
The spacing automatically becomes:
18°.
This makes the radial system reusable.
Project 4: Loading Spinner
Create a short rounded line.
Position it away from the center.
Add Repeater.
Create perhaps:
12 copies.
Arrange them radially.
Then use Start and End Opacity to fade the repeated sequence.
Rotate the Shape Layer continuously.
You now have a classic loading spinner.
Add a time Expression
Instead of Rotation keyframes, you can use:
time * speed
to rotate continuously.
For example, a Rotation property driven by time can create an endlessly rotating spinner.
Add a Speed Slider
Create:
Rotation Speed
Slider Control.
Use it inside the expression.
Now you can adjust the loader speed without editing the expression.
Project 5: Circular Burst
Create a line pointing outward.
Use the radial Repeater technique.
Then animate the original line’s Scale or path length.
All repeated copies animate simultaneously.
This creates a burst.
Useful for:
- transitions;
- emphasis;
- logo reveals;
- celebratory graphics.
Add Trim Paths to the Burst
Create each radial element as a Stroke.
Use Trim Paths to animate it outward.
The result can resemble:
- rays;
- energy;
- sunburst;
- impact lines.
Project 6: Spiral
Create a small circle.
Add Repeater.
Use:
Position
plus:
Rotation
plus:
Scale
together.
For example:
Copies:
30
Rotation:
15°
Scale:
95%
Position:
small horizontal or vertical offset.
The copies can form a spiral.
Why Spirals Work
Every new copy:
- moves;
- rotates;
- scales.
Those transformations accumulate.
The repeated transformations create the spiral geometry.
Experiment Rather Than Memorize
Spiral designs depend heavily on the relationship between:
- Position;
- Anchor Point;
- Rotation;
- Scale;
- Copies.
Small changes can produce dramatically different results.
Project 7: Motion Trail
Create a simple shape.
Add Repeater.
Set multiple copies.
Give the Repeater a small Position offset.
Set:
Start Opacity = 100%
End Opacity = 0%
Now the copies fade progressively.
This can resemble a trail.
Animate the Parent Shape
Move or rotate the entire Shape Layer.
The repeated fading shapes reinforce the direction of motion.
Scale the Trail
Set Repeater Scale slightly below:
100%.
For example:
95%
Now the copies become progressively smaller.
This creates a stronger sense of depth or motion.
Project 8: Repeating Arrow
Create an arrow.
Add Repeater.
Position copies horizontally.
Fade them from low to high opacity or high to low.
Animate Offset.
This creates a directional indicator.
Useful for:
- UI animation;
- tutorials;
- process diagrams;
- calls to action.
Project 9: Chevron Animation
Create one chevron:
>
Repeat it several times.
Animate opacity or Offset.
The sequence can suggest:
movement to the right.
This is common in:
- interface animation;
- loading states;
- transitions.
Project 10: Audio-Style Equalizer Pattern
Create a vertical rectangle.
Repeat it horizontally.
Now you have several bars.
To make each bar animate differently, you may need additional techniques because a basic Repeater applies systematic transformations rather than independent random values.
Still, the Repeater is useful for building the base geometry quickly.
Project 11: Animated Grid
Create a square.
Add one Repeater for horizontal copies.
Then add another Repeater for vertical copies.
This creates a two-dimensional grid.
Repeater Inside Repeater
This is one of the most powerful techniques.
First Repeater:
creates a row.
Second Repeater:
duplicates the entire row vertically.
Now one original square can generate dozens or hundreds of grid elements.
Example
First Repeater:
Copies = 10
Position = 100, 0
Second Repeater:
Copies = 6
Position = 0, 100
Result:
10 × 6 grid
from one original Shape.
Animate Grid Spacing
Animate the Repeater Position properties.
The grid can:
- expand;
- collapse;
- stretch;
- compress.
Animate Grid Scale
Scale the original Shape.
Every grid element updates.
This is much easier than changing 60 individual layers.
Project 12: Dot Grid Background
Create a tiny circle.
Use two Repeaters to create a grid.
Lower opacity.
Now you have a reusable dot-grid background.
Animate:
- spacing;
- overall rotation;
- opacity;
- scale.
This works well for modern technology graphics.
Project 13: Geometric Pattern
Start with:
- triangle;
- hexagon;
- rectangle;
- circle.
Use Repeaters to create symmetrical arrangements.
Then animate:
- Rotation;
- Scale;
- Offset.
This can generate sophisticated abstract backgrounds from very simple source shapes.
Project 14: Tunnel Effect
Create a rectangle or circle outline.
Add Repeater.
Set:
Scale < 100%
and perhaps adjust Position or Rotation.
Create many copies.
The result can resemble a tunnel or recursive frame.
Animate the Repeater
Animate:
- Scale;
- Offset;
- Rotation.
The tunnel can appear to move toward or away from the viewer.
Add 3D?
The basic Repeater exists within Shape Layer geometry, but you can combine the resulting Shape Layer with 3D transformations for additional depth.
For many abstract designs, however, 2D scale and rotation are enough.
Project 15: Repeating Rings
Create an outlined circle.
Add Repeater.
Set Position:
0, 0
Scale:
greater than or less than 100%.
For example:
120%.
Each new copy becomes larger.
You get concentric circles.
Animate Opacity
Fade the outer circles.
This can create:
- radar;
- sonar;
- pulse;
- signal graphics.
Animate Scale
Animate the source circle or Repeater parameters.
The rings can pulse outward.
Radar Animation
Combine:
- concentric rings;
- rotating line;
- glowing point;
- Trim Paths.
This creates a convincing radar-style interface.
Project 16: Repeating Text-Like Symbols
The Repeater is fundamentally a Shape Layer operator, so for repeated symbols it’s often easiest to create or convert suitable artwork into Shape Layers.
Examples:
- stars;
- arrows;
- hearts;
- icons;
- custom vector symbols.
Repeater and Illustrator Artwork
Vector artwork created in Adobe Illustrator can be imported into After Effects and, when appropriate, converted into Shape Layers.
You can then use Shape Layer operators such as Repeater.
Simplify Imported Artwork
Complex vector artwork may produce complicated Shape Layer hierarchies.
Before applying a Repeater:
- inspect groups;
- remove unnecessary paths;
- rename important groups.
Simple source artwork is easier to control.
Repeater Offset Explained
Offset shifts the repeated sequence relative to the original.
Animating Offset can create the impression that the repeated pattern is moving through its sequence.
It’s especially useful when combined with progressive:
- scale;
- rotation;
- opacity.
Animate Offset
Create keyframes on Offset.
For example:
0 → 10
Depending on the Repeater transforms, the entire pattern may appear to evolve or travel.
Fractional Offset
Offset can often use fractional values.
This creates smooth transitions rather than jumping only between whole copies.
Repeater Anchor Point
Anchor Point strongly affects Rotation and Scale behavior.
If your radial pattern looks wrong, inspect the Repeater’s Anchor Point.
Moving the Anchor Point changes the center around which each successive transformation occurs.
Shape Transform vs Repeater Transform
This is a frequent source of confusion.
A Shape Layer can contain several Transform levels:
Layer Transform
Group Transform
Transform: Repeater
They do different things.
Layer Transform
Moves the entire Shape Layer.
Group Transform
Transforms a specific Shape group.
Repeater Transform
Determines the progressive transformation between copies.
Understanding this distinction makes complex Shape Layer setups much easier.
Repeater Rotation vs Layer Rotation
If you rotate the Layer:
the entire pattern rotates.
If you change Repeater Rotation:
the angle between successive copies changes.
These are fundamentally different operations.
Repeater Scale vs Layer Scale
Layer Scale enlarges the entire finished pattern.
Repeater Scale makes each successive copy larger or smaller relative to the previous one.
Repeater Position vs Layer Position
Layer Position moves everything.
Repeater Position changes the spacing between copies.
This Is the Key Concept
Think:
Layer Transform = entire result
Repeater Transform = relationship between copies
Once this clicks, the Repeater becomes much easier to use.
Start Opacity and End Opacity
These controls distribute opacity across the copies.
For example:
Start:
100%
End:
0%
creates a fading sequence.
Reverse them:
Start:
0%
End:
100%
and the copies become progressively more visible.
Create a Light Chase
Create repeated circles.
Set a progressive opacity.
Animate Offset.
The bright portion appears to travel through the sequence.
This is useful for:
- loaders;
- indicator lights;
- futuristic interfaces.
Combine Repeater with Wiggle
You can add expressions to other properties around the repeated system.
However, remember that the Repeater creates procedural copies rather than independent layers.
If every copy needs unique random behavior, a different technique may be required.
Repeater vs Duplicating Layers
Use Repeater when:
- elements share the same design;
- spacing is systematic;
- transformations follow a pattern;
- you want procedural control.
Duplicate separate layers when:
- each copy needs unique content;
- timing differs significantly;
- each object requires independent control.
Repeater vs Expressions
These tools complement each other.
Repeater handles:
duplication and transformation.
Expressions can automate:
- copy count;
- rotation angle;
- speed;
- spacing;
- synchronization.
Automatically Calculate Radial Rotation
Suppose your Repeater has:
Copies = 16.
Instead of manually setting:
22.5°,
use a relationship based on:
360 / Copies.
Now changing Copies automatically maintains an evenly spaced circle.
Master Controls
For reusable designs, create a controller:
CTRL — REPEATER
Add:
Copies
Spacing
Rotation
Scale
Speed
Color
Then connect your Shape Layer properties.
Why Master Controls Help
A user can change:
Copies = 8 → 20
without digging into:
Contents → Group → Repeater → Transform.
This is particularly useful for templates.
Animate with One Progress Slider
You can also create:
Animation Progress
0–100.
Use it to control:
- spacing;
- rotation;
- scale;
- opacity.
Now one Slider can animate the complete pattern.
Create an Expand Animation
At:
Progress = 0
Spacing:
0
Scale:
0
Rotation:
At:
Progress = 100
Spacing:
100
Scale:
100
Rotation:
Use expressions to map the values.
The pattern expands into its final configuration.
Create a Collapse Animation
Reverse Progress:
100 → 0.
The pattern collapses back into the source Shape.
Repeater + Trim Paths
This combination deserves special attention.
Create a Shape with a Stroke.
Add Trim Paths.
Then repeat it.
You can generate many identical drawing animations.
Examples:
- radial rays drawing outward;
- repeated circles;
- loading elements;
- animated technical patterns.
Repeater + Gradient Fill
Use Gradient Fill on the original Shape.
The repeated pattern inherits the styling according to the Shape Layer structure.
This can create rich abstract graphics.
Repeater + Round Corners
Create a rectangle.
Add:
Round Corners
and:
Repeater.
Now you can build repeating rounded UI elements or abstract geometric patterns.
Repeater + Twist
Other Shape Layer operators can create even more complex results.
Experiment with combinations rather than thinking of Repeater as an isolated tool.
Operator Order Can Change Everything
For example:
Shape → Repeater → Transform
can behave differently from another operator order.
When a result seems unexpected, don’t immediately assume something is broken.
Move the operators and observe the result.
Build Simple First
Before combining five Shape Layer operators:
- Create one Shape.
- Add Repeater.
- Understand Copies.
- Understand Position.
- Understand Rotation.
- Understand Scale.
- Then add additional operators.
This makes troubleshooting much easier.
Performance Considerations
A Repeater can generate many vector copies.
Creating:
10 copies
is generally simple.
Creating:
1,000 complex copies
can increase rendering workload.
Use only as many copies as the design needs.
Motion Blur
If the entire repeated pattern moves or rotates quickly, Motion Blur can improve the appearance.
Test it visually.
For abstract patterns, motion blur can create beautiful transitions.
Add Glow
Repeated lines and circles work particularly well with Glow.
This is useful for:
- HUDs;
- technology graphics;
- neon patterns;
- loading animations.
Create a Futuristic HUD
Combine:
- radial Repeaters;
- Trim Paths;
- rotating circles;
- Glow;
- time expressions.
You can create a sophisticated interface from only a handful of Shape Layers.
Common Mistake: Using Layer Transform Instead
If you’re trying to change the spacing between copies but adjust Layer Position, the entire pattern moves.
Use:
Transform: Repeater → Position
instead.
Common Mistake: Wrong Anchor Point
Radial patterns often fail because the Repeater Anchor Point isn’t where you expect.
Common Mistake: Manually Calculating Every Angle
For reusable radial patterns, connect Rotation to:
360 / Copies.
Common Mistake: Too Many Layers
Don’t duplicate 30 Shape Layers when one Repeater can do the job.
Common Mistake: Too Many Copies
Large copy counts can increase complexity and render time.
Common Mistake: Ignoring Operator Order
Shape Layer hierarchy matters.
Common Mistake: Expecting Independent Copies
Repeater copies aren’t normal independent layers.
They are procedurally generated instances.
Common Mistake: Overcomplicated Source Shape
Start with simple geometry.
Then increase complexity.
Common Mistake: No Layer Naming
Rename:
Shape Layer 1
to something meaningful such as:
RADIAL DOTS
or:
LOADER RING.
Repeater Quick Reference
Copies
Number of repeated instances.
Offset
Shifts the repeated sequence.
Position
Spacing and direction between copies.
Rotation
Rotation added to each successive copy.
Scale
Scale applied progressively between copies.
Start Opacity
Opacity near the beginning of the repeated sequence.
End Opacity
Opacity near the end.
Five Repeater Exercises
Exercise 1 — Row of Circles
Create one circle.
Repeat it ten times horizontally.
Exercise 2 — Radial Pattern
Create 12 repeated rectangles around a center point.
Exercise 3 — Loader
Turn the radial pattern into an animated loading indicator.
Exercise 4 — Spiral
Combine Rotation, Position, and Scale.
Exercise 5 — Grid
Use two Repeaters to create a two-dimensional dot grid.
These five exercises cover the most important Repeater concepts.
Practical Project: Animated Loading Spinner
Create a short rounded rectangle.
Move it above the center point.
Add:
12 copies.
Use:
360 / 12 = 30°
rotation between copies.
Fade the repeated sequence.
Rotate the finished pattern continuously.
You now have a reusable loader.
Practical Project: Animated Dot Grid
Create one circle.
First Repeater:
10 horizontal copies.
Second Repeater:
6 vertical copies.
Animate:
- circle Scale;
- spacing;
- overall opacity.
This creates a modern background animation.
Practical Project: Radial Logo Reveal
Create a small geometric Shape.
Repeat it around the center.
Animate:
- Scale;
- Rotation;
- Opacity.
Reveal the logo afterward.
This works particularly well for short brand intros.
Practical Project: Technology Background
Create several Shape Layers using:
- grids;
- radial circles;
- repeated lines.
Use slow animation.
Add subtle Glow.
Keep the motion restrained so it doesn’t overpower foreground content.
Frequently Asked Questions
What is the Repeater in After Effects?
The Repeater is a Shape Layer operator that creates procedural copies of Shapes.
Where is the Repeater?
Select a Shape Layer and choose:
Contents → Add → Repeater.
What does Copies do?
It determines the number of repeated instances.
What does Offset do?
Offset shifts the repeated sequence.
What does Repeater Position do?
It determines the positional change between successive copies.
How do I create a circle of repeated Shapes?
Set Repeater Position appropriately, position the Anchor Point, and use:
360 ÷ number of copies
for the Rotation value.
Can I animate the Repeater?
Yes.
You can animate:
- Copies;
- Offset;
- Position;
- Rotation;
- Scale;
- opacity.
Can I use expressions?
Yes. Expressions are especially useful for automatically calculating angles and continuous animation.
Can I create a grid?
Yes. Use one Repeater for rows and another for columns.
Can I create a loading spinner?
Yes. Radial repetition combined with opacity and rotation works very well.
Can I combine Repeater with Trim Paths?
Yes.
Can I repeat imported Illustrator artwork?
Suitable vector artwork can be converted or prepared as Shape Layers and then used with Shape Layer operators.
Are repeated copies separate layers?
No. They’re procedural Shape Layer copies rather than independent Timeline layers.
Does Repeater affect performance?
Large numbers of complex copies can increase processing requirements.
Do I need a plug-in?
No. Repeater is built directly into After Effects Shape Layers.
Practice the Repeater in After Effects
Create:
one circle.
Add:
Repeater.
Set:
Copies = 10.
Change:
Position.
Then change:
Rotation.
Then:
Scale.
Then:
Start and End Opacity.
Don’t try to create a complex pattern immediately.
Understanding how each Transform: Repeater property changes successive copies is the essential skill.
After that, create:
- row;
- radial pattern;
- spiral;
- grid;
- loader.
You’ll quickly see why the Repeater is such a useful motion-design tool.
If you’d like to experiment with the Repeater and Shape Layer animation yourself, you can explore Adobe’s current After Effects options here:
Get Adobe After Effects and start creating repeating Shape animations
What Should You Learn Next?
The Repeater makes it easy to create geometric patterns.
The next logical Shape Layer technique is learning how to control more complex path transformations with:
Merge Paths.
Merge Paths lets you combine Shapes using operations similar to vector Boolean tools.
You can:
- add shapes;
- subtract shapes;
- intersect shapes;
- exclude intersections;
- create complex icons;
- build animated geometric transitions.
The next article will therefore be:
How to Use Merge Paths in Adobe After Effects: Add, Subtract, Intersect, and Combine Shapes.
We’ll use simple examples first and then build practical motion-graphics designs.
Final Thoughts
The After Effects Repeater is much more than a duplication command.
It is a procedural motion-design system.
You create:
one Shape.
Then define how every successive copy should change.
That transformation can involve:
Position
Rotation
Scale
Opacity
and:
Offset.
From those few controls, you can create:
- rows;
- grids;
- radial patterns;
- spirals;
- trails;
- loading indicators;
- animated backgrounds;
- HUD graphics.
The most important distinction to remember is:
Layer Transform changes the complete pattern.
Repeater Transform changes the relationship between copies.
Once you understand that, the Repeater becomes considerably easier to control.
Combine it with Trim Paths and expressions, and a single Shape Layer can produce animations that would otherwise require dozens—or even hundreds—of manually duplicated layers.
Explore Adobe After Effects and start building procedural motion graphics






