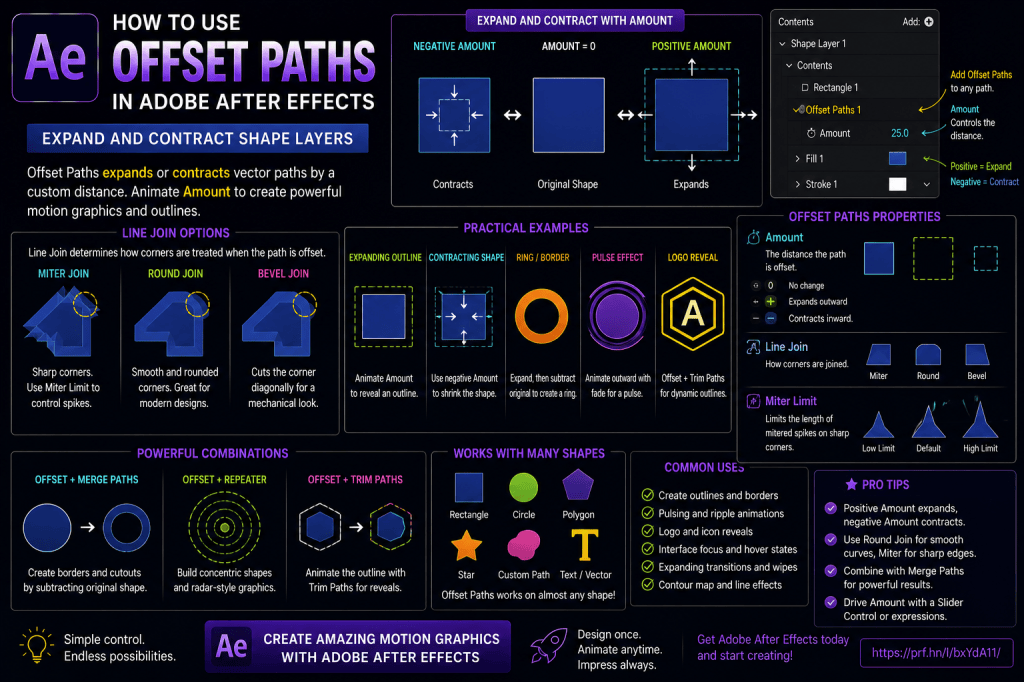
Offset Paths is one of the most useful Shape Layer operators in Adobe After Effects when you want to grow or shrink vector geometry without manually editing every point.
With Offset Paths, you can:
- expand a shape outward;
- contract a shape inward;
- create animated outlines;
- build borders;
- create logo reveals;
- make growing interface graphics;
- produce abstract transitions;
- generate layered vector effects.
If you have used vector design software before, the basic idea will feel familiar: Offset Paths creates a new version of the path at a consistent distance from the original geometry.
In After Effects, the real advantage is that the offset amount can be animated.
That turns a static vector-design operation into a motion-graphics tool.
In this guide, you’ll learn how Offset Paths works, what Amount and Line Join do, how to create expanding and contracting shapes, how to combine Offset Paths with Merge Paths and Repeater, and how to use it in practical animation projects.
Affiliate disclosure: This article contains affiliate links. If you purchase Adobe After Effects through one of these links, we may earn a commission at no additional cost to you.
What Is Offset Paths in After Effects?
Offset Paths is a Shape Layer operator that expands or contracts vector paths.
Imagine a square.
At:
Amount = 0
the square remains unchanged.
Increase Amount:
the square expands outward.
Use a negative Amount:
the square contracts inward.
The original geometry remains procedurally editable.
This makes Offset Paths particularly useful for designs that need consistent spacing around vector shapes.
Where Is Offset Paths?
Select a Shape Layer.
Expand:
Contents
Choose:
Add → Offset Paths
After Effects creates:
Offset Paths 1
Expand it to reveal the main properties.
You will typically see controls such as:
Amount
Line Join
Miter Limit
These determine how the offset behaves around the path.
Amount
Amount controls the distance of the offset.
At:
0
there is no visible change.
Positive values:
expand the path.
Negative values:
contract the path.
For example:
Amount = 20
creates a larger shape.
Amount = -20
creates a smaller one.
Positive vs Negative Offset
Think:
Positive = outward
Negative = inward
This simple distinction is the foundation of most Offset Paths workflows.
Line Join
Line Join determines how the offset behaves around corners.
Common styles include:
- Miter;
- Round;
- Bevel.
Each creates a different visual result.
Miter Join
Miter keeps corners sharp.
This is useful for:
- geometric shapes;
- technical graphics;
- sharp icons.
Large offsets can create long pointed corners, which may need Miter Limit adjustments.
Round Join
Round creates smoother corners.
This is ideal for:
- soft UI elements;
- rounded logos;
- modern motion graphics.
Bevel Join
Bevel cuts the corner diagonally.
This can create a more mechanical or stylized look.
Miter Limit
Miter Limit controls how far sharp corners are allowed to extend.
On acute angles, a large outward offset can create extremely long spikes.
Reducing the Miter Limit can prevent those excessive corners.
Your First Offset Paths Animation
Let’s create a simple expanding square.
Step 1: Create a Composition
Create a new composition.
For example:
1920 × 1080
with your preferred frame rate.
Step 2: Create a Shape Layer
Create a square.
Give it a Fill.
Rename the layer:
OFFSET TEST
Step 3: Add Offset Paths
Inside:
Contents
choose:
Add → Offset Paths
Open:
Offset Paths 1
Step 4: Adjust Amount
Set:
Amount = 0
Then increase it.
For example:
Amount = 50
The square expands.
Try:
Amount = -30
The square contracts.
If you’d like to practice Offset Paths and other Shape Layer techniques yourself, you can explore Adobe’s current After Effects options here:
Explore Adobe After Effects and current plans
Step 5: Animate Amount
Set:
Amount = -50
Create a keyframe.
Move forward one second.
Set:
Amount = 50
Preview.
The Shape grows outward.
This creates a simple procedural expansion animation.
Why Offset Paths Is Different from Scale
At first glance, Offset Paths might seem similar to Scale.
But they are not the same.
Scale
Scale transforms the entire Shape relative to an Anchor Point.
The geometry grows proportionally.
Offset Paths
Offset Paths expands or contracts the path by a fixed distance.
This distinction matters.
Example
Imagine a rectangle.
Scaling by:
150%
changes both dimensions proportionally.
Offsetting by:
20 pixels
adds approximately 20 pixels around the path.
This can produce a very different result.
Why Offset Paths Is Useful for Borders
Because the offset distance is consistent, it’s ideal for creating:
- outlines;
- borders;
- rings;
- halos.
Project 1: Expanding Outline
Create a filled shape.
Duplicate it within the same Shape Layer or create another version.
Use Offset Paths to expand the outer copy.
Give it a different Fill or Stroke.
Now the shape has a border.
Animate the Border
Animate Amount:
0 → 20
The border grows outward.
This works well for:
- button focus states;
- logo reveals;
- highlight effects.
Project 2: Contracting Shape
Set Amount to:
0
then animate to:
-50
The shape shrinks inward.
This can create a clean disappearance animation.
Contract to Nothing
Depending on the geometry and amount, the path may eventually collapse.
This can be useful for:
- icon exits;
- shape transitions;
- wipes.
Project 3: Animated Badge
Create a star or polygon.
Add Offset Paths.
Animate Amount outward.
Use another color on the expanded version.
The result can look like an animated badge outline.
Project 4: Logo Outline
Suppose your logo consists of a simple vector Shape.
Create an expanded version using Offset Paths.
Give the expanded geometry a different color or Stroke.
Animate the offset.
This can create a glowing or expanding logo reveal.
Offset Paths + Merge Paths
This combination is particularly useful.
For example:
- Create an outer expanded shape.
- Subtract the original shape.
- Keep only the difference.
The result is a procedural border.
Create a True Border Shape
Conceptually:
Expanded Shape
minus:
Original Shape
=
Border
This is different from applying a Stroke because you are creating actual filled geometry.
Why Create a Filled Border?
It gives you more flexibility for:
- gradients;
- masks;
- fills;
- Boolean operations;
- layered transitions.
Project 5: Expanding Ring
Create a circle.
Duplicate its geometry.
Expand one version.
Subtract the inner circle.
Now you have a ring.
Animate the offset to control ring thickness.
Ring Thickness Control
Create a Slider:
Ring Thickness
Connect it to the Offset Paths Amount.
Now the ring width can be adjusted from one control.
Project 6: Highlight Pulse
Create an icon.
Duplicate or offset its shape outward.
Lower the opacity.
Animate:
Amount 0 → 40
and:
Opacity 100 → 0
This creates a pulse radiating outward.
Useful for:
- notifications;
- map pins;
- click indicators;
- interface feedback.
Project 7: Map Marker Pulse
Create a location pin.
Add an expanded circular element around it.
Animate outward.
Fade at the same time.
Loop carefully if required.
This creates a classic location-pulse animation.
Project 8: Button Hover Animation
Create a rounded button.
Add an outer offset border.
On hover-style animation:
Amount increases
and:
Opacity changes
This creates a modern UI interaction effect.
Offset Paths + Round Corners
These tools work well together.
Create a sharp polygon.
Add:
Offset Paths
then:
Round Corners
or reverse the order.
The result changes depending on hierarchy.
Offset Then Round
The expanded geometry is rounded afterward.
Round Then Offset
The original path is rounded first and then offset.
Try both.
Operator order can strongly affect the design.
Project 9: Soft Expanding Blob
Create a polygon.
Add Round Corners.
Then Offset Paths.
Animate Amount.
The shape expands while retaining smooth edges.
This can create a stylized organic transition.
Offset Paths + Repeater
Create one shape.
Add Offset Paths.
Then Repeater.
Now each copy contains the offset geometry.
Or change the operator order to repeat first and offset the whole result.
Again, hierarchy matters.
Project 10: Concentric Shapes
Create one circle or polygon.
Add a Repeater.
Use Repeater Scale to generate copies.
Alternatively, use multiple Offset Paths operators to create evenly spaced contours.
This can create:
- radar graphics;
- contour maps;
- layered logo effects.
Multiple Offset Paths Operators
You can add more than one Offset Paths operator.
For example:
Offset 1 = 10
Offset 2 = 20
Offset 3 = 30
Depending on hierarchy and appearance setup, this can generate layered expanding geometry.
Project 11: Contour Line Effect
Create a complex Shape.
Duplicate or offset it several times.
Use Strokes or differing fills.
The result can resemble contour lines.
This works well for:
- maps;
- topographic graphics;
- abstract designs.
Project 12: Animated Logo Echo
Create a logo Shape.
Generate several outward offsets.
Give each lower opacity.
Animate the Amount values.
This creates a geometric echo around the logo.
Project 13: Expanding Transition
Create a Shape at the center of the frame.
Animate Offset Paths outward until it covers the entire composition.
Use the result as:
- matte;
- wipe;
- scene transition.
Why Use Offset Instead of Scale?
An irregular Shape may expand more naturally with Offset Paths than Scale because the path grows outward from its edges.
This can preserve the character of the geometry better.
Project 14: Contracting Reveal
Start with a Shape covering the screen.
Use a negative offset to contract it.
Reveal footage behind it.
This creates a reverse-style wipe.
Project 15: Animated Text Outline
If suitable text or vector lettering is converted into Shape Layers, Offset Paths can expand the letter geometry.
This can create:
- bold outline effects;
- echo effects;
- glow-like layers.
Be Careful with Complex Lettering
Large offsets can cause nearby letterforms or internal counters to behave unpredictably.
Test carefully.
Offset Paths and Internal Holes
Shapes with internal holes can change significantly when offset.
For example:
letters such as:
O
A
B
have internal negative spaces.
Positive offsets can shrink those openings.
Negative offsets may enlarge them.
This Can Be Useful
For logo animation, changing internal negative space can produce interesting transformations.
But it can also break readability if overused.
Project 16: Animated Icon Weight
An icon can appear:
- thin;
- medium;
- bold;
depending on its geometry.
Offset Paths can alter the perceived weight.
For some filled icons, increasing Amount makes the icon feel heavier.
Animate Thin to Bold
Start:
Amount negative.
End:
Amount positive.
This creates a weight-change animation.
Offset Paths vs Stroke Width
Again, these are different.
Stroke Width
Changes the thickness of a Stroke around a path.
Offset Paths
Changes the actual path geometry.
Use Stroke Width when you simply need a thicker line.
Use Offset Paths when the filled geometry itself should expand or contract.
Offset Paths vs Scale
Scale
changes the whole object proportionally.
Offset Paths
moves the boundary outward or inward.
Offset Paths vs Expand Appearance in Illustrator
Conceptually, Offset Paths is similar to vector offset tools in Illustrator.
But After Effects keeps the operation live and animatable.
That is the major motion-design advantage.
Create a Master Offset Controller
Add a Slider:
Offset Amount
Connect it to:
Offset Paths → Amount
Now the effect can be adjusted without opening the Shape Layer hierarchy.
Link Multiple Shapes
Several Shape Layers can reference the same Slider.
Change one control.
All offsets update.
Example: Global Border Thickness
Create:
CTRL — STYLE
Add:
Border Thickness
Several icons use that value to control their Offset Paths.
Now the visual system remains consistent.
Animate a Master Progress Slider
Create:
Progress
0–100.
Use expressions to map Progress to Offset Amount.
Now several shapes can expand together from one control.
Example
Progress:
0
→ Offset:
-20
Progress:
100
→ Offset:
40
Use linear() or ease() to create the mapping.
Offset Paths + Expressions
Because Amount is numerical, it works well with expressions.
You can control it using:
- Sliders;
- audio;
- time;
- linked properties.
Audio-Reactive Offset
Connect amplitude to Amount.
Loud audio:
larger shape.
Quiet audio:
smaller shape.
This can create pulsing visualizer elements.
Use with Restraint
Rapidly changing path geometry can look chaotic.
Smooth the reaction if necessary.
Offset Paths + Wiggle
You can procedurally vary Amount.
However, small values usually work better.
Large random offsets can destabilize the geometry.
Offset Paths + Trim Paths
These solve different problems but can work together.
For example:
- Offset a Shape to create an outer contour.
- Add a Stroke.
- Animate the Stroke with Trim Paths.
This creates an animated border around an expanded shape.
Project 17: Animated Logo Border
Create the logo geometry.
Offset it outward.
Apply a Stroke.
Use Trim Paths to draw the outer contour.
Reveal the logo afterward.
Project 18: Pulsing Badge
Create a circular badge.
Add multiple offset contours.
Animate their opacity and Amount.
This can create a pulse or sonar effect.
Project 19: Animated Focus Ring
For UI demonstrations, create an outer contour around a button.
Animate:
Amount
and:
Opacity
to show focus or selection.
Project 20: Layered Abstract Shapes
Create several colorful shapes.
Use different Offset Paths values.
Animate:
- Amount;
- Position;
- Rotation.
This can create modern abstract motion-graphics backgrounds.
Operator Order with Merge Paths
Suppose you have:
Circle A
Circle B
Merge Paths
Offset Paths
The merged result is offset.
But if you place Offset Paths before Merge Paths, each individual shape may be offset first.
These can produce dramatically different results.
Build One Operator at a Time
If the result becomes confusing:
- Disable Repeater.
- Disable Merge Paths.
- Check Offset Paths alone.
- Re-enable operators one by one.
This is the fastest way to troubleshoot Shape Layer systems.
Fill Placement
Like other Shape Layer operators, appearance settings matter.
A clean conceptual structure is often:
Paths
↓
Operators
↓
Fill / Stroke
But specific designs may require other arrangements.
Common Mistake: Offset Paths Doesn’t Work
Check:
- Is it inside the correct Shape group?
- Is there a visible Fill or Stroke?
- Is Amount large enough to notice?
- Is another operator affecting the result?
Common Mistake: Positive and Negative Are Confused
Remember:
Positive expands.
Negative contracts.
Common Mistake: Corners Become Huge Spikes
Change:
Line Join
or:
Miter Limit.
Common Mistake: Using Scale Instead
If you need a consistent boundary expansion, Scale may not give the desired geometry.
Try Offset Paths.
Common Mistake: Amount Too Large
Extreme offsets can cause:
- self-intersections;
- collapsed geometry;
- strange internal shapes.
Reduce the value.
Common Mistake: Complex Imported Vectors
Simplify Illustrator artwork before applying multiple operators.
Common Mistake: Ignoring Hierarchy
As with Repeater, Merge Paths, and Round Corners, hierarchy matters.
Common Mistake: Too Many Procedural Operators
Each operator adds complexity.
Use only what the design needs.
Offset Paths Quick Reference
Amount = 0
No change.
Positive Amount
Expands the path.
Negative Amount
Contracts the path.
Miter Join
Sharp corners.
Round Join
Smooth corners.
Bevel Join
Cut corners.
Miter Limit
Controls extreme sharp-corner extensions.
Five Offset Paths Exercises
Exercise 1 — Expanding Square
Animate Amount:
0 → 50.
Exercise 2 — Contracting Circle
Animate:
0 → -40.
Exercise 3 — Border
Create an expanded outer shape and subtract the original.
Exercise 4 — Pulse
Animate an outer offset and fade it out.
Exercise 5 — Merge Paths Combination
Combine two shapes, then offset the merged result.
These exercises cover the most important concepts.
Practical Project: Animated Focus Button
Create a rounded button.
Create an outer offset contour.
Animate:
Amount:
0 → 12.
Opacity:
0 → 100.
Then reverse.
This creates a clean focus state.
Practical Project: Map Pin Pulse
Create a map marker.
Add an outer circle.
Animate its Offset Paths Amount outward.
Fade the contour.
Repeat at a restrained pace.
Practical Project: Logo Outline Reveal
Create a vector logo.
Generate an outer offset contour.
Use Trim Paths to draw the contour.
Reveal the original logo after it completes.
Practical Project: Full-Screen Wipe
Create a Shape.
Animate Offset Paths until it fills the frame.
Use the Shape as a transition matte.
This works especially well with:
- stars;
- polygons;
- custom logos.
Frequently Asked Questions
What does Offset Paths do in After Effects?
It procedurally expands or contracts Shape Layer vector paths.
Where is Offset Paths?
Select a Shape Layer and choose:
Contents → Add → Offset Paths.
What does Amount control?
It controls the distance the path moves outward or inward.
What does a positive Amount do?
It expands the path.
What does a negative Amount do?
It contracts the path.
Can Amount be animated?
Yes.
What does Line Join control?
It determines how corners are treated when the path is offset.
What is Miter Limit?
It limits how far sharp corner joins can extend.
Is Offset Paths the same as Scale?
No. Scale transforms the whole Shape proportionally, while Offset Paths changes the boundary by a consistent offset distance.
Is Offset Paths the same as Stroke Width?
No. Stroke Width changes Stroke thickness; Offset Paths changes the path geometry itself.
Can I combine Offset Paths with Merge Paths?
Yes.
Can I combine it with Round Corners?
Yes.
Can I combine it with Repeater?
Yes.
Can I use expressions?
Yes.
Can Offset Paths create animated outlines?
Yes. It is particularly useful for procedural borders, contours, pulses, and logo effects.
Do I need a plug-in?
No. Offset Paths is built into After Effects Shape Layers.
Practice Offset Paths in After Effects
Start with:
one square.
Add:
Offset Paths.
Set:
Amount = 30.
Then:
-30.
Observe the difference.
Next, try:
- circle;
- triangle;
- star;
- custom Pen Tool path.
Then change:
Line Join.
Finally, animate Amount.
After that, combine Offset Paths with:
- Round Corners;
- Merge Paths;
- Repeater.
You’ll quickly see why it is one of the most useful procedural Shape Layer tools.
If you’d like to practice these techniques yourself, you can explore Adobe’s current After Effects options below:
Get Adobe After Effects and start creating procedural Shape Layer animations
What Should You Learn Next?
Offset Paths expands or contracts geometry.
Another very useful Shape Layer operator is:
Zig Zag.
Zig Zag can convert ordinary paths into:
- waves;
- spikes;
- ripples;
- sawtooth patterns;
- decorative borders.
Because the effect is procedural and animatable, it’s useful for:
- motion backgrounds;
- audio-style graphics;
- energetic transitions;
- stylized lines.
The next article will therefore be:
How to Use Zig Zag in Adobe After Effects Shape Layers: Create Waves, Spikes, and Animated Patterns.
We’ll cover Size, Ridges per Segment, Points modes, animation techniques, and combinations with Repeater and Trim Paths.
Final Thoughts
Offset Paths is a simple concept with a wide range of practical uses.
At its core:
Positive Amount expands geometry.
Negative Amount contracts it.
But when you combine that with animation, you can create:
- expanding outlines;
- shrinking icons;
- pulsing markers;
- growing logos;
- focus rings;
- borders;
- transitions;
- contour effects.
The most important thing to remember is that Offset Paths changes the path itself, not merely the object’s Scale or Stroke Width.
That makes it particularly useful when geometric consistency matters.
Combine it with:
Merge Paths
for borders and cutouts.
Round Corners
for smoother shapes.
Repeater
for procedural patterns.
Trim Paths
for animated contour reveals.
Once these Shape Layer operators start working together, After Effects becomes an extremely flexible procedural vector-animation environment.
Explore Adobe After Effects and start building advanced Shape Layer motion graphics






