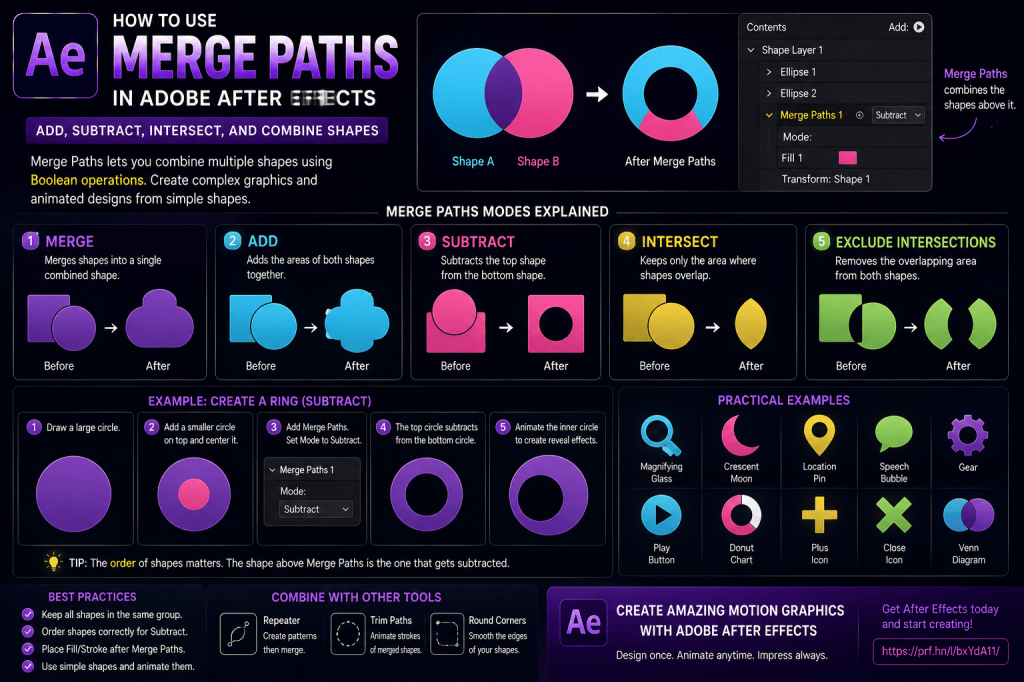
Merge Paths is one of the most useful Adobe After Effects Shape Layer tools for creating complex vector graphics from simple shapes.
Instead of drawing a complicated icon manually, you can start with basic objects such as:
- circles;
- rectangles;
- polygons;
- stars;
- custom paths.
Then use Merge Paths to combine them mathematically.
You can add two shapes together.
Subtract one shape from another.
Keep only the area where two shapes overlap.
Or remove the overlapping area entirely.
If you’ve used tools such as Pathfinder in Adobe Illustrator, the basic concept will feel familiar.
For motion designers, however, Merge Paths becomes even more interesting because the shapes themselves can be animated.
That means you can create animated:
- icons;
- logo reveals;
- transitions;
- geometric patterns;
- interface graphics;
- masks;
- abstract designs.
In this guide, you’ll learn how Merge Paths works in Adobe After Effects, what each Merge Paths mode does, why Shape Layer hierarchy matters, and how to use Merge Paths in practical motion-graphics projects.
Affiliate disclosure: This article contains affiliate links. If you purchase Adobe After Effects through one of these links, we may earn a commission at no additional cost to you.
What Is Merge Paths in After Effects?
Merge Paths is a Shape Layer operator that combines multiple vector paths.
Suppose you have:
Circle A
and:
Circle B
overlapping each other.
Merge Paths can determine what happens to those overlapping regions.
Depending on the selected mode, After Effects can:
- combine both shapes;
- subtract one from another;
- preserve only their intersection;
- remove their intersection.
This is often described as a Boolean operation.
What Are Boolean Shape Operations?
Boolean operations use relationships between shapes to create new geometry.
Imagine two overlapping circles:
A + B
Different operations produce different results.
Add
Keep both shapes.
Subtract
Remove one shape from the other.
Intersect
Keep only the overlapping region.
Exclude Intersections
Keep the shapes but remove their overlapping area.
These simple operations can generate surprisingly complex artwork.
Where Is Merge Paths?
Create or select a Shape Layer.
Expand:
Contents
Then choose:
Add → Merge Paths
After Effects adds:
Merge Paths 1
to the Shape Layer.
Expand it to access the available mode.
Merge Paths Modes
Depending on your After Effects version and context, you’ll generally encounter modes such as:
Merge
Add
Subtract
Intersect
Exclude Intersections
Each produces a different relationship between the Shape paths.
Merge
Merge combines paths into a unified result while generally preserving the overall visible area.
It’s useful when several separate paths should behave as one combined shape.
Add
Add combines the filled areas of multiple shapes.
Imagine two overlapping circles.
Before:
Circle A + Circle B
After Add:
the combined silhouette behaves like one larger shape.
Subtract
Subtract removes one Shape from another.
For example:
Large Circle
minus
Small Circle
can produce:
a ring.
This is one of the easiest ways to understand the operation.
Intersect
Intersect keeps only the region where the Shapes overlap.
If two circles overlap slightly, everything except their shared area disappears.
Exclude Intersections
Exclude Intersections does approximately the opposite.
The overlapping region is removed while the non-overlapping parts remain.
Your First Merge Paths Project
Let’s build a simple ring using Subtract.
Step 1: Create a Composition
Create a new composition.
For example:
1920 × 1080
with your preferred frame rate.
Step 2: Create a Shape Layer
Create a large circle.
Give it a Fill.
You don’t need a Stroke for this example.
Step 3: Add a Second Circle
Inside the same Shape Layer, create another smaller circle.
Position it directly in the center of the larger circle.
You now have:
Large Circle
and:
Small Circle.
Step 4: Add Merge Paths
Inside:
Contents
choose:
Add → Merge Paths
Place Merge Paths so it operates on the two circles.
Set the mode to:
Subtract.
If the hierarchy is correct, the smaller circle cuts a hole in the larger circle.
You now have a ring.
If you’d like to practice Merge Paths and other Shape Layer techniques yourself, you can explore Adobe’s current After Effects options here:
Explore Adobe After Effects and current plans
Why Shape Layer Hierarchy Matters
This is probably the most important thing to understand about Merge Paths.
Shape Layer operators don’t simply affect everything automatically.
Their behavior depends on where they appear inside:
Contents.
For example:
Ellipse 1
Ellipse 2
Merge Paths 1
Fill 1
can produce a different result from a structure where the Merge Paths operator is located inside another group.
Think Top to Bottom
After Effects processes Shape Layer components according to their hierarchy.
If Merge Paths doesn’t appear to work:
don’t immediately assume the feature is broken.
First inspect:
- Shape groups;
- operator position;
- Fill position;
- Stroke position.
A Clean Merge Paths Structure
For beginners, try to keep related Shapes together.
For example:
Shape Layer
→ Contents
→ Ellipse 1
→ Ellipse 2
→ Merge Paths 1
→ Fill 1
This makes the relationship easier to understand.
Project 1: Create a Ring
We’ve already created one using:
Large Circle − Small Circle
This is useful for:
- icons;
- loading indicators;
- interface elements;
- logo components.
Animate the Ring
Because the two circles remain editable, you can animate:
Ellipse Size
or:
Position.
For example, animate the inner circle from:
small → large.
The hole expands dynamically.
This is one of the major advantages over creating a static vector beforehand.
Project 2: Crescent Moon
Create:
Circle A
and:
Circle B
Offset Circle B slightly to one side.
Set Merge Paths to:
Subtract.
Circle B cuts into Circle A.
The remaining Shape resembles a crescent moon.
Animate the Crescent
Animate Circle B’s Position.
As it moves through Circle A, the crescent changes shape.
This can create a stylized:
- moon-phase animation;
- abstract transition;
- logo reveal.
Project 3: Simple Plus Symbol
Create:
Rectangle 1
vertical.
Create:
Rectangle 2
horizontal.
Set Merge Paths to:
Add.
The two rectangles combine into a plus symbol.
Animate into a Plus
Start with the rectangles separated.
Animate them toward the center.
Once they overlap, Merge Paths creates the combined shape.
This works well for UI icon animation.
Turn Plus into X
Rotate the Shape group:
45°.
The plus becomes an X.
You can animate:
0° → 45°
to transform a plus into a close icon.
Project 4: Create a Minus Symbol
Use one rectangle.
For a UI icon system, you could animate between:
- plus;
- minus;
- X.
Shape Layers make this easy to build procedurally.
Project 5: Magnifying Glass
Create:
Large Circle
Smaller Circle
Use Subtract to create the ring.
Add a rectangle for the handle.
Use Add to combine the handle with the ring if appropriate.
You now have a magnifying-glass icon built entirely from basic shapes.
Why Build Icons Procedurally?
Because every component remains editable.
You can change:
- circle size;
- handle length;
- stroke/fill;
- proportions.
This is excellent for reusable UI animation.
Project 6: Map Pin
Create:
Circle
plus:
Triangle or custom Shape.
Use Add to combine them.
Then subtract a smaller central circle.
The result can resemble a location pin.
Animate the internal hole or outer geometry for a logo-style reveal.
Project 7: Speech Bubble
Create:
Rounded Rectangle
plus:
Small Triangle.
Use Add.
The two shapes become a speech bubble.
This is useful for:
- messaging animations;
- social-media graphics;
- explainer videos.
Project 8: Camera Icon
Build from:
- rounded rectangle;
- circle;
- smaller shapes.
Use Subtract for the lens opening or Add to combine components.
You can construct surprisingly sophisticated icons from primitives.
Project 9: Play Button
Create:
Circle
and:
Triangle.
Use Subtract if you want the triangle cut out of the circle.
Or keep the triangle as a separate Fill for a traditional play icon.
Animate the Play Button
Scale the triangle.
Rotate it.
Morph or replace it with pause bars.
Merge Paths can help create transitions between icon states.
Project 10: Donut Chart Segment
Create concentric circles.
Use Subtract to create a ring.
Then combine with other shapes to isolate a segment.
For simple progress rings, Trim Paths is often easier.
But Merge Paths becomes useful when you need custom geometric segments.
Merge Paths vs Trim Paths
These tools solve different problems.
Trim Paths
Controls how much of a Stroke is visible.
Excellent for:
- line drawing;
- progress rings;
- route animations.
Merge Paths
Combines filled vector geometry.
Excellent for:
- cutting holes;
- combining shapes;
- creating icons;
- Boolean geometry.
Often, you can use both in the same project.
Project 11: Animated Logo Geometry
Suppose your logo contains:
- circle;
- rectangle;
- cutout.
Instead of importing the finished logo, reconstruct it with Shape Layers.
Use Merge Paths to create the final geometry.
Then animate the source Shapes.
Example
Start:
two circles separated.
Animate:
circles overlap.
Use:
Intersect
to reveal the overlapping logo shape.
This can create a sophisticated logo animation from very simple geometry.
Project 12: Lens/Venn Diagram Animation
Create two overlapping circles.
Use Intersect.
Only the overlapping region remains.
Animate the circles apart.
The intersection shrinks.
Move them together.
The intersection grows.
This is excellent for explaining:
- shared characteristics;
- overlapping markets;
- combined technologies;
- common features.
Create a Business Infographic
For example:
Circle A:
Design
Circle B:
Technology
Intersection:
Digital Product
Animate the overlap.
This visually explains the relationship.
Project 13: Excluded Intersection
Use two overlapping circles.
Set:
Exclude Intersections.
The shared middle region disappears.
This creates a different visual relationship.
Animate the circles to explore how the excluded area changes.
Project 14: Geometric Transition
Create several large Shapes.
Use Merge Paths while animating their positions and sizes.
As the Shapes overlap, the resulting geometry changes dynamically.
This can produce:
- wipes;
- reveals;
- abstract transitions.
Use a Shape as a Matte
The final Merge Paths result can also participate in broader compositing workflows.
For example, use animated Shape geometry to reveal:
- video;
- photographs;
- text.
Merge Paths and Track Mattes
You can create a complex animated Shape using Merge Paths.
Then use that Shape Layer as a matte for another layer.
This combines procedural geometry with compositing.
Project 15: Animated Cutout Title
Create a large rectangle.
Create text-shaped or vector paths where appropriate.
Subtract the foreground geometry from the rectangle.
The background footage can appear through the cutout.
Depending on the text workflow, converting suitable artwork to Shape Layers may be required.
Merge Paths with Illustrator Artwork
Adobe Illustrator artwork can be useful when you need more complex vector shapes.
Import the artwork.
Where appropriate, convert it into Shape Layers.
Then inspect the generated hierarchy before applying Merge Paths.
Imported Artwork Can Be Complicated
Illustrator conversions may create:
- multiple groups;
- compound paths;
- fills;
- strokes.
Merge Paths becomes much easier when the Shape hierarchy is clean.
Simplify First
Remove unnecessary:
- groups;
- paths;
- transforms.
Rename the important Shape groups.
Then build your Boolean operations.
Merge Paths and Fills
A common source of confusion is the Fill.
If each individual Shape has its own Fill inside separate groups, Merge Paths may not behave as expected.
Sometimes you’ll want the Fill applied after the merged paths.
Think Geometry First, Appearance Second
A useful conceptual workflow is:
Paths
↓
Merge Paths
↓
Fill / Stroke
In other words:
first create the final geometry.
Then style it.
This isn’t the only possible hierarchy, but it’s an excellent starting point.
Merge Paths and Strokes
Merge Paths primarily concerns vector path geometry.
Depending on the setup, Stroke behavior may differ from what you expect.
If you’re trying to combine visible line strokes rather than filled regions, consider whether:
- Trim Paths;
- Stroke;
- converted outlines;
would be more appropriate.
Add vs Merge
These modes can sometimes appear similar with simple filled Shapes.
The differences become more noticeable in more complex path configurations.
Experiment with both using the same source Shapes.
Subtract Direction Matters
If the wrong Shape disappears, change:
- Shape order;
- hierarchy;
- path arrangement.
Boolean operations depend on which Shape is acting on which.
Swap the Shape Order
Suppose you want:
Circle A − Circle B
but get the opposite result.
Try changing their order in:
Contents.
Understanding ordering is essential for Subtract operations.
Animate the Subtracting Shape
This is where Merge Paths becomes especially useful for motion graphics.
Instead of treating the subtracting Shape as static, animate it.
For example:
a circle travels across a rectangle.
As it moves, it cuts a moving hole through the rectangle.
Create an Animated Reveal
Imagine a full-screen Shape.
Move a large subtracting circle across it.
The resulting cutout can reveal another layer beneath.
This can create a clean transition.
Project 16: Circular Wipe
Create:
Large Rectangle
covering the frame.
Create:
Circle
inside the same Shape system.
Use Subtract.
Animate the circle:
small → enormous.
The expanding hole reveals the content beneath.
Project 17: Sliding Cutout
Create a rectangle.
Subtract another rectangle.
Animate the second rectangle horizontally.
The moving opening can reveal:
- text;
- footage;
- images.
Project 18: Animated Stripe Pattern
Create several rectangles using the Repeater.
Then combine or subtract them from another Shape using Merge Paths.
This is a good example of combining two Shape Layer operators.
Repeater + Merge Paths
Create:
one Shape
↓
Repeater
↓
multiple copies
↓
Merge Paths
The result can become a single complex geometric pattern.
Operator order will strongly influence the result.
Merge Paths + Repeater
Changing the order may instead:
- merge source geometry;
- repeat the merged result.
These can produce very different designs.
Operator Order Is a Creative Tool
Don’t think of Shape Layer order only as a technical limitation.
It is also a design tool.
Try:
Merge → Repeat
and:
Repeat → Merge.
Compare the results.
Merge Paths + Trim Paths
You can combine Merge Paths with Trim Paths in some Shape Layer designs.
For example:
- Create custom merged geometry.
- Add Stroke.
- Animate suitable paths.
The exact hierarchy depends on the artwork.
Merge Paths + Round Corners
Build a geometric Shape.
Then apply:
Round Corners.
This can soften the final result.
Great for:
- interface icons;
- modern logos;
- badges.
Merge Paths + Repeater + Round Corners
Combining operators can generate complex procedural patterns from very simple Shapes.
But build them one operator at a time.
Project 19: Gear-Like Shape
Start with:
- circle;
- repeated rectangles around the perimeter.
Use Repeater for the teeth.
Combine the geometry.
Subtract a smaller circle from the center.
You can build a stylized gear icon.
Animate the Gear
Rotate the finished Shape.
Create a second gear.
Rotate it in the opposite direction.
This is useful for:
- settings icons;
- engineering graphics;
- process animations.
Project 20: Animated Badge
Combine:
- circle;
- star;
- ribbon shapes.
Use Add and Subtract operations.
Animate the components into place.
This can create:
- achievement badges;
- awards;
- certification graphics.
Merge Paths for Logo Design Experiments
Because the Shapes remain editable, Merge Paths can also help explore logo geometry directly inside After Effects.
However, Illustrator remains better suited for detailed static vector design.
After Effects excels when the geometry needs to animate.
Animate Boolean Relationships
This is the key advantage.
You’re not merely combining Shapes.
You’re animating the relationship between them.
A circle can:
- enter;
- intersect;
- subtract;
- leave.
The resulting geometry changes continuously.
Use Expressions
Expressions can automate the underlying Shape properties.
For example, a Slider could control:
Ellipse Size
or:
Position.
The Merge Paths result updates automatically.
Create a Cutout Slider
Add:
Cutout Size
Slider Control.
Connect it to the inner Ellipse Size.
Now:
Slider = 0
creates almost no hole.
Increasing the Slider enlarges the cutout.
Create a Master Icon Controller
For reusable graphics, create:
CTRL — ICON
with:
- Size;
- Hole Size;
- Roundness;
- Rotation;
- Color.
Connect these to the Shape Layer.
Now the icon can be customized without digging into Contents.
Responsive Shape Systems
Merge Paths can also participate in responsive motion graphics.
For example, a background Shape could adapt to text dimensions while another Shape creates a decorative cutout.
Combine this with:
sourceRectAtTime()
for advanced template systems.
Merge Paths and MOGRTs
Procedural Shape graphics can be useful when creating Motion Graphics templates.
Expose useful controls such as:
- color;
- size;
- icon state.
Keep the internal Merge Paths structure hidden from the end user.
Keep Templates Simple
Just because a Shape system can expose 20 controls doesn’t mean it should.
Expose only what the editor needs.
Performance
Merge Paths is generally efficient for reasonable vector designs.
But very complex Shape Layers containing:
- hundreds of paths;
- Repeaters;
- multiple Boolean operations;
- expressions;
can become harder to preview.
Simplify where possible.
Pre-Compose Complex Graphics
If a finished procedural icon doesn’t need constant editing, pre-composing can help keep the main Timeline manageable.
Common Mistake: Merge Paths Does Nothing
Check:
- Are the Shapes inside the same relevant group?
- Is Merge Paths positioned correctly?
- Is there a Fill after the merged geometry?
- Are you using suitable Shape paths?
Common Mistake: Wrong Shape Is Subtracted
Change the Shape order.
Common Mistake: Separate Shape Layers
Merge Paths operates within Shape Layer structures.
If your Shapes are on completely separate Shape Layers, simply adding Merge Paths to one won’t automatically combine geometry from the other.
Common Mistake: Fill Is in the Wrong Place
Try restructuring:
Paths → Merge Paths → Fill
rather than giving each source Shape an isolated appearance setup.
Common Mistake: Using Merge Paths for a Stroke Reveal
Use Trim Paths when the real goal is drawing a Stroke.
Common Mistake: Too Much Complexity
Don’t start with a 200-path logo.
Practice with:
two circles.
Common Mistake: Ignoring Hierarchy
Most Merge Paths problems are easier to understand once you inspect:
Contents.
Common Mistake: Not Naming Groups
Rename:
Ellipse 1
to:
OUTER CIRCLE
and:
Ellipse 2
to:
CUTOUT.
This makes the operation much easier to understand later.
Common Mistake: Flattening Too Early
One advantage of Shape Layers is editability.
Keep source geometry procedural while you’re designing the animation.
Merge Paths Quick Reference
Merge
Combines path geometry into a merged result.
Add
Combines the visible areas of Shapes.
Subtract
Removes one Shape from another.
Intersect
Keeps only the overlapping region.
Exclude Intersections
Removes the shared overlap while keeping the other regions.
Five Merge Paths Exercises
Exercise 1 — Ring
Large circle minus small circle.
Exercise 2 — Crescent
Circle minus offset circle.
Exercise 3 — Plus Symbol
Vertical rectangle plus horizontal rectangle.
Exercise 4 — Intersection
Overlap two circles and keep only their shared area.
Exercise 5 — Animated Cutout
Subtract an animated circle from a rectangle.
These exercises will teach you most of the underlying logic.
Practical Project: Animated Search Icon
Create:
Outer Circle
minus:
Inner Circle
to form a ring.
Add:
Handle Rectangle.
Combine appropriately.
Animate:
- Scale;
- Rotation;
- Position.
You now have a reusable search icon.
Practical Project: Animated Location Pin
Build the pin from simple geometry.
Subtract the central hole.
Animate it dropping into position.
Add a small bounce to the Layer Position—not to the geometric meaning of the icon.
Practical Project: Logo Reveal
Build a simple logo from overlapping Shapes.
Start with the components separated.
Animate them into overlap.
Let Merge Paths generate the final geometry.
Then reveal the brand name.
Practical Project: Full-Screen Transition
Create a rectangle covering the frame.
Subtract a circle.
Animate:
Circle Size 0 → larger than frame.
The circular opening expands and reveals the next scene.
This creates a clean transition entirely with Shape Layers.
Frequently Asked Questions
What is Merge Paths in After Effects?
Merge Paths is a Shape Layer operator that combines vector paths using Boolean-style operations.
Where is Merge Paths?
Select a Shape Layer and choose:
Contents → Add → Merge Paths.
What can Merge Paths do?
It can combine, subtract, intersect, or exclude overlapping Shape geometry.
How do I cut a hole in a Shape?
Place a smaller Shape over a larger one and use:
Subtract.
Why isn’t Merge Paths working?
The most common cause is Shape Layer hierarchy. Check the placement of the paths, Merge Paths operator, and Fill.
Can Merge Paths work between separate layers?
Merge Paths works within Shape Layer path structures, so Shapes generally need to be organized appropriately within the same Shape Layer hierarchy.
Can I animate Merge Paths?
You normally animate the source Shape properties rather than the Merge Paths mode itself.
Can I animate the subtracting Shape?
Yes. This is one of the most useful techniques.
Can I combine Merge Paths with Repeater?
Yes.
Can I combine Merge Paths with Trim Paths?
Yes, depending on the Shape Layer hierarchy and desired result.
Is Merge Paths like Illustrator Pathfinder?
Conceptually, yes. Both use Boolean-style vector operations, although their interfaces and workflows differ.
Can I use Merge Paths for logos?
Yes, particularly geometric logos.
Can I create transitions with Merge Paths?
Yes. Animated subtracting Shapes can create excellent wipes and reveals.
Do I need a plug-in?
No. Merge Paths is built into After Effects Shape Layers.
Practice Merge Paths in After Effects
Start with two circles.
Put them inside one Shape Layer.
Move them so they overlap.
Add Merge Paths.
Then switch between:
Add
Subtract
Intersect
Exclude Intersections.
Watch what happens.
Then animate one circle’s Position.
This is the fastest way to understand the feature.
Once the concept is clear, try:
- ring;
- crescent;
- plus;
- icon;
- transition.
If you’d like to practice Merge Paths and procedural Shape Layer animation yourself, you can explore Adobe’s current After Effects options here:
Get Adobe After Effects and start creating procedural Shape animations
What Should You Learn Next?
Merge Paths gives you control over how Shapes combine.
Another extremely useful Shape Layer operator is:
Round Corners.
Round Corners can transform sharp vector geometry into smoother designs without manually editing every path point.
It’s useful for:
- icons;
- interface graphics;
- geometric animation;
- logo design;
- rounded transitions.
The next article will therefore be:
How to Use Round Corners in Adobe After Effects Shape Layers.
We’ll look at how Radius works, how Round Corners interacts with different paths, how to animate it, and how to combine it with Repeater and Merge Paths.
Final Thoughts
Merge Paths turns basic After Effects Shape Layers into a much more capable vector-design system.
The fundamental operations are simple:
Add
Subtract
Intersect
Exclude.
But the possibilities expand rapidly because the original Shapes remain animatable.
You can move a circle through another Shape.
Resize a cutout.
Rotate overlapping geometry.
Repeat Shapes before combining them.
Use the final result as part of a transition.
The most important concept to remember is:
Shape Layer hierarchy matters.
When Merge Paths doesn’t produce the result you expect, inspect:
the paths
↓
their order
↓
Merge Paths
↓
Fill or Stroke.
Start with two simple Shapes until the logic becomes intuitive.
Then combine Merge Paths with:
- Repeater;
- Trim Paths;
- Round Corners;
- expressions;
- responsive controls.
At that point, Shape Layers become much more than basic rectangles and circles—they become a procedural vector-animation system directly inside Adobe After Effects.
Explore Adobe After Effects and start building advanced Shape Layer animations






