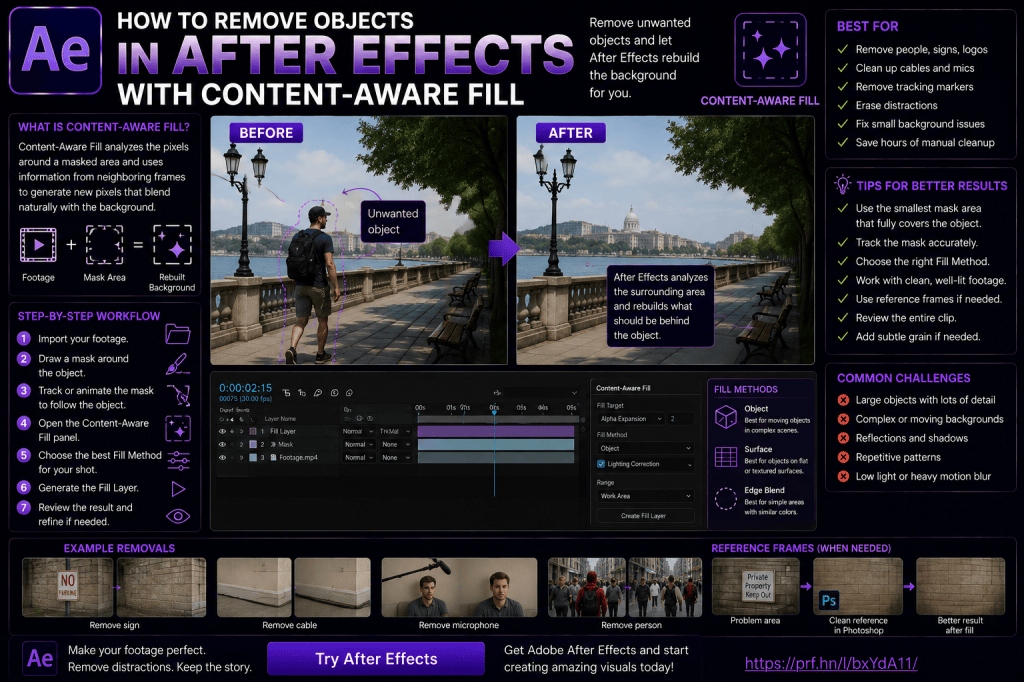
Removing unwanted objects from video used to be one of those visual-effects jobs that could require considerable manual painting, masking, tracking, and frame-by-frame cleanup.
Adobe After Effects provides a much faster option for many shots: Content-Aware Fill.
Content-Aware Fill analyzes surrounding image information and neighboring frames to generate replacement pixels for an area you’ve defined. Instead of simply hiding an unwanted object, After Effects attempts to reconstruct what the background might look like if that object wasn’t there.
That makes it useful for removing things such as:
- unwanted people;
- signs;
- logos;
- cables;
- microphones;
- small equipment;
- dust or distracting objects;
- temporary markers;
- unwanted items in the background.
In this guide, we’ll look at how Content-Aware Fill works, how to remove your first object, how to create and track a mask, which Fill Method to choose, how to generate a Fill Layer, and what to do when the automatic result isn’t good enough.
Affiliate disclosure: This article contains affiliate links. If you purchase Adobe After Effects through one of these links, we may earn a commission at no additional cost to you.
What Is Content-Aware Fill in After Effects?
Content-Aware Fill is a compositing tool that attempts to replace unwanted regions of video by analyzing surrounding visual information.
Imagine a camera moving across a street.
There’s a small sign on a wall that you want to remove.
You create a mask around the sign and tell After Effects which area should disappear.
After Effects analyzes the surrounding wall and attempts to generate replacement imagery for the masked region.
The basic workflow is:
Identify unwanted object → Create mask → Track or animate mask → Generate Fill Layer → Review result
For suitable footage, this can save an enormous amount of manual cleanup.
Content-Aware Fill for Video vs Photoshop
You may already know Content-Aware Fill from Adobe Photoshop.
The underlying idea is similar:
Remove something and reconstruct the missing background.
But video introduces another dimension:
time.
After Effects can use information from surrounding frames to help determine what should appear behind the removed object.
This can be extremely powerful.
A region hidden in one frame may become visible in another.
That gives After Effects additional information from which to reconstruct the scene.
What Can You Remove?
Content-Aware Fill can work particularly well for relatively small unwanted objects.
Examples include:
- microphone entering the frame;
- cable on the floor;
- small road sign;
- logo on a wall;
- piece of equipment;
- unwanted background person;
- tracking marker;
- dust spot;
- temporary object.
The complexity of the removal depends heavily on the footage.
Easy vs Difficult Object Removal
Some removals are much easier than others.
Easier example
A small object appears against a simple textured wall.
Harder example
A person walks across:
- patterned pavement;
- moving water;
- reflections;
- other moving people;
- complicated shadows.
Content-Aware Fill isn’t magic.
It needs useful image information from which to construct the replacement.
When Content-Aware Fill Works Best
Good candidates often have:
- relatively small unwanted objects;
- backgrounds visible elsewhere in the footage;
- predictable textures;
- sufficient surrounding information;
- moderate camera movement;
- clear separation between object and background.
The better the available visual information, the better the potential fill.
When It Can Struggle
Content-Aware Fill may struggle with:
- large removed objects;
- highly detailed backgrounds;
- moving reflections;
- water;
- smoke;
- complex shadows;
- heavy motion blur;
- objects covering unique information throughout the entire shot.
In those situations, you may need additional compositing techniques.
Before You Begin
Our previous tutorials covered:
3D Camera Tracking
Mocha AE planar tracking
Roto Brush
Object Matte
These techniques can all contribute to object-removal workflows.
For example, you may need tracking to keep a removal mask attached to an object.
Or you may use object isolation to generate a more accurate region for removal.
If you’d like to practice Content-Aware Fill yourself, you can check Adobe’s current After Effects options here:
Explore Adobe After Effects and current plans
Your First Object Removal
For your first exercise, choose easy footage.
Imagine a static object on a wall while the camera moves slowly.
For example:
- sticker;
- small sign;
- wall decoration.
This gives you a straightforward background texture and a manageable object.
Step 1: Import Your Footage
Import the footage into After Effects.
Create a composition from the clip.
Place the video on the Timeline.
Trim the composition to the section where the unwanted object needs to be removed.
There’s no reason to process frames you won’t use.
Step 2: Find the Unwanted Object
Scrub through the footage.
Watch how the object behaves.
Ask:
- Does it move?
- Does the camera move?
- Does its apparent size change?
- Does anything pass in front of it?
- Does the lighting change?
Understanding the shot before creating the mask can save time later.
Step 3: Draw a Mask Around the Object
Select the footage layer.
Use the Pen Tool or an appropriate mask shape to draw around the unwanted object.
You don’t necessarily need to trace every edge with extreme precision.
Give the object some surrounding space where appropriate.
The goal is to define the region After Effects should replace.
Step 4: Set the Mask to Subtract
For Content-Aware Fill, you typically want the masked region to become transparent.
Set the mask appropriately so the unwanted object is removed from the visible layer.
You should now see transparency where the object was.
That transparent region becomes the area Content-Aware Fill needs to reconstruct.
Why Mask Size Matters
If the mask is too tight, parts of the unwanted object may remain.
If it’s unnecessarily large, After Effects has to reconstruct more of the image than necessary.
A useful principle is:
Remove the complete unwanted object while keeping the replacement region reasonably compact.
Add Some Margin
Don’t let the mask sit directly on the object’s visible edge if that leaves anti-aliased pixels, shadows, or color contamination behind.
Include enough margin to remove:
- object edges;
- small shadows;
- glow;
- reflected color;
when these are part of what you want removed.
Step 5: Track the Mask
If the camera or object moves, the mask must continue covering the unwanted object throughout the shot.
For simple movement, you can animate the mask manually.
For more complex motion, tracking can save time.
After Effects provides mask-tracking capabilities that can help follow the object or region.
The important thing is simple:
The transparent hole must continue covering the unwanted object on every required frame.
Check Every Frame
Don’t assume the mask stays correct simply because the first and last frames look good.
Scrub through the shot.
Look for moments where the object escapes the mask.
Even a few visible pixels can reveal the removal.
Mask Feather
A small amount of feathering can sometimes help create a smoother transition between the generated fill and surrounding footage.
However, excessive feathering can create:
- blurry edges;
- ghosting;
- visible contamination from the original object.
Use only as much as the shot requires.
Mask Expansion
Mask Expansion can help enlarge or shrink the removal region without manually redrawing the mask.
This is useful if you realize that the mask needs a slightly larger safety margin.
Again, don’t make the removal region larger than necessary.
Step 6: Open Content-Aware Fill
With your layer and removal area prepared, open the Content-Aware Fill panel.
This is where you control how After Effects generates the missing imagery.
You’ll find settings related to:
- Fill Method;
- Range;
- Alpha Expansion;
- lighting correction options where applicable;
- Fill Layer generation.
Let’s look at the important concepts.
Fill Method
The Fill Method tells After Effects something about the kind of region it’s reconstructing.
Different types of footage benefit from different approaches.
Depending on your version and workflow, methods include options such as:
Object
Surface
Edge Blend
Choosing the correct method can significantly affect the result.
Object Fill
Use Object when you’re removing an object from footage where the background changes as the camera or scene moves.
This is a common choice for general object removal.
Imagine removing a person walking through a shot.
After Effects attempts to use information across frames to reconstruct what is behind them.
Surface Fill
Use Surface when the removed object sits on a relatively flat or consistent surface.
Examples might include:
- sticker on a wall;
- logo on a sign;
- object on a floor;
- marking on a relatively flat area.
Surface-oriented reconstruction can work particularly well when the background texture remains relatively consistent.
Edge Blend
Edge Blend can be useful for simpler regions where color and texture are relatively uniform.
For example:
- smooth sky;
- softly changing background;
- simple gradient-like regions.
It’s less appropriate for reconstructing complicated detailed textures.
Which Fill Method Should You Choose?
A useful starting point is:
Moving object/general scene → Object
Object on flat textured area → Surface
Simple low-detail region → Edge Blend
But don’t treat this as an absolute rule.
Try alternatives if the first result isn’t convincing.
Different shots behave differently.
Step 7: Choose the Fill Range
You may not need to process the entire composition.
Content-Aware Fill can operate over the relevant work area or other defined range depending on your setup.
Limit the processing to the frames that actually require object removal.
This can reduce processing time.
Step 8: Generate the Fill Layer
Once the settings are ready, generate the Fill Layer.
After Effects analyzes the footage and creates replacement imagery.
The processing time depends on:
- clip length;
- resolution;
- size of removal area;
- footage complexity;
- computer performance.
When complete, a new Fill Layer is added to the composition.
What Is the Fill Layer?
The Fill Layer contains generated image information used to cover the transparent region.
Think of it as a patch sequence created specifically for your shot.
Your original footage remains available.
The generated layer provides the reconstructed pixels.
This non-destructive approach is useful because you can modify or regenerate the fill without permanently changing your source footage.
Step 9: Preview the Result
Now watch the entire shot.
Don’t judge only a single frame.
Look for:
- flickering;
- repeated textures;
- smearing;
- strange patterns;
- visible seams;
- incorrect shadows;
- distorted background features.
The removal should remain convincing over time.
What Makes a Good Removal?
The best object removal is invisible.
The viewer shouldn’t think:
“That was digitally removed.”
They shouldn’t notice anything.
This means temporal consistency matters enormously.
A replacement that looks perfect on one frame but flickers on the next isn’t successful.
Common Problem: Repeating Textures
Suppose you’re removing something from a brick wall.
After Effects may generate repeated brick patterns that look unnatural.
This can happen when the software doesn’t have enough suitable information.
Possible solutions include:
- changing Fill Method;
- adjusting mask size;
- creating a reference frame;
- manually repairing the generated imagery.
Common Problem: Smearing
Generated pixels may sometimes appear smeared across frames.
This can occur when the background contains complex movement or insufficient clean information.
Again, consider whether After Effects actually has access to the background you’re asking it to reconstruct.
Common Problem: Shadows Remain
Imagine removing a person but leaving their shadow on the ground.
The viewer immediately senses something is wrong.
The removal mask may need to include both:
Person + Shadow
However, this increases the reconstruction area.
Sometimes it’s better to handle the shadow separately.
Common Problem: Reflections Remain
If an unwanted object appears in a reflective surface, removing only the physical object isn’t enough.
You may also need to remove its reflection.
Examples include:
- windows;
- mirrors;
- polished floors;
- cars;
- water.
Visual effects require thinking about how the object interacts with the environment.
Reference Frames
When Content-Aware Fill doesn’t have enough information to reconstruct a difficult region, reference frames can become extremely useful.
The idea is straightforward.
You provide After Effects with an example of what the corrected frame should look like.
This gives the fill process better information.
How Reference Frames Help
Suppose you want to remove a sign from a complicated wall.
The automatic fill creates ugly texture.
You can create a reference frame and manually repair that frame in an image-editing workflow.
You then provide that corrected image as guidance.
After Effects can use the reference information when generating the fill across the shot.
When to Use a Reference Frame
Consider one when:
- the automatic fill fails;
- the background contains unique detail;
- repeated patterns look wrong;
- geometry needs to be preserved;
- you can manually create one convincing clean frame.
Reference frames combine automation with human guidance.
Choosing a Good Reference Frame
Choose a frame where:
- the background is clearly visible;
- perspective is useful;
- motion blur is limited;
- lighting is representative.
You want a frame that provides strong information about what the scene should look like.
Content-Aware Fill and Photoshop
A reference-frame workflow can involve editing a still image in Adobe Photoshop.
This is particularly useful for reconstructing:
- architectural details;
- textures;
- lines;
- patterned surfaces.
You manually create one high-quality clean plate.
After Effects then uses that information across the video.
This is a powerful Adobe workflow because Photoshop handles detailed still-image cleanup while After Effects handles temporal compositing.
What Is a Clean Plate?
A clean plate is an image of the scene without the unwanted object.
Clean plates are fundamental in visual effects.
Imagine a street scene.
You want to remove a trash bin.
A clean plate would show the same section of street without the bin.
If you have a clean plate, object removal becomes much easier.
Shoot Clean Plates When Possible
If you’re planning the production yourself, record clean plates.
After filming the main action:
- Remove actors or unwanted temporary objects.
- Keep the camera in the same position where possible.
- Record several seconds of the empty scene.
That footage can save enormous amounts of time in post-production.
Good production planning beats complicated repair work.
Removing a Person
Let’s consider a more challenging example.
A person walks through a static background.
You want them gone.
Create a mask around the person.
Track or animate the mask through the shot.
Generate the fill.
After Effects may be able to reconstruct the background using information from frames before and after the person passes through each area.
This is exactly where temporal analysis becomes valuable.
Why Moving Objects Can Sometimes Be Easier Than Expected
Suppose a person walks from left to right.
At frame 1, they cover the left side of the wall.
Later, that part of the wall becomes visible.
At frame 100, they cover the right side.
Earlier frames contain information about that region.
Across the entire clip, After Effects may have seen most of the background.
That gives Content-Aware Fill useful reconstruction data.
Removing a Stationary Object
Interestingly, a stationary object can sometimes be harder.
Suppose a sign remains attached to a wall throughout the entire clip.
After Effects never sees what is behind it.
It must infer the missing wall texture.
This is where a reference frame or clean plate can become particularly valuable.
Removing Cables
Cable removal is a classic cleanup task.
A cable may run across:
- floor;
- wall;
- equipment.
Because it’s relatively thin, the reconstruction area can be small.
Create a mask covering the cable.
Track where necessary.
Generate the fill.
Thin unwanted elements can be good candidates for Content-Aware Fill.
Removing Microphones
Suppose a boom microphone briefly enters the top of the frame.
This can be an excellent cleanup candidate.
The microphone appears only for a short period, meaning other frames may contain plenty of clean background information.
Mask it.
Track the mask.
Generate the fill for the affected range.
Removing Logos
A logo on a wall or product can sometimes be removed using Content-Aware Fill.
But consider the surface.
If the logo sits on:
simple flat material
the fill may be straightforward.
If it sits across:
complex texture + reflections + curved geometry
the task becomes more difficult.
In some cases, planar tracking and patch replacement may be more appropriate.
Content-Aware Fill vs Clone Stamp
After Effects also includes paint and cloning capabilities.
Clone-based cleanup gives you more manual control.
Content-Aware Fill provides greater automation.
A practical approach is:
Try Content-Aware Fill first.
If it gets you 90% of the way there, manually repair the remaining problems.
Don’t manually paint hundreds of frames if automation can create a useful starting point.
Content-Aware Fill vs Mocha AE
Mocha AE is primarily a tracking tool, but planar tracking can support object-removal workflows.
For example, if a logo sits on a moving wall or screen, Mocha can track the plane.
You can then apply a clean patch to that surface.
In some situations this may produce better results than Content-Aware Fill.
Again:
Choose the technique based on the shot.
Content-Aware Fill vs Object Matte
Object Matte helps isolate an object.
Content-Aware Fill attempts to reconstruct what should appear behind that object.
These technologies can complement one another.
Conceptually:
Object Matte → Identify object
Content-Aware Fill → Replace object area
This can become an increasingly efficient workflow as AI-assisted tools improve.
Content-Aware Fill vs Roto Brush
Roto Brush can also help create an isolation of the unwanted subject.
That matte may then contribute to a removal workflow.
This can be useful when the unwanted object is:
- person;
- animal;
- irregular moving subject.
A hand-drawn mask isn’t always the easiest way to define the removal area.
Removing Tracking Markers
Tracking markers are intentionally placed into footage to make visual-effects work easier.
Later, they need to disappear.
Content-Aware Fill can sometimes help remove them.
Because markers are usually:
- small;
- high contrast;
- surrounded by known surfaces;
they can be good candidates for automated cleanup.
Removing Objects from Moving Camera Shots
Camera movement adds complexity because the background itself changes position and perspective.
But camera movement also reveals different parts of the environment over time.
That can provide additional reconstruction information.
Whether the result succeeds depends on the shot.
Removing Objects from Handheld Footage
Handheld footage can be more challenging because of:
- motion blur;
- irregular movement;
- changing perspective.
However, don’t assume it won’t work.
Test the fill.
The actual result matters more than theoretical difficulty.
Removing Objects from Water
Water is difficult.
Its appearance changes constantly.
Reflections and ripples move independently.
The software has to synthesize a temporally convincing dynamic surface.
Small removals may work.
Large removals can be much harder.
Removing Objects from Crowds
Crowds are also challenging because almost everything moves.
There may be little stable background information.
If the unwanted person overlaps other moving people, reconstructing believable human movement behind them becomes especially difficult.
This may require advanced compositing rather than a one-click fill.
Removing Objects from the Sky
Simple skies can be relatively easy.
A small unwanted object against a mostly uniform sky may be an excellent candidate.
Edge Blend or another appropriate Fill Method may produce a convincing result.
Cloud movement can make the task more complicated.
Removing Objects from Grass
Grass contains detailed texture.
A small removal may work well because nearby texture provides useful information.
But repeated or smeared patterns can become visible.
Watch the result in motion.
Removing Objects from Brick Walls
Brick walls appear simple but can be deceptive.
Viewers immediately notice broken lines and repeating brick patterns.
A reference frame can help preserve architectural consistency.
Removing Objects Near Straight Lines
Straight lines reveal errors quickly.
Examples include:
- door frames;
- window edges;
- roads;
- shelves;
- tiles.
If the fill bends or breaks these lines, the repair becomes obvious.
Reference frames or manual patches may produce better results.
Alpha Expansion
Content-Aware Fill provides controls that affect the area surrounding the transparency used for reconstruction.
Adjusting the expansion can help ensure the unwanted object’s edge isn’t left behind.
But larger values also increase the amount of generated imagery.
Use enough to remove contamination without unnecessarily enlarging the task.
Lighting Changes
Some Content-Aware Fill workflows can compensate for lighting changes across the shot.
This can be important when illumination varies because of:
- camera movement;
- shadows;
- exposure changes;
- moving lights.
If generated patches appear brighter or darker than the surrounding footage, investigate lighting-related settings and source consistency.
Object Removal Workflow for Beginners
Use this checklist:
1. Identify the unwanted object
Understand how it moves.
2. Trim the work area
Process only what you need.
3. Create a mask
Cover the entire unwanted region.
4. Track the mask
Keep it aligned throughout the shot.
5. Create transparency
Define the area to replace.
6. Choose Fill Method
Object, Surface, or Edge Blend as appropriate.
7. Generate Fill Layer
Let After Effects analyze the footage.
8. Preview the complete shot
Look for temporal artifacts.
9. Adjust settings
Try alternative methods if necessary.
10. Create a reference frame
Use one if the automatic reconstruction isn’t sufficient.
11. Perform manual cleanup
Fix remaining visible problems.
12. Render and inspect
Always review the exported result.
Five Beginner Exercises
Exercise 1 — Remove a Small Wall Object
Use a simple wall with visible texture.
This teaches the basic workflow.
Exercise 2 — Remove a Cable
Practice using a narrow animated mask.
Exercise 3 — Remove a Boom Microphone
Work with an object that enters only briefly.
Exercise 4 — Remove a Walking Person
Explore temporal reconstruction.
Exercise 5 — Difficult Surface with Reference Frame
Use Photoshop or another appropriate image-editing workflow to create a clean reference.
These exercises gradually increase the difficulty.
Common Content-Aware Fill Mistakes
Mistake 1: Mask Is Too Small
Parts of the original object remain visible.
Mistake 2: Mask Is Far Too Large
After Effects has to reconstruct unnecessary pixels.
Mistake 3: Wrong Fill Method
Try another method when the result looks poor.
Mistake 4: Processing the Entire Clip
Limit the range when only a short section needs repair.
Mistake 5: Ignoring Shadows
Removing the object but leaving its shadow looks unnatural.
Mistake 6: Ignoring Reflections
Remember environmental interaction.
Mistake 7: Accepting the First Result
Generate, inspect, refine.
Mistake 8: Avoiding Reference Frames
Sometimes one manually repaired frame dramatically improves the result.
Mistake 9: Expecting Impossible Reconstruction
If the background never appears anywhere, After Effects has limited information.
Mistake 10: Ignoring Temporal Artifacts
A still frame can look perfect while the video flickers badly.
Can Content-Aware Fill Remove Anything?
No.
There are practical limits.
Imagine removing a large moving truck that covers half the frame throughout the entire shot.
The background behind it is never visible.
The software would have to invent enormous amounts of scene detail.
A clean plate or different compositing approach would likely be better.
Content-Aware Fill works best when the reconstruction problem is reasonably constrained.
Does Content-Aware Fill Use AI?
Content-Aware Fill relies on intelligent image analysis and synthesis techniques to determine how missing regions can be reconstructed from surrounding spatial and temporal information.
From a practical user perspective, the important point is that After Effects performs much of the reconstruction automatically.
You define what should disappear.
After Effects attempts to determine what should replace it.
Is Content-Aware Fill Destructive?
The workflow creates generated fill information rather than permanently overwriting your original source footage.
This makes it possible to adjust the removal and regenerate the result as necessary.
Maintaining your original footage is always good practice.
Do You Need Photoshop?
Not for every removal.
Many objects can be removed entirely inside After Effects.
Photoshop becomes particularly useful when you need to create a high-quality reference frame or clean plate for a difficult shot.
Do You Need Plug-Ins?
No.
Content-Aware Fill is built into Adobe After Effects.
Third-party cleanup and tracking tools can be useful for specialized workflows, but beginners can learn object removal using native After Effects tools.
Content-Aware Fill and AI-Assisted After Effects Workflows
Object removal demonstrates how several modern After Effects tools can work together.
Imagine you need to remove a person from footage.
A future-facing workflow could combine:
Object isolation
to define the person,
tracking
to maintain the region,
and
Content-Aware Fill
to reconstruct the background.
AI and automation increasingly handle repetitive parts of the process.
The artist still evaluates the result and determines how to solve difficult frames.
Should Beginners Learn Content-Aware Fill?
Absolutely.
Object removal is one of the most immediately useful visual-effects skills.
Even if you never work on a Hollywood production, you may need to remove:
- distracting person;
- logo;
- cable;
- microphone;
- unwanted sign;
- background object.
Being able to repair those problems can save an otherwise excellent shot.
Practice Object Removal in After Effects
Start with a five-second shot.
Choose one small unwanted object.
Create a mask.
Generate the fill.
Then deliberately choose something more difficult.
Compare the results.
You’ll quickly learn which kinds of scenes Content-Aware Fill handles well and which require additional techniques.
If you’d like to practice Content-Aware Fill and other compositing tools yourself, you can check Adobe’s current After Effects options below:
Get Adobe After Effects and start practicing object removal
Frequently Asked Questions
What is Content-Aware Fill in After Effects?
Content-Aware Fill attempts to reconstruct transparent areas of video using visual information from surrounding pixels and frames.
Can After Effects remove objects from video?
Yes. Content-Aware Fill is one of the native tools designed for this type of cleanup.
Can I remove a person?
Potentially, yes. Success depends on the size of the person, background complexity, movement, and availability of clean background information.
Can I remove a logo?
Yes, particularly when it sits on a surface that can be reconstructed convincingly.
Can I remove wires or cables?
Yes. Thin unwanted objects can be good candidates for Content-Aware Fill.
Can Content-Aware Fill remove a microphone?
Yes, especially when it appears only briefly and clean background information exists in other frames.
What is a Fill Layer?
It’s the generated imagery After Effects creates to reconstruct the transparent removal region.
What is a reference frame?
A reference frame provides manually corrected image information that can help After Effects generate a better fill.
Do I need Photoshop for reference frames?
Photoshop can be very useful for manually repairing a reference frame, particularly for complex textures and structures.
Why does my fill flicker?
The generated texture may be changing inconsistently between frames. Try different fill settings, refine the removal region, or use reference information.
Why can I still see part of the object?
Your removal mask or Alpha Expansion may not completely cover the object and its contaminated edge pixels.
Does Content-Aware Fill work on moving footage?
Yes, although camera movement, perspective changes, motion blur, and background complexity can affect the quality of the result.
What Should You Learn Next?
We’ve now covered a substantial sequence of compositing techniques:
Motion Tracking
↓
3D Camera Tracking
↓
Mocha AE
↓
Roto Brush
↓
Object Matte
↓
Content-Aware Fill
The next logical topic addresses another extremely common video problem:
shaky footage.
After Effects includes a tool specifically designed to analyze unwanted camera movement and stabilize it.
The next article will therefore be:
Adobe After Effects Warp Stabilizer: How to Fix Shaky Video.
We’ll cover stabilization, Smooth Motion versus No Motion, Smoothness settings, cropping, common Warp Stabilizer errors, and how to avoid the strange “warping” effect that can occur when stabilization is pushed too far.
Final Thoughts
Content-Aware Fill can turn an unusable shot into a usable one.
The essential workflow is straightforward:
Mask the unwanted object.
Track the mask.
Create transparency.
Choose the Fill Method.
Generate the Fill Layer.
Inspect the result.
But successful object removal requires more than pressing Generate Fill Layer.
You need to think about the entire scene.
If you remove a person, what happens to their shadow?
If you remove an object beside a window, does its reflection remain?
If you remove something from a brick wall, do the brick lines still make sense?
If the camera moves, does the replacement remain temporally stable?
These are compositing questions.
Content-Aware Fill provides automation, but your visual judgment determines whether the effect succeeds.
Start small.
Remove a sign.
Then a cable.
Then a microphone.
Then a moving person.
Learn when automatic reconstruction works and when you need a reference frame, clean plate, tracked patch, or manual cleanup.
Once you understand those limitations, Content-Aware Fill becomes much more than a novelty.
It becomes a practical production tool for repairing footage and solving real-world visual-effects problems.
Explore Adobe After Effects and start experimenting with Content-Aware Fill






