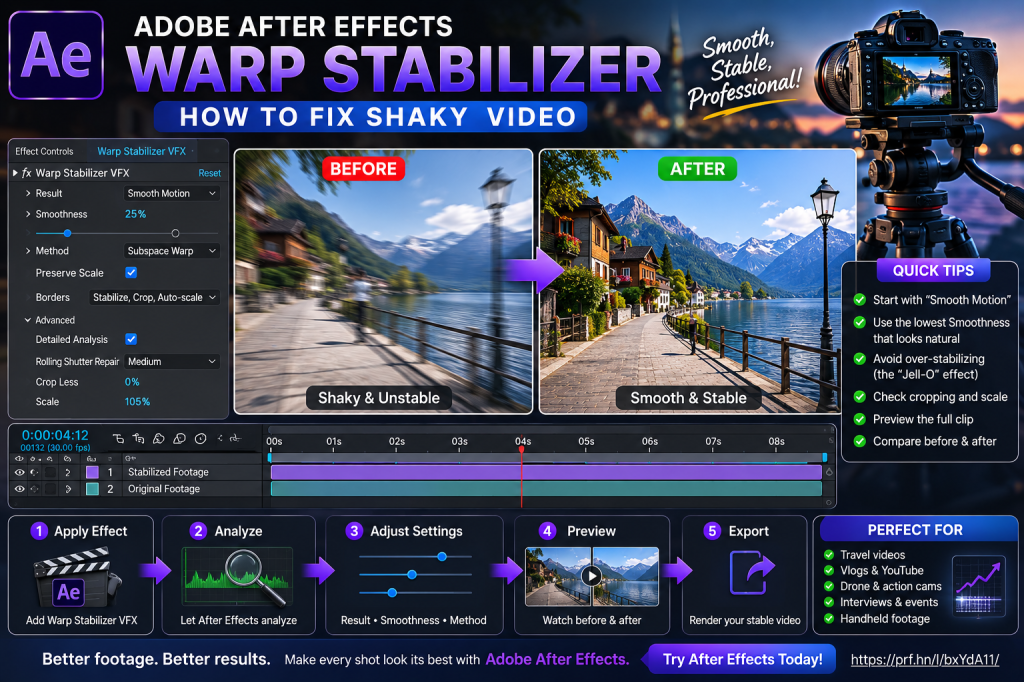
Shaky footage can quickly make an otherwise good video look amateurish.
Perhaps you filmed handheld while walking. Maybe a lightweight camera introduced small vibrations. Or perhaps a shot that looked stable on the camera display suddenly seems much rougher when viewed on a large monitor.
Fortunately, Adobe After Effects includes a powerful stabilization tool designed specifically for this problem: Warp Stabilizer VFX.
Warp Stabilizer analyzes movement in your footage and automatically attempts to reduce unwanted camera shake. In many cases, you can transform noticeably unstable footage into a much smoother shot with only a few adjustments.
However, stabilization isn’t simply a matter of applying the effect and accepting the default result.
Push the settings too far and your footage can develop strange stretching, wobbling, or the infamous “Jell-O effect.”
In this guide, you’ll learn how Warp Stabilizer works, how to stabilize shaky video in After Effects, what Smooth Motion and No Motion mean, how Smoothness affects the result, how cropping works, which stabilization methods to use, and how to troubleshoot common problems.
Affiliate disclosure: This article contains affiliate links. If you purchase Adobe After Effects through one of these links, we may earn a commission at no additional cost to you.
What Is Warp Stabilizer in After Effects?
Warp Stabilizer VFX is an Adobe After Effects effect that analyzes movement in video footage and attempts to compensate for unwanted camera shake.
The basic process is:
Original shaky footage
↓
Analyze camera movement
↓
Calculate stabilization
↓
Transform or warp frames
↓
Smoother footage
After Effects handles much of this process automatically.
That makes Warp Stabilizer one of the easiest stabilization tools for beginners to start using.
What Can Warp Stabilizer Fix?
Warp Stabilizer can potentially improve footage containing:
- handheld camera shake;
- small vibrations;
- uneven camera movement;
- minor walking movement;
- imperfect handheld pans;
- subtle rotational shake;
- some drone or action-camera movement.
The quality of the result depends heavily on the original footage.
Stabilization can improve camera movement.
It cannot completely repair every poorly recorded shot.
When Warp Stabilizer Works Best
The best candidates usually have:
- visible scene detail;
- manageable camera movement;
- reasonable shutter speed;
- limited motion blur;
- consistent subjects;
- enough room for cropping.
Moderately shaky handheld footage is an excellent place to start.
When Stabilization Becomes Difficult
Warp Stabilizer can struggle with footage containing:
- extreme motion blur;
- very fast camera movement;
- large foreground objects;
- rapidly changing scenes;
- strong rolling-shutter distortion;
- severe focus changes;
- very low-detail surfaces;
- large amounts of independent movement.
Sometimes the footage simply doesn’t contain enough reliable information to produce a convincing stabilization.
Stabilization Always Has a Cost
This is one of the most important concepts to understand.
To stabilize an image, After Effects often needs to move, rotate, scale, or distort frames.
That can expose empty areas around the edges.
To hide those edges, the image usually needs to be cropped or enlarged.
Therefore:
More stabilization often means more cropping.
You need to balance smoothness against image quality and framing.
Step 1: Import Your Footage
Open After Effects.
Import the shaky video.
Create a composition from the footage.
Place the clip in the Timeline.
For your first experiment, use a relatively short clip.
This makes analysis and experimentation faster.
Step 2: Select the Footage Layer
Select the footage layer you want to stabilize.
Warp Stabilizer analyzes the selected layer.
Make sure you’re applying it to the actual video footage rather than an unrelated adjustment or graphic layer.
Step 3: Apply Warp Stabilizer VFX
Locate Warp Stabilizer VFX in the Effects & Presets panel.
Apply it to the footage.
After Effects begins analyzing the clip.
You’ll typically see the analysis progress displayed while it processes the frames.
If you’d like to practice stabilization and the other techniques in this tutorial yourself, you can explore Adobe’s current After Effects options here:
Explore Adobe After Effects and current plans
Step 4: Let After Effects Analyze the Footage
Warp Stabilizer generally works in stages.
First it analyzes motion.
Then it calculates the stabilization result.
The amount of time required depends on factors including:
- clip duration;
- resolution;
- frame rate;
- footage complexity;
- computer performance.
Long 4K clips naturally require more processing than short HD clips.
What Is Warp Stabilizer Analyzing?
After Effects looks for visual features it can follow across frames.
By examining how those features move, it can estimate how the camera moved.
The software then calculates transformations designed to reduce unwanted movement.
You don’t need to manually create tracking points for the basic Warp Stabilizer workflow.
The analysis happens automatically.
Step 5: Preview the Default Result
Once stabilization is complete, preview the footage.
Don’t change ten settings immediately.
First see what the default result does.
Ask:
- Is the shot smoother?
- Does it look natural?
- Is the image distorted?
- Is too much of the frame cropped?
- Does the background wobble?
Sometimes the default settings produce a perfectly acceptable result.
If so, don’t complicate the workflow unnecessarily.
Smooth Motion vs No Motion
One of the most important Warp Stabilizer controls is Result.
The two main approaches are:
Smooth Motion
and
No Motion
These produce fundamentally different outcomes.
What Is Smooth Motion?
Smooth Motion keeps the intentional camera movement but attempts to make it smoother.
Imagine a handheld shot where the camera slowly pans across a room.
You want to preserve the pan.
You simply want to remove the small bumps and vibrations.
Use:
Result → Smooth Motion
This is appropriate for many handheld shots.
What Is No Motion?
No Motion attempts to make the camera appear locked in place.
Imagine a shot that should look as though the camera was mounted on a tripod.
Use:
Result → No Motion
After Effects attempts to remove as much camera movement as possible.
This can require significantly more cropping or transformation.
Which Result Should You Use?
A simple guideline:
Handheld shot that should still move → Smooth Motion
Shot that should appear stationary → No Motion
Don’t use No Motion automatically.
If the original camera movement was intentional, completely removing it may make the shot feel unnatural.
Understanding Smoothness
When using Smooth Motion, the Smoothness setting controls how aggressively After Effects smooths the camera movement.
A larger value generally produces stronger stabilization.
But stronger isn’t always better.
Increasing Smoothness can lead to:
- more cropping;
- greater scaling;
- stronger warping;
- unnatural movement.
This is one of the most common beginner mistakes.
Don’t Assume 100% Is Better
Imagine your footage has mild handheld shake.
A relatively modest Smoothness setting may be enough.
Increasing it dramatically may produce a technically smoother shot but introduce visible distortion.
The goal isn’t:
Maximum stabilization.
The goal is:
Natural-looking stabilization.
Try Lower Smoothness Values
If the default result looks too aggressive, reduce Smoothness.
Experiment with values such as:
- 5%;
- 10%;
- 20%;
- 30%.
The best setting depends on the footage.
Sometimes surprisingly low values produce the most convincing result.
Stabilization Methods
Warp Stabilizer provides several methods for determining how frames may be transformed.
These include:
- Position;
- Position, Scale, Rotation;
- Perspective;
- Subspace Warp.
Understanding these options helps when the default result looks strange.
Position
The simplest method compensates primarily for horizontal and vertical movement.
This is useful when the shake is relatively simple.
Because it makes fewer geometric changes, it can sometimes produce a cleaner result.
Position, Scale, Rotation
This method also considers:
- scale changes;
- rotational movement.
It can handle more complex camera motion than Position alone.
For many shots, this provides a useful compromise between stabilization and image integrity.
Perspective
Perspective stabilization allows After Effects to account for perspective-related changes.
This gives the software more freedom to correct the image.
But greater freedom can also create unwanted distortion in difficult shots.
Subspace Warp
Subspace Warp is generally the most flexible method.
Instead of treating the entire frame as one rigid plane, it can warp different portions of the image to compensate for movement.
This can produce impressive stabilization.
It can also create the most obvious distortions.
What Is the Jell-O Effect?
You’ve probably seen stabilized footage where buildings, walls, or people seem to bend and wobble.
The frame appears almost rubbery.
This is commonly described as:
Jell-O
or
warping.
It often occurs when the stabilization algorithm applies complex local distortions to footage that doesn’t respond well to them.
How to Fix Warp Stabilizer Wobble
If Subspace Warp produces strange distortion, try a simpler Method.
For example:
Subspace Warp
↓
Perspective
↓
Position, Scale, Rotation
↓
Position
Each step gives After Effects less freedom to distort the image.
The result may be slightly less stable but visually much more natural.
Why Simpler Can Be Better
Suppose your shot only has minor horizontal shake.
You don’t need complex perspective warping.
Position-based stabilization may be sufficient.
Using the simplest model that solves the problem can reduce unwanted artifacts.
This principle applies throughout visual effects.
Borders and Cropping
When After Effects moves a frame to stabilize it, empty areas can appear around the edges.
Warp Stabilizer therefore needs to decide how to handle those borders.
Common approaches involve combinations of:
- stabilization;
- cropping;
- scaling;
- synthesis.
Stabilize, Crop, Auto-scale
This is a common approach.
After Effects stabilizes the image, crops unstable edges, and automatically scales the result so the composition remains filled.
It’s convenient.
The tradeoff is that you lose some of the original field of view.
How Much Scaling Is Too Much?
Watch the resulting scale carefully.
If stabilization requires substantial enlargement, image quality may suffer.
For example, heavily scaling HD footage can make it visibly softer.
You may need to reduce Smoothness or choose a less aggressive stabilization method.
Stabilize Only
A stabilization-only option can help you understand what After Effects is actually doing.
You may see moving black or transparent borders around the frame.
This isn’t usually your final output.
But it reveals how much image movement the stabilization requires.
It can be useful diagnostically.
Crop Less, Smooth Less
If you’re losing too much of the frame, reduce the amount of stabilization.
This is often the simplest solution.
Remember the tradeoff:
More smoothness = potentially more cropping
Less smoothness = more original framing
Find the balance appropriate for your shot.
Auto-scale
Auto-scale enlarges the image enough to prevent empty borders from appearing.
Pay attention to the scale amount.
If it becomes excessive, reconsider the stabilization settings.
Detailed Analysis
Warp Stabilizer may offer more detailed analysis options depending on the workflow and version.
A more detailed analysis can potentially improve certain shots but requires additional processing.
Don’t enable every advanced option automatically.
Start simple.
Use additional analysis when the normal result isn’t good enough.
Rolling Shutter
Many digital cameras and smartphones use rolling shutters.
Instead of capturing the entire frame at precisely the same instant, different portions of the sensor may be read sequentially.
Fast movement can create:
- skew;
- wobble;
- bending vertical lines.
Warp Stabilizer includes controls intended to help with rolling-shutter-related artifacts in suitable footage.
However, severe rolling-shutter distortion may be impossible to eliminate completely.
Stabilizing Smartphone Footage
Smartphones are a common source of footage that benefits from stabilization.
Even though modern phones often include optical and electronic stabilization, handheld clips can still contain:
- footsteps;
- rotation;
- small vibrations.
Warp Stabilizer can help smooth these further.
Be careful when combining heavy in-camera stabilization with aggressive post-production stabilization.
Sometimes the interaction creates unnatural movement.
Stabilizing Walking Footage
Walking footage is challenging because every step can introduce vertical and rotational movement.
Warp Stabilizer can improve it, but don’t necessarily expect handheld walking footage to become identical to a professional gimbal shot.
Try:
- Smooth Motion.
- Lower Smoothness.
- Position, Scale, Rotation.
- Compare with Subspace Warp.
Choose the version that feels most natural.
Stabilizing Drone Footage
Drone footage can contain:
- wind vibration;
- small yaw movements;
- gimbal imperfections.
Warp Stabilizer can sometimes help polish these shots.
However, large moving landscapes and parallax can make aggressive warping visible.
Again, compare different Methods.
Stabilizing GoPro and Action-Camera Footage
Wide-angle action-camera footage often contains significant distortion.
This can interact with stabilization in complicated ways.
Extreme camera movement plus wide-angle lens distortion can make Subspace Warp behave unpredictably.
Test simpler stabilization methods if the image begins bending unnaturally.
Stabilizing Interview Footage
Suppose an interview was shot handheld but should look almost locked off.
No Motion may be appropriate.
However, watch the person carefully.
If they occupy much of the frame and move substantially, Warp Stabilizer may interpret some subject movement as camera movement.
This can create strange results.
Foreground Movement Can Confuse Stabilization
Imagine someone walks very close to the camera.
They fill half the frame.
Warp Stabilizer sees a large amount of motion.
But that movement belongs to the person, not the camera.
Automatic stabilization can sometimes struggle to distinguish these situations.
This is one reason some shots stabilize better than others.
Stabilizing Shots with Water
Moving water contains huge amounts of independent motion.
Waves, reflections, and ripples constantly change.
This can complicate automatic motion analysis.
A shot containing mostly ocean may therefore be more difficult than a shot containing stable architecture.
Stabilizing Low-Light Footage
Low-light footage often contains:
- noise;
- motion blur;
- reduced detail.
All of these can make motion analysis harder.
Warp Stabilizer works best when it has clear visual features to analyze.
Good capture remains important.
Motion Blur and Stabilization
This is an important limitation.
Suppose the camera shakes during exposure.
The frame becomes motion-blurred.
Warp Stabilizer can reposition that frame.
But it cannot simply undo all the blur already recorded into the image.
The camera may appear stabilized while the blur still reveals the original shake.
This can produce an unusual look.
Stabilization Isn’t a Substitute for Good Filming
Warp Stabilizer is powerful, but prevention is better than repair.
Whenever possible:
- use proper camera support;
- hold the camera correctly;
- use suitable shutter speed;
- use optical stabilization;
- use a tripod;
- use a gimbal where appropriate.
Post-production stabilization should improve footage, not become the entire capture strategy.
Warp Stabilizer and Pre-Compositions
Sometimes After Effects may require or benefit from a pre-composition workflow before certain transformations or effects can be combined with Warp Stabilizer.
If you’ve already:
- changed speed;
- applied transformations;
- added other processing;
you may need to structure the composition carefully.
Pre-compositions are an essential After Effects concept, and we’ll cover them in a dedicated tutorial later in this series.
“Warp Stabilizer Requires Clip Dimensions to Match Composition”
A common error can occur when the source layer’s dimensions don’t match the composition in a way Warp Stabilizer expects.
A typical solution is to pre-compose the layer appropriately and apply stabilization within the correct composition context.
The key idea is that Warp Stabilizer needs a predictable relationship between the footage and composition dimensions.
Warp Stabilizer and Time Remapping
Stabilization and time manipulation can sometimes conflict.
If you’re:
- changing speed;
- time remapping;
- creating slow motion;
consider the order of operations.
A useful approach is often to isolate one operation inside a pre-comp and perform the other outside it.
For example:
Pre-comp → speed treatment
Main comp → stabilization
or vice versa depending on the shot.
Always test the result.
Warp Stabilizer and Motion Tracking
Warp Stabilizer and motion tracking solve related but different problems.
Warp Stabilizer
Changes the footage to reduce camera movement.
Motion Tracking
Extracts movement so another layer can follow it.
For example:
If the footage is shaky and you want text attached to an object, you may need both stabilization and tracking depending on the desired result.
Warp Stabilizer and 3D Camera Tracker
These tools also serve different purposes.
Warp Stabilizer → reduce unwanted camera movement
3D Camera Tracker → reconstruct camera movement
Interestingly, stabilization can sometimes remove motion that you actually wanted to analyze.
Think carefully about the final effect before deciding which operation comes first.
Should You Stabilize Before Tracking?
There is no universal answer.
If you’re tracking an object within shaky footage, stabilization may make the object easier to work with.
But if you need the original camera movement for a 3D track, altering it first may complicate the workflow.
Plan the effect before applying processing.
A Good Beginner Stabilization Workflow
Try this sequence:
1. Trim the clip
Work only on the section you need.
2. Apply Warp Stabilizer VFX
Let After Effects analyze the footage.
3. Preview the default result
Don’t change anything yet.
4. Decide between Smooth Motion and No Motion
Preserve movement or remove it.
5. Adjust Smoothness
Use the lowest value that gives you the desired improvement.
6. Watch for warping
Inspect buildings, faces, straight lines, and backgrounds.
7. Try a simpler Method
Reduce geometric complexity if necessary.
8. Check cropping
Make sure Auto-scale isn’t excessive.
9. Preview at full speed
Judge the actual motion.
10. Compare before and after
Make sure stabilization genuinely improved the shot.
Before-and-After Comparison
A useful trick is to duplicate your footage.
Create:
Version A → original
Version B → stabilized
Toggle between them.
Sometimes you become so focused on making the stabilized version smoother that you forget whether it actually looks better.
Comparison keeps your judgment grounded.
Five Stabilization Exercises
Exercise 1 — Mild Handheld Shot
Apply Warp Stabilizer with default settings.
Compare before and after.
Exercise 2 — Reduce Smoothness
Try several Smoothness values.
Observe cropping and movement.
Exercise 3 — Compare Methods
Test:
- Subspace Warp;
- Perspective;
- Position, Scale, Rotation;
- Position.
Watch how each affects the image.
Exercise 4 — Smooth Motion vs No Motion
Use the same clip.
Create two versions.
Compare the intent of each.
Exercise 5 — Difficult Walking Shot
Use intentionally challenging footage.
Learn what Warp Stabilizer cannot completely fix.
Understanding limitations is as important as understanding features.
Common Warp Stabilizer Mistakes
Mistake 1: Using Too Much Smoothness
More isn’t automatically better.
Mistake 2: Ignoring Cropping
Strong stabilization may significantly enlarge the footage.
Mistake 3: Accepting Subspace Warp Automatically
Try simpler Methods when the image bends.
Mistake 4: Using No Motion for Everything
Preserve intentional camera movement when appropriate.
Mistake 5: Ignoring Faces
Warping can be particularly obvious on people.
Mistake 6: Ignoring Straight Lines
Buildings and architecture reveal distortion quickly.
Mistake 7: Expecting Stabilization to Remove Motion Blur
Repositioning frames doesn’t automatically restore detail lost during exposure.
Mistake 8: Stabilizing an Entire Long Clip
Trim to the actual section you need when possible.
Mistake 9: Never Comparing with the Original
A smoother result isn’t necessarily a better result.
Mistake 10: Expecting a Gimbal from Terrible Footage
There are limits to what software can reconstruct.
How to Reduce the Jell-O Effect
If your footage looks rubbery:
- Reduce Smoothness.
- Change Method from Subspace Warp.
- Try Position, Scale, Rotation.
- Compare with Position only.
- Check for rolling-shutter problems.
- Reduce the amount of stabilization.
The goal is to find the least aggressive correction that produces acceptable movement.
How to Reduce Cropping
If Warp Stabilizer zooms in too much:
- lower Smoothness;
- use a simpler Method;
- accept slightly more camera movement;
- investigate alternative border handling.
Don’t sacrifice half the image just to remove a tiny amount of shake.
How to Make Stabilized Footage Look Natural
Natural stabilization often retains some movement.
Real cameras move.
A perfectly locked image isn’t always desirable.
For cinematic handheld footage, subtle motion can add energy and realism.
The best stabilization may simply remove distracting high-frequency shake while preserving broader camera movement.
Can Warp Stabilizer Fix Extremely Shaky Video?
Sometimes it can improve it.
But severely shaky footage may contain:
- excessive blur;
- missing image areas;
- extreme perspective changes;
- rolling-shutter distortion.
Software cannot recreate information that was never captured cleanly.
Treat Warp Stabilizer as a correction tool, not a miracle.
Can Warp Stabilizer Fix Out-of-Focus Video?
No.
Stabilization and focus are different problems.
Warp Stabilizer can change camera movement.
It cannot restore detail that was never recorded because the subject was out of focus.
Can Warp Stabilizer Fix Motion Blur?
Not directly.
It may reduce movement between frames, but motion blur already embedded within individual frames remains.
Other restoration techniques may help in some situations, but results vary.
Can Warp Stabilizer Make Handheld Footage Look Like a Tripod?
Using No Motion, some shots can become impressively stable.
Success depends on the source footage.
If the camera moves significantly through three-dimensional space, a perfectly static result may require substantial cropping or distortion.
Can Warp Stabilizer Make Footage Look Like a Gimbal?
It can sometimes make handheld movement smoother.
But a gimbal physically controls camera movement during capture.
Warp Stabilizer modifies already recorded images.
These are not identical.
Good gimbal footage will usually preserve image quality and framing better than extreme post-production stabilization.
Is Warp Stabilizer Good for YouTube Videos?
Yes.
It’s particularly useful for:
- handheld B-roll;
- travel footage;
- product footage;
- walking clips;
- interviews;
- behind-the-scenes video.
Even subtle stabilization can make footage feel more polished.
Is Warp Stabilizer Good for Social Media?
Absolutely.
Vertical videos are frequently filmed handheld.
Warp Stabilizer can help improve:
- Reels;
- Shorts;
- promotional clips;
- smartphone footage.
Be careful with cropping because vertical compositions already have limited horizontal space.
Does Warp Stabilizer Require Plug-Ins?
No.
Warp Stabilizer VFX is included within Adobe After Effects.
You can perform powerful stabilization without purchasing an additional plug-in.
Specialized third-party stabilization tools exist, but Warp Stabilizer is an excellent starting point for most After Effects users.
Is Warp Stabilizer Worth Learning?
Yes.
Unlike some highly specialized visual-effects techniques, stabilization solves a problem you’ll encounter repeatedly.
Sooner or later you’ll receive footage that is:
almost good
except for distracting camera shake.
Knowing how to use Warp Stabilizer can turn that clip into usable material.
If you want to practice stabilization and other After Effects workflows yourself, you can explore Adobe’s current options here:
Get Adobe After Effects and start stabilizing your footage
Frequently Asked Questions
What is Warp Stabilizer in After Effects?
Warp Stabilizer VFX analyzes camera movement and transforms footage to reduce unwanted shake.
How do I stabilize shaky video in After Effects?
Apply Warp Stabilizer VFX to the footage layer, allow the analysis to complete, and then adjust the stabilization settings as needed.
What does Smooth Motion do?
Smooth Motion preserves overall camera movement while reducing unwanted shake.
What does No Motion do?
No Motion attempts to make the camera appear stationary.
What Smoothness should I use?
There is no universal value. Start with the default result and reduce or increase Smoothness based on how natural the footage looks.
Why does Warp Stabilizer zoom in?
Stabilization moves frames, which can expose empty edges. Auto-scale enlarges the footage to keep the composition filled.
Why does Warp Stabilizer make footage look wobbly?
Complex warping—particularly on unsuitable footage—can produce visible geometric distortion. Try lower Smoothness or a simpler Method.
What is Subspace Warp?
Subspace Warp allows different portions of the image to be transformed to compensate for complex movement.
Should I always use Subspace Warp?
No. Simpler Methods may produce more natural results on many shots.
Can Warp Stabilizer remove motion blur?
It can reduce camera movement but doesn’t automatically restore detail already lost to motion blur.
Can Warp Stabilizer fix smartphone footage?
Yes. It can often improve handheld smartphone footage, although results depend on the original recording.
Can I stabilize 4K footage?
Yes, but analysis and processing can require more time and computing resources.
What Should You Learn Next?
Warp Stabilizer solves unwanted movement.
But After Effects becomes even more powerful when you learn how to create and control movement programmatically.
Instead of manually creating every animation with keyframes, you can use small pieces of code called expressions.
Expressions can create:
- automatic motion;
- looping animation;
- random movement;
- relationships between properties;
- procedural animation;
- reusable animation systems.
The next article in this series will therefore be:
Adobe After Effects Expressions for Beginners: 15 Essential Expressions to Learn.
We’ll start with simple expressions such as wiggle() and loopOut() before moving into property linking, time-based animation, randomness, and practical examples.
Final Thoughts
Warp Stabilizer is one of those After Effects tools that can look almost magical the first time you use it.
Apply the effect.
Wait for the analysis.
Suddenly the shaky clip looks considerably smoother.
But the real skill isn’t knowing where the effect is located.
It’s knowing when to stop stabilizing.
A technically motionless shot isn’t automatically a better shot.
Sometimes a little natural camera movement should remain.
Use Warp Stabilizer to remove distracting shake while preserving the character of the original camera work.
Remember the key principles:
Start with the default result.
Use Smooth Motion when intentional movement should remain.
Use No Motion when the shot should look locked off.
Don’t automatically increase Smoothness.
Watch your crop and Auto-scale.
If the image wobbles, try a simpler Method.
Judge the result at normal playback speed.
And most importantly:
Compare it with the original.
If the stabilized version feels smoother, cleaner, and more intentional without looking digitally distorted, you’ve done the job correctly.
Explore Adobe After Effects and start improving shaky footage with Warp Stabilizer






