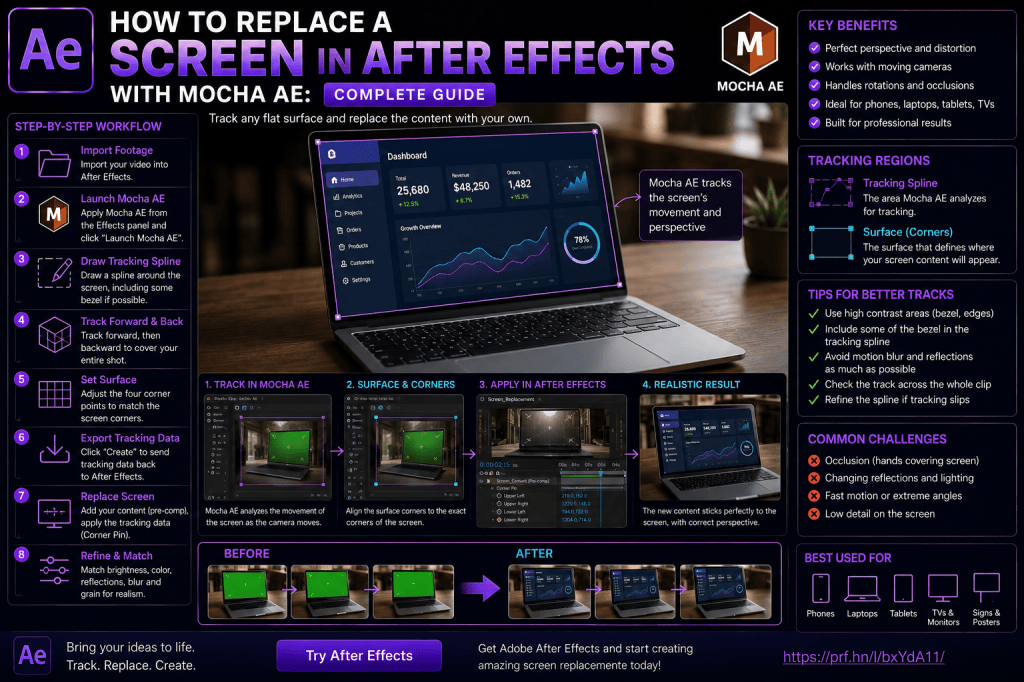
Screen replacement is one of the most practical visual-effects techniques you can learn in Adobe After Effects.
You’ve probably seen it hundreds of times without noticing.
A person holds a smartphone while an app interface appears perfectly attached to the display. A laptop moves across a desk while a website remains locked to its screen. A television in the background shows completely different footage from what was originally recorded.
These effects are commonly created using tracking and compositing.
For screen replacement, one of the most useful tools available to After Effects users is Mocha AE.
Instead of tracking only individual points, Mocha AE can analyze the movement of a flat surface. This is known as planar tracking.
That makes it particularly useful for tracking:
- smartphones;
- tablets;
- laptops;
- televisions;
- monitors;
- signs;
- posters;
- billboards;
- book covers;
- packaging.
In this guide, we’ll create a complete screen replacement and explain how planar tracking works, how to track a screen in Mocha AE, use Surface and Corner Pin data, insert replacement content, match perspective, and make the final composite look convincing.
Affiliate disclosure: This article contains affiliate links. If you purchase Adobe After Effects through one of these links, we may earn a commission at no additional cost to you.
What Is Screen Replacement?
Screen replacement means replacing the visible content of a screen in recorded footage with different content during post-production.
Imagine you’ve filmed someone holding a smartphone.
The phone originally displays a blank green screen.
Later, you decide the phone should show your website.
Instead of filming the entire scene again, you can track the phone’s display and insert the website afterward.
The replacement content follows the phone’s:
- position;
- rotation;
- scale;
- perspective.
When done correctly, it looks as though the new content was actually displayed on the device when the scene was filmed.
Why Use Adobe After Effects for Screen Replacement?
After Effects provides the tools needed to combine:
Tracking + Compositing + Masks + Color Correction + Motion Blur + Effects
This makes it well suited to screen replacements.
Mocha AE adds planar tracking capabilities that are especially valuable when the surface changes perspective.
What Is Mocha AE?
Mocha AE is a planar tracking tool integrated with Adobe After Effects workflows.
Traditional point tracking follows a specific visual feature.
Mocha uses a different approach.
It tracks the movement of a planar region.
A planar region is essentially a relatively flat surface.
Examples include:
- phone display;
- laptop screen;
- television;
- road sign;
- wall;
- book cover.
This distinction makes Mocha particularly useful for screen replacement.
Point Tracking vs Planar Tracking
Suppose you’re tracking a smartphone.
Traditional tracking might follow the four corners of the screen.
That can work in some situations.
But as the phone rotates, tilts, and changes perspective, those points can become difficult to track reliably.
Planar tracking instead asks:
How is this entire surface moving?
Mocha analyzes the texture and detail across the defined region.
That often provides a more robust solution.
When Should You Use Mocha AE?
Mocha AE is particularly useful when you’re tracking surfaces that:
- move;
- rotate;
- scale;
- change perspective;
- become partially obscured.
It isn’t only a screen-replacement tool.
The same principles can be used for:
- sign replacement;
- poster replacement;
- object cleanup;
- logo replacement;
- surface graphics;
- compositing.
Once you understand Mocha, you’ll find many uses for it.
Before You Begin
This tutorial builds naturally on two previous topics:
How to Use Motion Tracking in Adobe After Effects
and
Adobe After Effects 3D Camera Tracker: Complete Beginner Guide
Basic motion tracking follows features.
3D Camera Tracking reconstructs camera movement.
Mocha AE tracks planar surfaces.
Understanding these three approaches helps you choose the right tracker for each shot.
If you’d like to practice the techniques in this guide yourself, you can check Adobe’s current After Effects options here:
Explore Adobe After Effects and current plans
What You’ll Need
For a basic screen replacement, you’ll need:
- Footage containing a screen.
- Replacement content.
- Adobe After Effects.
- Mocha AE.
Your replacement content could be:
- screenshot;
- website;
- app interface;
- photograph;
- video;
- animation;
- motion graphic.
For your first attempt, use a short clip with a clearly visible screen.
Choosing Good Footage
Tracking becomes much easier when the source footage is suitable.
Look for:
- visible screen edges;
- sufficient contrast;
- limited motion blur;
- stable exposure;
- recognizable surface details.
Avoid extremely difficult footage for your first project.
A slowly moving laptop or phone is ideal.
Do You Need a Green Screen on the Device?
No.
A physical green screen can make some parts of the compositing process easier, but it isn’t mandatory.
Mocha can track natural screen or bezel details.
In fact, a perfectly uniform green area may contain little tracking information.
The tracker often benefits from visible details around the screen.
Tracking Markers
If you’re planning the shoot specifically for screen replacement, you can add temporary high-contrast markers to the display.
For example, small crosses near the corners can provide useful visual references.
The replacement content later covers them.
However, natural features may be sufficient.
Don’t add markers unless they actually help the production.
Step 1: Import Your Footage
Open After Effects.
Import your video.
Create a composition matching the footage.
Place the video in the Timeline.
Trim the composition to the section you actually need.
Tracking unnecessary footage wastes processing time.
Step 2: Select the Footage Layer
Select your video layer.
You can then launch the appropriate Mocha AE workflow from After Effects.
The footage opens in the Mocha interface.
Don’t worry if Mocha initially looks unfamiliar.
For a basic screen replacement, you only need to understand a small number of concepts.
The Mocha Interface
The key things we’ll work with are:
- viewer;
- timeline;
- spline tools;
- tracking controls;
- layer controls;
- Surface;
- planar tracking settings.
You don’t need to learn every Mocha feature before creating your first track.
Start with the fundamental workflow.
Step 3: Find a Good Starting Frame
Don’t automatically start tracking from frame one.
Find a frame where the screen is:
- clearly visible;
- reasonably large;
- relatively sharp;
- minimally obstructed.
This may be in the middle of the shot.
You can track forward and backward from that frame.
Choosing a strong reference frame can improve the workflow considerably.
Step 4: Draw a Shape Around the Screen
Use an appropriate spline tool.
Draw a shape around the planar region you want Mocha to analyze.
Here’s an important point:
The tracking shape does not necessarily need to match the exact screen boundary.
The spline defines the region containing useful tracking information.
You may include part of the device bezel if it provides helpful detail.
The goal is reliable tracking.
Tracking Shape vs Final Screen Boundary
This distinction is fundamental in Mocha.
The tracking shape tells Mocha where to analyze pixels.
The Surface defines the planar area you ultimately care about.
They don’t have to be identical.
For example, your tracking spline might include:
- screen;
- bezel;
- buttons;
- nearby device texture.
But the Surface can be positioned precisely at the four corners of the display.
This gives Mocha more information to track while still producing accurate screen geometry.
Step 5: Choose Tracking Parameters
For screen replacement, you may need Mocha to analyze transformations such as:
- Translation;
- Scale;
- Rotation;
- Shear;
- Perspective.
The exact options depend on how the device moves.
If the screen rotates significantly in three-dimensional space, perspective tracking becomes particularly important.
For simple movement, you may not need every parameter.
Translation
Translation tracks horizontal and vertical movement.
If the phone simply moves left and right without rotating or changing size much, translation may account for much of the motion.
Scale
Scale accounts for the screen appearing larger or smaller.
This happens when the device moves toward or away from the camera.
Rotation
Rotation tracks changes in orientation.
For example, a laptop may rotate slightly clockwise during the shot.
Shear
Shear helps account for certain changes in the planar geometry.
This can be useful when the surface’s apparent shape changes.
Perspective
Perspective is especially important for screen replacements.
Imagine turning a phone away from the camera.
The rectangular screen becomes visually narrower on one side.
Its corners no longer form a simple front-facing rectangle.
Perspective tracking helps capture this transformation.
Step 6: Track Forward
Start tracking forward.
Watch the spline and tracking result.
Mocha analyzes the planar region from frame to frame.
Don’t assume the track is correct just because processing continues.
Watch for obvious slipping.
If the tracked region starts moving away from the screen, stop and investigate.
Step 7: Track Backward
If you started from a frame in the middle of the shot, return to that reference frame.
Then track backward.
This gives you tracking data for the entire required range.
Starting from a strong frame and tracking in both directions is often better than forcing the tracker to begin from a poor first frame.
Step 8: Check the Track
This is one of the most important steps.
Don’t immediately export the tracking data.
First verify it.
Look at the tracked surface throughout the shot.
Does it remain attached?
Does it:
- slide?
- drift?
- rotate incorrectly?
- lose perspective?
- jump?
If so, refine the track before continuing.
Use the Surface Tool
Enable the Surface display.
You’ll see a rectangular planar representation.
Position its four corners at the actual corners of the screen.
This Surface represents where the replacement content should ultimately go.
Move through the Timeline.
The Surface should remain attached to the display.
If it does, your track is likely working well.
Why Surface Accuracy Matters
Your replacement content will inherit the geometry represented by the Surface.
If the Surface is misaligned, the replacement will also be misaligned.
Spend time getting the four corners positioned accurately.
Zoom in when necessary.
Use a Grid to Check the Track
Mocha can provide a grid-style visualization that is extremely useful for evaluating planar tracking.
The grid should appear locked to the physical surface.
As the phone moves, the grid should move with it.
If the grid looks like it’s sliding across the screen, your track needs improvement.
This is often easier to judge than looking only at the spline.
What Causes Tracking Drift?
Common causes include:
- motion blur;
- reflections;
- insufficient texture;
- occlusion;
- rapid movement;
- changing illumination;
- incorrect tracking region;
- perspective changes beyond the chosen tracking model.
If the track fails, don’t immediately abandon the shot.
Often you can improve it by refining the region or tracking settings.
Track the Bezel, Not Just the Display
A common mistake is drawing the tracking shape entirely inside a blank screen.
Suppose the phone displays a uniform green image.
There may be almost no texture to track.
Instead, include useful details such as:
- screen edges;
- bezel;
- speaker;
- camera notch;
- buttons;
- frame texture.
These can give Mocha more stable information.
Avoid Reflections When Possible
Phone and laptop screens are reflective.
Reflections can be difficult because they may move independently from the physical screen surface.
Mocha wants to track the actual plane.
If a large reflection moves across the display, it can confuse the analysis.
When possible, focus the tracking region on stable structural details.
Occlusion
Imagine someone waves a hand in front of the phone.
Part of the screen disappears temporarily.
Mocha’s planar approach can sometimes remain useful when part of the tracked region is obscured, especially if sufficient surface information remains visible.
However, severe occlusion may require additional work.
You may need:
- additional tracking layers;
- masks;
- holdout mattes;
- manual adjustments.
Step 9: Save and Return to After Effects
Once you’re satisfied with the track, save the Mocha project and return to After Effects.
The tracking information can now be used to drive your replacement layer.
Depending on the workflow and version, you can transfer or apply the appropriate tracking data from Mocha back into After Effects.
Step 10: Prepare the Replacement Content
Now create the content that should appear on the screen.
For example, you could use a screenshot of your website.
Ideally, prepare it at a suitable aspect ratio.
If the physical screen is approximately 16:9, using replacement content with a similar aspect ratio can simplify the composition.
Use a Pre-Composition
A very useful workflow is to place your replacement design inside a pre-composition.
For example:
Phone Screen Content
Inside that pre-comp, you can include:
- website screenshot;
- scrolling animation;
- cursor;
- app interface;
- video;
- text;
- transitions.
The main composition then treats the entire pre-comp as the replacement screen.
This keeps your project organized.
Why Pre-Comps Are Ideal for Screen Replacement
Suppose your replacement contains:
- background;
- five text layers;
- icons;
- animation;
- video.
You don’t want to individually corner-pin every layer.
Instead:
- Build everything inside one pre-comp.
- Apply the tracking transformation to the pre-comp.
Now the whole interface moves as a single screen.
Step 11: Apply the Tracking Data
Use the Mocha tracking information to transform the replacement layer appropriately.
For screen replacement, this often involves a corner-pin-style result.
The four corners of the replacement correspond to the tracked Surface.
As the device moves, those corners change position.
The replacement follows the perspective of the screen.
What Is Corner Pin?
Corner Pin is a transformation that maps an image to four corner points.
Imagine taking a rectangular photograph and pinning each corner to a different location.
You can distort the image into a quadrilateral.
That’s exactly what is needed when a rectangular screen changes perspective.
Instead of remaining a perfect rectangle, the replacement follows the screen’s apparent four-corner geometry.
Test the Replacement
Preview the composition.
Don’t worry about color or reflections yet.
First ask:
Does the replacement stay attached to the screen?
Look especially at the corners.
If they slide away from the real display edges, revisit the track or Surface alignment.
Tracking accuracy comes first.
Step 12: Fit the Replacement to the Screen
Make sure your replacement content fills the display correctly.
Check:
- aspect ratio;
- edge alignment;
- cropping;
- orientation.
If necessary, adjust the replacement inside its pre-comp rather than disturbing the tracking transformation.
This preserves the tracking relationship.
Don’t Adjust Tracked Corners Randomly
Once the tracking data is working, avoid manually changing individual tracked corners unless you understand the consequences.
Instead, make design adjustments inside the replacement pre-comp.
Think of the outer tracked layer as the physical screen.
Think of the pre-comp contents as what’s being displayed on that screen.
This separation is much easier to manage.
Step 13: Match the Screen Brightness
Now we move from tracking into compositing.
A perfectly tracked replacement can still look fake if it’s too bright.
Real screens exist inside lighting environments.
Ask:
- How bright is the device?
- Is the room dark?
- Is the screen overexposed?
- Is the footage warm or cool?
Adjust the replacement accordingly.
Match Contrast
A replacement screenshot may contain extremely deep blacks and bright whites.
But the recorded display may have:
- reduced contrast;
- glare;
- reflections;
- camera exposure effects.
Consider reducing contrast slightly if necessary.
The replacement should look like something filmed through a camera, not a perfect digital image pasted on top.
Match Color Temperature
Suppose the scene is illuminated by warm indoor lighting.
A perfectly neutral replacement may appear too cool.
Conversely, outdoor daylight may affect the screen differently.
Subtle color adjustment can help integrate the replacement.
Add Screen Reflections
One of the best ways to make a replacement believable is to preserve or recreate reflections from the original screen.
Real screens often reflect:
- windows;
- lights;
- faces;
- environment.
If you completely cover these reflections with pristine replacement content, the screen may look artificial.
Depending on the source footage, you may be able to preserve reflection information and blend it over the replacement.
Reflection Layer Concept
One conceptual workflow is:
Original footage
↓
Extract or preserve useful reflection/highlight information
↓
Replacement content
↓
Blend reflection information over replacement
The exact method varies with the footage.
The goal is to retain the environmental interaction that makes the screen feel physically present.
Add a Small Blur
Real filmed screens are rarely as perfectly sharp as a digital screenshot.
The camera lens, focus, motion, sensor, and compression all affect sharpness.
A tiny amount of blur can help the replacement match the source.
Don’t overdo it.
Often a subtle adjustment is enough.
Match Noise and Grain
Your replacement content is digitally clean.
Your footage may contain:
- sensor noise;
- film grain;
- compression artifacts.
That mismatch can reveal the composite.
Adding a small amount of matching texture or grain to the replacement can help.
Again, subtlety matters.
Match Motion Blur
If the phone moves quickly, the original screen edges may blur.
Your replacement should exhibit compatible motion blur.
A razor-sharp interface inside a motion-blurred phone looks obviously composited.
Motion blur is one of the details that separates a basic screen replacement from a convincing one.
Edge Treatment
Pay attention to the edges of the screen.
The replacement shouldn’t overlap the physical bezel.
Zoom in and inspect:
- corners;
- rounded edges;
- notches;
- camera cutouts;
- bezels.
Modern smartphones often have rounded display corners, so a simple rectangular replacement may need masking.
Rounded Screen Corners
If the device has rounded corners:
- Create the screen content pre-comp.
- Use an appropriate mask or matte.
- Match the screen’s corner radius.
- Apply the tracked transformation.
This prevents replacement pixels from appearing outside the physical display.
Camera Notches and Dynamic Islands
Modern phones may have:
- camera holes;
- notches;
- sensor areas;
- interface cutouts.
These should remain visually consistent.
Depending on the shot, you may need to mask them back over the replacement.
Small details like these can make a large difference.
Fingers in Front of the Screen
This is one of the most common screen-replacement challenges.
A person holds the phone.
Their fingers overlap the screen.
If you simply place replacement content over the phone, it will cover the fingers.
That breaks the illusion.
You need to restore the fingers in front of the replacement.
Rotoscoping Foreground Objects
A typical layer structure might be:
Foreground fingers
Replacement screen
Original footage
You isolate the fingers from the original footage and place them above the replacement.
This can be done using:
- masks;
- Roto Brush;
- AI-assisted object isolation where appropriate.
This is why screen replacement often combines several After Effects skills.
Screen Replacement Layer Stack
A more complete composition might look like:
Foreground hand/fingers
Original screen reflections
Replacement content
Original footage
This layering helps preserve the natural depth of the shot.
Add Interactive Screen Content
The replacement doesn’t have to be static.
You can animate:
- scrolling;
- typing;
- buttons;
- cursor;
- video;
- app transitions;
- notifications.
Because everything lives inside the screen pre-comp, the tracked perspective applies to the complete animation.
Create a Scrolling Website
Place a full webpage screenshot inside the pre-comp.
Animate its Y Position.
Now the webpage scrolls while the entire pre-comp remains tracked to the device.
This is a great technique for:
- website promotions;
- software demos;
- portfolio videos;
- advertisements.
Add a Mouse Cursor
For a laptop replacement, add a cursor inside the pre-comp.
Animate it across the interface.
Add click animations if desired.
Because the cursor exists inside the replacement composition, it automatically inherits the screen’s perspective.
Add Touch Interaction
For a phone, you can synchronize interface animations with the actor’s finger movements.
For example:
Finger touches screen.
↓
Button reacts.
↓
New interface panel appears.
This requires timing rather than additional tracking.
When done well, it creates a convincing interactive device demonstration.
Replacing a Laptop Screen
Laptop screens can be relatively straightforward because they often provide:
- clear corners;
- strong bezel detail;
- larger surface area.
However, reflections can be substantial.
Pay particular attention to preserving realistic screen highlights.
Replacing a Phone Screen
Phone screens can be more challenging because:
- they’re smaller;
- they move quickly;
- fingers obscure them;
- screens have rounded corners;
- reflections are strong.
Good footage and careful tracking are especially important.
Replacing a Television
Television replacements can often be easier because the screen may remain relatively stationary.
But you still need to consider:
- perspective;
- reflections;
- room lighting;
- screen glow.
A television displaying bright content may illuminate nearby surfaces.
For a highly realistic composite, you may need to reproduce some of that light interaction.
Add Screen Glow
Suppose your replacement shows a bright blue interface in a dark room.
The real screen would likely cast blue light onto nearby surfaces or the person’s face.
If the original footage was recorded with a dark blank screen, that illumination may be missing.
You can sometimes simulate it with:
- soft light layers;
- masks;
- color adjustments;
- glow effects.
This is an advanced detail, but it can greatly improve realism.
Screen Replacement Without Mocha
Can you replace screens without Mocha AE?
Yes.
Depending on the shot, you might use:
- point tracking;
- manual Corner Pin animation;
- 3D Camera Tracking;
- masks.
For simple stationary or minimally moving screens, those approaches can work.
Mocha becomes particularly valuable when planar perspective changes need to be tracked accurately.
When Point Tracking Is Enough
Suppose a laptop remains almost completely still.
Only the camera moves slightly.
A simpler tracking workflow may be sufficient.
Don’t use a more complicated technique just because it’s available.
Choose the simplest method that produces a reliable result.
When Manual Tracking Is Necessary
Some shots simply refuse to track perfectly.
You may need to manually adjust the result for difficult frames.
This isn’t a failure.
Professional visual effects often combine:
Automatic tracking + Manual correction
Automation gets you most of the way.
Human judgment handles exceptions.
Common Screen Replacement Mistakes
Mistake 1: Tracking Only the Blank Screen
Include stable surrounding detail if the display itself lacks texture.
Mistake 2: Ignoring Perspective
A flat overlay won’t look attached to a rotating device.
Mistake 3: Misaligned Surface
Make sure the Mocha Surface matches the real screen corners.
Mistake 4: No Track Verification
Use the Surface or grid to evaluate the track before returning to After Effects.
Mistake 5: Replacement Is Too Sharp
Match the camera’s actual image quality.
Mistake 6: Replacement Is Too Bright
Match exposure and contrast.
Mistake 7: Covering Reflections
Preserving realistic reflections can greatly improve the composite.
Mistake 8: Covering Fingers
Foreground objects must remain in front of the replacement.
Mistake 9: Ignoring Motion Blur
Fast-moving devices need compatible blur.
Mistake 10: Editing the Tracking Data to Fix Design Problems
Keep design changes inside the replacement pre-comp whenever practical.
A Better Screen Replacement Workflow
Use this sequence:
1. Trim the footage
Track only what you need.
2. Choose a strong reference frame
Start where the screen is clearly visible.
3. Create the planar tracking region
Include useful detail.
4. Track forward and backward
Cover the required shot.
5. Position the Surface
Match the real screen.
6. Verify the track
Use the grid or Surface.
7. Prepare replacement content
Preferably inside a pre-comp.
8. Apply tracking data
Map the replacement to the screen.
9. Fix occlusions
Restore fingers and foreground objects.
10. Match the image
Brightness, color, blur, grain, reflections, motion blur.
11. Preview at full speed
Look for slipping or unnatural details.
12. Render
Check the exported result again.
Five Screen Replacement Exercises
Exercise 1 — Stationary Laptop
Replace a mostly stationary laptop screen.
Focus on alignment.
Exercise 2 — Moving Laptop
Use planar tracking to follow mild perspective changes.
Exercise 3 — Smartphone
Track a phone moving through the shot.
Exercise 4 — Finger Occlusion
Create a foreground matte so fingers remain above the replacement.
Exercise 5 — Animated Interface
Add scrolling or interface animation inside the tracked screen.
These exercises progressively introduce the skills required for professional-looking replacements.
Is Mocha AE Included with After Effects?
Mocha AE is integrated into the After Effects ecosystem, giving After Effects users access to powerful planar-tracking functionality without requiring them to begin with a separate standalone tracking package.
There are more advanced Mocha products and capabilities available for specialized work, but Mocha AE provides substantial functionality for common After Effects tracking tasks.
Is Mocha AE Difficult to Learn?
The interface can look intimidating at first.
But the basic planar-tracking workflow is relatively straightforward:
Draw region
↓
Track surface
↓
Check Surface
↓
Transfer tracking data
↓
Apply to replacement
The most important conceptual lesson is this:
You aren’t tracking the screen’s four corners directly. You’re tracking the planar surface and using the Surface to define the final geometry.
Once that makes sense, Mocha becomes much easier to understand.
AI and Screen Replacement
AI-assisted tools are increasingly useful for tasks surrounding screen replacement.
For example, AI-assisted isolation can help with:
- hands;
- fingers;
- people;
- foreground objects.
But planar tracking still provides extremely valuable geometric information about how the screen moves.
A modern workflow might therefore combine:
Mocha planar tracking
with
AI-assisted foreground isolation
and
traditional compositing.
The tools complement each other.
Practice Screen Replacement in After Effects
For your first project, keep everything simple.
Film a laptop on a desk.
Move the camera slowly.
Make sure the screen and bezel remain visible.
Track the screen in Mocha AE.
Insert a screenshot.
Once the track works, add:
- slight blur;
- color correction;
- reflections.
Then try a smartphone.
If you want to practice these techniques yourself, you can check Adobe’s current After Effects options here:
Get Adobe After Effects and start practicing screen replacement
Frequently Asked Questions
What is Mocha AE?
Mocha AE is a planar-tracking tool integrated with Adobe After Effects workflows.
What is planar tracking?
Planar tracking analyzes the movement of a relatively flat surface rather than only tracking individual points.
Is Mocha AE good for screen replacement?
Yes. Screen replacement is one of its most common applications.
Can I replace a phone screen in After Effects?
Yes. Mocha AE can track the screen while After Effects handles the compositing and replacement content.
Do I need a green phone screen?
No. Natural screen and bezel details can often provide enough tracking information.
Should I track the exact screen boundary?
Not necessarily. The tracking spline defines the region Mocha analyzes, while the Surface defines the screen geometry.
What is the Surface in Mocha?
The Surface is a planar reference used to represent the area where the final replacement should be positioned.
What is Corner Pin?
Corner Pin maps content to four points, allowing it to match the perspective of a quadrilateral such as a screen.
How do I keep fingers in front of the replacement?
Isolate the fingers from the original footage and composite them above the replacement layer.
Why does my replacement look fake?
Common causes include inaccurate tracking, incorrect perspective, excessive sharpness, mismatched brightness, missing reflections, incorrect motion blur, or poor foreground masking.
Can replacement content be animated?
Yes. Place the animation inside a pre-composition and apply the screen tracking to that pre-comp.
Can I replace signs with Mocha AE?
Yes. The same planar-tracking principles can be used for signs, posters, billboards, packaging, and similar surfaces.
What Should You Learn Next?
Screen replacement introduces an important challenge:
What happens when a person or object moves in front of the element you’re compositing?
You need to isolate that foreground subject.
Historically, this often required substantial manual rotoscoping.
After Effects provides tools that make this process considerably easier.
The next article in this series will therefore be:
How to Use Roto Brush in Adobe After Effects: Complete Beginner Guide.
That article will cover subject isolation, foreground/background separation, edge refinement, propagation, and practical rotoscoping workflows.
Final Thoughts
Mocha AE is one of the most useful tools to learn if you want to move beyond basic After Effects animation and into serious compositing.
The most important concept is:
Track the plane, not just the corners.
Once the planar movement has been solved, the Mocha Surface provides the geometry needed to position your replacement.
From there, After Effects handles the creative compositing work.
But remember that tracking is only the first half of a convincing screen replacement.
You also need to consider:
- perspective;
- brightness;
- contrast;
- color;
- reflections;
- sharpness;
- grain;
- motion blur;
- rounded corners;
- foreground fingers;
- environmental light.
When all of these details work together, the viewer shouldn’t think:
“That’s a screen replacement.”
They should simply accept that the content belongs on the device.
Start with a stationary laptop.
Then try a moving screen.
Then add perspective.
Then add finger occlusion.
Then add reflections and interactive animation.
Each project adds another layer of skill.
And once you understand planar tracking, you’ll discover that Mocha AE is useful for far more than replacing screens.
The same workflow can help replace signs, add graphics to walls, remove objects, modify packaging, and integrate motion graphics with real-world surfaces.
Explore Adobe After Effects and start creating your own screen replacements






