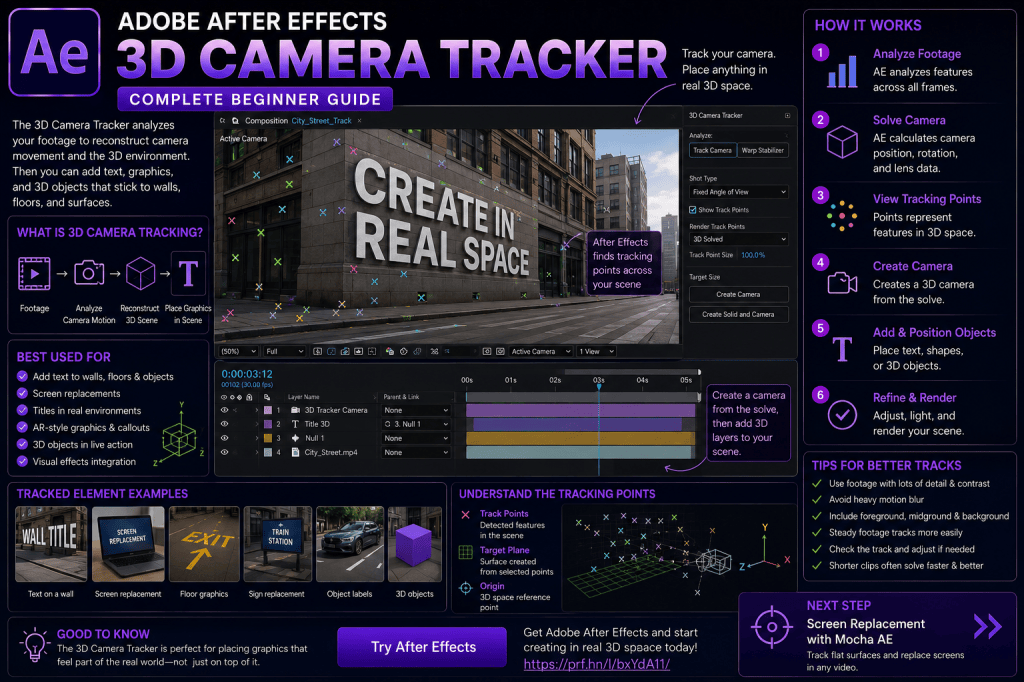
The 3D Camera Tracker is one of the most powerful compositing tools in Adobe After Effects.
Instead of tracking a single moving object, the 3D Camera Tracker analyzes the movement of the camera itself and attempts to reconstruct a virtual 3D representation of the shot.
That means you can place text, graphics, solids, and other elements into real-world footage so they appear to exist naturally inside the scene.
You could place a title on the side of a building, attach a graphic to the ground, position labels throughout a room, or make 3D elements appear to occupy the same space as the original footage.
The basic concept is:
Footage → Analyze Camera Movement → Reconstruct 3D Scene → Place Graphics in That Scene
In this beginner guide, we’ll look at how the After Effects 3D Camera Tracker works, how to analyze footage, understand tracking points and target planes, create a tracked camera, place text and graphics in your scene, troubleshoot failed tracks, and create more convincing composites.
Affiliate disclosure: This article contains affiliate links. If you purchase Adobe After Effects through one of these links, we may earn a commission at no additional cost to you.
What Is the After Effects 3D Camera Tracker?
The 3D Camera Tracker analyzes a video sequence and attempts to determine how the original camera moved through the scene.
After Effects examines visual features across many frames.
From those features, it tries to estimate information about:
- camera movement;
- scene perspective;
- camera position;
- camera orientation;
- focal characteristics;
- spatial relationships between visible surfaces.
After the analysis is complete, After Effects displays tracking points throughout the scene.
You can select suitable points and use them to create elements positioned within the reconstructed 3D environment.
Why Is 3D Camera Tracking Different from Normal Motion Tracking?
Traditional point tracking normally asks:
“Where does this particular feature move?”
The 3D Camera Tracker asks a much broader question:
“How did the camera move through this scene?”
This distinction is important.
Suppose you film a street while walking forward.
Buildings appear to change position because the camera itself is moving.
A conventional tracker might follow one window.
The 3D Camera Tracker analyzes many visual features and uses their relative motion to estimate the movement of the camera.
That lets you position multiple virtual elements throughout the scene.
What Can You Create with 3D Camera Tracking?
Typical uses include:
- attaching text to buildings;
- placing graphics on walls;
- creating virtual signs;
- adding titles to floors;
- inserting 3D objects;
- creating environmental callouts;
- adding virtual interface graphics;
- integrating visual effects;
- adding location labels;
- creating augmented-reality-style graphics;
- combining real footage with motion graphics.
It is especially useful when your footage contains noticeable camera movement.
Motion Tracking vs 3D Camera Tracking
Use basic motion tracking when you need to follow a specific object.
For example:
Track a moving car → Attach a label to the car
Use 3D Camera Tracking when the camera is moving and you want graphics to remain fixed within the environment.
For example:
Camera moves through a street → Text remains attached to a building
These are different problems and require different approaches.
What Makes Good Footage for 3D Camera Tracking?
Not every video clip is equally suitable.
The tracker needs visible features it can recognize across frames.
Good footage often contains:
- textured surfaces;
- visible corners;
- buildings;
- floors;
- walls;
- objects at different depths;
- clear perspective;
- sufficient contrast.
A city street, office, warehouse, room, or outdoor environment can provide excellent tracking information.
Difficult Footage
Some footage is much harder to solve.
Potential problems include:
- extreme motion blur;
- very low light;
- excessive noise;
- large areas without detail;
- strong reflections;
- rapidly changing lighting;
- moving objects filling most of the frame;
- heavy zooming;
- severe lens distortion;
- very short shots.
The tracker needs stable environmental information.
If most of the image consists of moving water, clouds, crowds, or reflective surfaces, solving the camera may become more difficult.
Before You Begin
If you’re completely new to tracking, I recommend first understanding basic motion tracking.
Read:
How to Use Motion Tracking in Adobe After Effects: Complete Beginner Guide
That article explains how After Effects can analyze movement and how Null Objects and parenting can be used with tracking data.
3D Camera Tracking expands those ideas into three-dimensional space.
If you want to practice these techniques yourself, you can check Adobe’s current After Effects options here:
Explore Adobe After Effects and current plans
Your First 3D Camera Track
Choose a short video in which the camera moves through an environment.
For your first attempt, use something relatively simple.
A good example might be:
A slow handheld or stabilized movement through a room or street.
Try to avoid:
- rapid camera movement;
- severe blur;
- huge moving foreground objects.
A short 5–10 second clip is ideal for learning.
Step 1: Import Your Footage
Import the footage into After Effects.
Create a composition from the clip or add it to an existing composition.
Select the footage layer.
Step 2: Apply the 3D Camera Tracker
With the footage layer selected, apply the 3D Camera Tracker.
You can access it through the appropriate tracking command, Tracker panel, or Perspective effects category depending on your workspace.
After Effects begins analyzing the clip.
You’ll see a message indicating that the footage is being analyzed.
Step 3: Let After Effects Analyze the Footage
The tracker examines the footage frame by frame.
It identifies visual features and studies how their positions change throughout the shot.
This first stage is called analysis.
The amount of time required depends on factors such as:
- clip duration;
- resolution;
- computer performance;
- footage complexity.
You don’t need to manually place tracking points.
Unlike basic point tracking, the 3D Camera Tracker identifies many candidate features automatically.
Step 4: Camera Solving
After analyzing the clip, After Effects performs another stage:
Solving the camera.
During this phase, the software attempts to convert the tracked feature movement into a virtual 3D camera solution.
Conceptually, it asks:
“If these points moved this way across the image, what camera movement could have produced that motion?”
Once the solve is complete, tracking points appear throughout the footage.
What Are the Colored Tracking Points?
After Effects displays many small tracking markers over the scene.
Each represents a feature that contributed to the camera analysis.
These points correspond to estimated locations within the reconstructed 3D environment.
As you move through the shot, they remain associated with their corresponding areas.
You’re not expected to use every tracking point.
Instead, you choose points representing the surface where you want to place your graphic.
Understanding the Target
Move your cursor over groups of tracking points.
After Effects displays a target indicator.
This target represents an estimated plane based on the selected points.
For example, if several tracking points belong to the ground, After Effects may interpret them as lying on a common plane.
Likewise, points on a wall may create a vertical plane.
This is extremely useful because it gives you a reference for positioning virtual elements.
Choosing Good Tracking Points
Don’t simply click the first points you see.
Choose points that clearly belong to the surface where your graphic should appear.
If you’re placing text on a wall, select points that appear physically attached to that wall.
Avoid combining:
- floor points;
- wall points;
- foreground-object points;
unless they genuinely represent the same plane.
A good target plane should visually align with the real surface.
Example: Put Text on a Wall
Imagine your footage shows the camera moving through an office.
You want to place:
AFTER EFFECTS 2026
on one wall.
After the camera solve:
- Move the cursor over tracking points on the wall.
- Find a target that appears aligned with the wall.
- Select an appropriate group of points.
- Create text and a camera using the available tracking options.
After Effects creates a 3D text layer positioned in the reconstructed scene.
It also creates a virtual camera based on the solved footage.
Preview the composition.
As the original footage moves, the text should remain attached to the wall.
What Is the Tracked Camera?
The camera created by the 3D Camera Tracker represents After Effects’ estimate of the camera used to capture the original shot.
This virtual camera contains animation matching the detected camera movement.
The important thing is that your added 3D layers now exist within the same virtual camera environment.
Conceptually:
Original camera movement
becomes
After Effects virtual camera movement
Your added graphics then react naturally to that movement.
Why Does the Text Appear to Stay in Place?
Suppose the original camera pans right.
A static 2D title would simply remain fixed on the screen.
That would make it obvious that the title was added afterward.
But tracked 3D text exists at a virtual location in the reconstructed environment.
As the virtual camera moves, the text changes perspective and screen position accordingly.
The result can look as though the typography was physically present when the footage was filmed.
Create a Solid and Camera
Instead of creating text directly, you can create a Solid and Camera from selected tracking points.
The solid becomes a 3D layer aligned with the chosen plane.
This can be extremely useful as a reference.
You can use it to:
- verify the track;
- place graphics;
- attach effects;
- establish surface orientation.
If the solid stays convincingly attached to the real-world surface, that’s a good sign that your track is working.
Always Test the Track First
Before designing elaborate graphics, create a simple test element.
For example:
- small solid;
- simple text;
- basic shape.
Attach it to the desired surface.
Preview the entire shot.
Look for:
- sliding;
- drifting;
- rotation errors;
- scale inconsistencies;
- perspective problems.
Fix the tracking problem before spending time polishing the graphic.
Setting a Ground Plane and Origin
After Effects can allow selected tracking points to define a reference ground plane and origin for the reconstructed environment.
This can be useful when you want the 3D scene orientation to correspond more logically to the real environment.
For example, choose points on the floor.
Define that surface as the ground plane.
This can make it easier to position additional 3D elements consistently.
Why the Ground Plane Matters
Imagine you’re adding multiple 3D elements to a room.
Without a sensible coordinate reference, positioning objects can become confusing.
Establishing a useful ground plane helps define:
- up;
- down;
- floor orientation;
- scene origin.
This becomes increasingly important as the composition grows more sophisticated.
Add Multiple Graphics to One Track
One solved camera can support many virtual elements.
For example, in a street scene you could add:
Building 1
“OFFICE”
Building 2
“RESTAURANT”
Road
“CITY CENTER”
Shopfront
“OPEN 24/7”
Each element can be positioned using tracking points associated with its corresponding surface.
This is one of the major advantages of 3D Camera Tracking.
You aren’t tracking each graphic independently.
You solve the camera once and use that reconstructed environment repeatedly.
Create Environmental Callouts
3D Camera Tracking is excellent for callout graphics.
Imagine a factory tour.
As the camera moves through the building, labels appear beside equipment:
AI SERVER CLUSTER
NETWORK CORE
COOLING SYSTEM
Because each label is positioned in 3D space, the camera can move naturally while the graphics remain associated with their real-world locations.
Create a Location Title
Another popular use is environmental typography.
Suppose your footage shows a camera approaching a city.
Place large text in the environment:
ROTTERDAM
or:
AMSTERDAM
Rather than floating as a flat overlay, the text appears to occupy space within the landscape.
Add subtle shadowing, color matching, and Depth of Field where appropriate to make the integration more convincing.
Use Shape Layers with Camera Tracking
You’re not limited to text.
Shape layers can also participate in tracked 3D graphics.
For example:
- arrows;
- circles;
- interface elements;
- labels;
- icons.
Build a callout from:
Circle + Line + Text
Pre-compose or organize the graphic appropriately.
Position it at a solved point in the scene.
Now the entire motion graphic can appear anchored to the environment.
Null Objects and 3D Camera Tracking
You can also create a Null Object at selected tracking points.
This is extremely useful.
The Null provides a 3D reference point.
You can then:
- parent graphics to it;
- position additional layers relative to it;
- use it to control visual effects.
This creates a flexible workflow similar to the Null Object approach used in basic motion tracking.
Why Null Objects Are So Useful
Imagine you’ve selected the exact position of a machine in your footage.
Create a Null there.
Now you can attach:
- label;
- icon;
- line;
- particle effect;
- glow.
All can reference the same 3D point.
If you later need to reposition the whole graphic system slightly, adjusting the parent structure may be much easier than editing every component individually.
Add a 3D Object
After Effects’ modern 3D environment provides increasingly sophisticated options for working with 3D elements.
Once you have solved camera movement, you can experiment with placing suitable 3D content into the scene.
The camera solve helps the virtual object respond to the original camera motion.
However, believable 3D compositing requires more than correct tracking.
You also need to consider:
- scale;
- lighting;
- shadows;
- materials;
- perspective;
- color;
- Depth of Field;
- motion blur.
Tracking is the foundation, not the entire composite.
Matching Scale
A virtual object can be perfectly tracked and still look fake if its scale is wrong.
Ask:
How large would this object actually be in the real scene?
Compare it to:
- doors;
- furniture;
- people;
- vehicles;
- architecture.
Use those references to estimate believable scale.
Matching Perspective
Your tracking points help determine orientation.
Make sure the graphic aligns with the real surface.
Text placed on a wall should share the wall’s apparent plane.
An object on the floor should appear to sit on the floor rather than float above it.
Small perspective mistakes can immediately reveal the composite.
Matching Lighting
If you’re inserting something intended to look physically present, lighting matters.
Look at the original footage.
Where does the light come from?
Is it:
- warm;
- cool;
- soft;
- hard;
- directional?
Your added element should feel consistent with the environment.
After Effects’ expanding 3D lighting capabilities can help with suitable workflows.
Matching Shadows
If your virtual object appears to sit on a real surface, viewers may expect it to cast or receive shadows.
Without appropriate contact and shadow information, an object may appear to float.
Creating convincing shadows can require additional compositing work.
The exact method depends on the shot and type of element.
Matching Depth of Field
Suppose the real footage has a shallow Depth of Field.
Foreground objects are sharp while the background is blurred.
If your virtual graphic remains perfectly sharp even though it appears to sit far in the background, the composite can look wrong.
Modern After Effects Advanced 3D workflows include more sophisticated Depth of Field capabilities.
Use focus carefully when trying to integrate 3D elements convincingly.
Matching Motion Blur
Camera movement can produce motion blur.
Your added graphics should generally respond consistently.
If the entire scene blurs during a fast camera movement while your virtual title remains razor sharp, the title will stand out.
Motion blur is an important part of integration.
Color Matching
A bright pure-white graphic may look artificial in warm sunset footage.
A saturated neon object may look out of place in a muted documentary shot.
Use color correction and grading where necessary to integrate your graphics with the footage.
Again:
Perfect tracking doesn’t automatically mean perfect compositing.
Add a Shadow Under Tracked Text
Suppose text appears attached to the ground.
A subtle shadow can help anchor it.
The shadow should follow:
- light direction;
- surface perspective;
- softness;
- scene exposure.
Avoid generic drop shadows that ignore the actual environment.
Even a subtle correctly oriented shadow can significantly improve realism.
Add a Glow to a Tracked Object
Not every graphic needs to look physically real.
You can also create stylized effects.
For example, place a neon marker at a tracked position.
Add:
- glow;
- animated ring;
- label;
- line.
The camera track keeps the graphic spatially anchored while the design remains intentionally futuristic.
This is common in:
- technology videos;
- product presentations;
- science content;
- sports graphics;
- documentaries.
3D Camera Tracking for Data Visualization
Tracking is also useful for information-rich graphics.
Imagine an aerial or street shot.
You might place labels showing:
- locations;
- distances;
- building names;
- statistics;
- directions.
Because the labels occupy reconstructed 3D space, the camera can move through the information.
This can create an augmented-reality-style presentation.
Create a HUD-Style Environment
Combine tracking with:
- shape layers;
- Trim Paths;
- typography;
- icons;
- glow.
Position different graphics throughout the scene.
For example:
Building
99% Uptime
Vehicle
EV System
Location
1.2 km
The camera moves naturally while the interface graphics remain attached to their environmental points.
What Is Solve Quality?
A successful camera track depends on how accurately After Effects can solve the camera from the available feature data.
If the solve is weak, your inserted elements may:
- slide;
- drift;
- wobble;
- scale incorrectly.
Always visually evaluate the result.
A completed analysis does not guarantee a production-quality track.
Solve Error
After Effects may provide information indicating the quality of the camera solution.
Lower error generally suggests a better mathematical fit, but don’t evaluate a track based only on one number.
The final visual result matters more.
Place a test solid.
Preview the footage.
If it remains convincingly fixed to the scene, the solve may be useful.
Why a Track Can Fail
Several factors can cause problems.
Moving Objects Dominate the Frame
The tracker wants to understand the static environment.
If most features belong to moving cars or people, it may interpret their movement incorrectly.
Heavy Motion Blur
Blur removes the clear feature detail required for reliable analysis.
Featureless Surfaces
A blank white wall gives the tracker very little information.
Reflections
Reflected imagery may move differently from the physical surface.
Severe Zoom
Certain camera moves can complicate the solve.
Lens Distortion
Strong wide-angle distortion can reduce tracking accuracy.
Remove or Ignore Moving Objects Where Possible
If a moving person occupies one corner of the shot while the rest of the environment is static, the tracker may still solve successfully.
But if large moving subjects cause problems, you may need to refine the analysis or use techniques that reduce their influence.
Choose footage carefully when learning.
Understanding Shot Type
The 3D Camera Tracker includes settings that help After Effects interpret the camera behavior.
Different footage may involve:
- fixed angle of view;
- variable zoom;
- tripod-like pan;
- typical free camera movement.
Allowing the software to automatically determine the shot can work well, but difficult footage may benefit from more deliberate settings.
Understanding how the original shot was filmed can help you choose appropriate options.
Tripod Pan Shots
Imagine the camera rotates left and right from a relatively fixed location.
That’s different from physically walking through the scene.
A tripod-style pan contains rotational movement without the same positional translation.
Appropriate tracker settings can help After Effects interpret this correctly.
Zoom Shots
Zooming changes focal length.
That affects how scene elements appear to move relative to one another.
A variable zoom can make solving more complicated than footage captured at a fixed focal length.
If you know the camera zoomed during the shot, consider that when evaluating the tracking solution.
Lens Distortion
Wide-angle and action-camera footage may contain significant distortion.
Straight lines appear curved.
That distortion can make accurate camera solving more difficult.
For demanding professional compositing, lens-distortion workflows may be needed.
Conceptually:
- Correct or account for distortion.
- Track the scene.
- Add graphics/effects.
- Restore the appropriate visual characteristics.
The exact workflow depends on the project.
Handheld Footage
Handheld footage can often be tracked successfully if it contains enough sharp environmental detail.
In fact, natural camera translation can provide useful parallax information.
But severe shake combined with motion blur can cause problems.
Good source footage makes everything easier.
What Is Parallax?
Parallax is the apparent difference in movement between objects at different distances from the camera.
Imagine walking sideways.
A nearby lamppost seems to move quickly across your view.
A distant building moves much less.
This difference helps reveal depth.
The 3D Camera Tracker can use relationships like these to infer aspects of the scene’s spatial structure.
Why Parallax Helps
If every visible feature behaves almost identically, it may be harder to estimate depth.
A camera translating through a scene containing objects at several distances provides more spatial information.
That is why some moving-camera shots solve particularly well.
3D Camera Tracker vs Mocha AE
Mocha AE is particularly strong for planar tracking.
Use it when you want to follow a flat surface such as:
- phone screen;
- sign;
- monitor;
- wall panel.
The 3D Camera Tracker serves a different purpose.
It reconstructs the camera’s movement through the overall scene.
Choose based on the problem.
3D Camera Tracker vs Point Tracking
Use point tracking when:
One feature needs to be followed.
Use 3D Camera Tracking when:
The camera movement needs to be reconstructed.
This is a useful distinction.
Don’t automatically use the most sophisticated tracker.
Use the simplest tool that solves the shot correctly.
3D Camera Tracker vs Warp Stabilizer
Warp Stabilizer attempts to make shaky footage appear smoother.
3D Camera Tracker reconstructs camera movement so you can integrate elements into the scene.
Interestingly, both involve analyzing motion.
But their goals are very different.
Common 3D Camera Tracking Mistakes
Mistake 1: Using Poor Footage
Low-detail, blurry footage makes camera solving much harder.
Mistake 2: Selecting Random Tracking Points
Choose points that genuinely describe the intended surface.
Mistake 3: Ignoring Target Orientation
Make sure the target aligns with the wall, floor, or surface.
Mistake 4: Designing Before Testing
Always create a simple test object first.
Mistake 5: Assuming the Solve Is Perfect
Preview carefully for drift and sliding.
Mistake 6: Ignoring Lighting
Tracked graphics still need to match the environment.
Mistake 7: Ignoring Motion Blur
Sharp graphics in blurry moving footage look artificial.
Mistake 8: Wrong Scale
Objects should appear physically plausible within the scene.
Mistake 9: Choosing Moving-Object Points
Use stable environmental features when solving environmental camera movement.
Mistake 10: Trying to Fix Everything with Tracking
Tracking only solves movement. Compositing still requires design and visual judgment.
Five Beginner Exercises
Exercise 1 — Text on a Wall
Film a slow camera movement across a room.
Track the camera.
Attach text to a wall.
Exercise 2 — Floor Graphic
Place a shape or title on the ground.
Check its perspective while the camera moves.
Exercise 3 — Environmental Callout
Track a street shot.
Add a label pointing toward a building.
Exercise 4 — Multiple Labels
Place several text labels at different depths.
Observe how parallax affects them.
Exercise 5 — Simple 3D Object
Insert a simple 3D element and experiment with scale, orientation, and lighting.
These exercises build confidence progressively.
A Practical Beginner Project
Record a short video walking slowly through your workspace.
Make sure the footage shows:
- floor;
- desk;
- wall;
- several detailed objects.
Import the clip into After Effects.
Apply the 3D Camera Tracker.
Let it analyze and solve.
Choose points on your desk.
Create a tracked text layer:
MY WORKSPACE
Choose another set of points on a monitor or wall.
Create another label:
MOTION DESIGN
Add subtle animation to each label.
Preview the shot.
You have now combined:
- real footage;
- camera analysis;
- 3D tracking;
- typography;
- environmental compositing.
Make the Graphics Feel Integrated
Once the tracking works, concentrate on visual integration.
Ask:
Does the graphic feel attached to the surface?
Does the perspective make sense?
Does its scale feel correct?
Does it move naturally with the camera?
Should it receive motion blur?
Should it be slightly softened?
Does its color fit the environment?
These decisions distinguish a technically tracked element from a convincing composite.
Can You Use 3D Camera Tracking with After Effects 2026 3D Features?
Yes, and this is where the workflow becomes particularly interesting.
Modern After Effects provides expanded native 3D capabilities such as:
- parametric meshes;
- 3D models;
- improved materials;
- lighting;
- shadows;
- Advanced 3D Depth of Field.
A tracked camera can provide the motion foundation while these newer 3D capabilities create the inserted content.
This means increasingly sophisticated mixed real-world/3D compositions can remain inside After Effects.
AI and Camera Tracking
AI is changing many visual-effects workflows, particularly object isolation.
But 3D Camera Tracking solves a different problem.
AI may identify:
What is this object?
Camera tracking determines:
How did the camera move through this scene?
Both types of information can work together.
For example:
- AI isolates a person.
- Camera tracking reconstructs the environment.
- 3D graphics are inserted behind the subject.
- The foreground isolation creates realistic layering.
This demonstrates how traditional compositing and newer AI-assisted workflows increasingly complement each other.
Do You Need Plug-Ins?
No.
The 3D Camera Tracker is built into After Effects.
You can create sophisticated tracked composites using native tools.
Additional plug-ins and specialized tracking applications can become useful for demanding professional situations, but beginners can learn the fundamental workflow entirely inside After Effects.
Is 3D Camera Tracking Difficult?
The basic workflow is surprisingly approachable:
Select footage → Track Camera → Wait for solve → Choose points → Create object and camera
The difficult part is learning to evaluate the track.
That skill develops with practice.
You’ll gradually learn:
- which footage tracks well;
- which points produce useful planes;
- how to spot sliding;
- how to integrate graphics convincingly.
The software performs the analysis.
You make the creative and technical judgments.
Practice the 3D Camera Tracker
Don’t begin with extremely difficult footage.
Use a short, well-lit shot containing:
- buildings;
- walls;
- floor;
- furniture;
- visible texture.
Solve it.
Create one piece of text.
Make sure it stays attached.
Then create another.
Gradually increase the difficulty.
If you want to practice these techniques yourself, you can check Adobe’s current After Effects options below:
Get Adobe After Effects and start practicing 3D Camera Tracking
Frequently Asked Questions
What does the 3D Camera Tracker do in After Effects?
It analyzes video footage to estimate camera motion and reconstruct 3D scene information that can be used to integrate virtual elements into the footage.
Where is the 3D Camera Tracker?
With footage selected, you can access Track Camera through the tracking workflow or apply the 3D Camera Tracker from the appropriate effects category.
What are the colored points?
They represent tracked visual features After Effects has identified in the scene.
What is the tracking target?
It represents an estimated plane created from selected tracking points.
Can I attach text to a wall?
Yes. This is one of the most common 3D Camera Tracker uses.
Can I place objects on the ground?
Yes, provided the camera solve and selected tracking points accurately describe that surface.
Does After Effects create a camera automatically?
A solved camera can be created as part of the tracking workflow when you create tracked elements.
Why does my graphic slide across the surface?
Possible causes include a poor camera solve, inappropriate tracking-point selection, incorrect surface orientation, or unsuitable source footage.
Can I use the tracker with 3D objects?
A tracked camera can form the basis for inserting compatible 3D elements into the scene.
Is the 3D Camera Tracker the same as Mocha AE?
No. Mocha AE is particularly focused on planar tracking, while the 3D Camera Tracker reconstructs camera motion and scene data.
Do I need tracking markers?
Usually not. The tracker can use natural features already present in suitable footage.
Can handheld footage be tracked?
Yes, provided it contains sufficient stable detail and isn’t excessively blurred or distorted.
What Should You Learn Next?
Now that you understand basic motion tracking and 3D Camera Tracking, the next logical technique is screen replacement.
Screens are everywhere:
- phones;
- tablets;
- laptops;
- monitors;
- televisions.
Replacing them convincingly requires tracking not just a point but a surface.
That’s where planar tracking becomes particularly useful.
The next article in this series will therefore be:
How to Replace a Screen in Adobe After Effects with Mocha AE: Complete Guide.
Final Thoughts
The 3D Camera Tracker changes the way you can combine motion graphics with real footage.
Instead of placing graphics on top of a video, you can begin placing them inside the visual space of the shot.
The essential workflow is:
Analyze footage.
Solve the camera.
Choose reliable tracking points.
Identify a surface.
Create a camera and tracked element.
Test the track.
Integrate the graphic.
Once the movement works, concentrate on the details that make the composite believable:
Perspective.
Scale.
Lighting.
Shadows.
Color.
Depth of Field.
Motion blur.
A perfect camera track is only the foundation.
The final goal is to make the viewer stop thinking about the graphic as something added afterward.
When the tracking and compositing work together, a title can look painted onto a wall, a virtual sign can appear attached to a building, and a 3D object can seem to occupy the same world as the original footage.
That’s when 3D Camera Tracking becomes much more than a technical tool.
It becomes a creative bridge between the real world and motion design.
Explore Adobe After Effects and start creating tracked 3D composites






