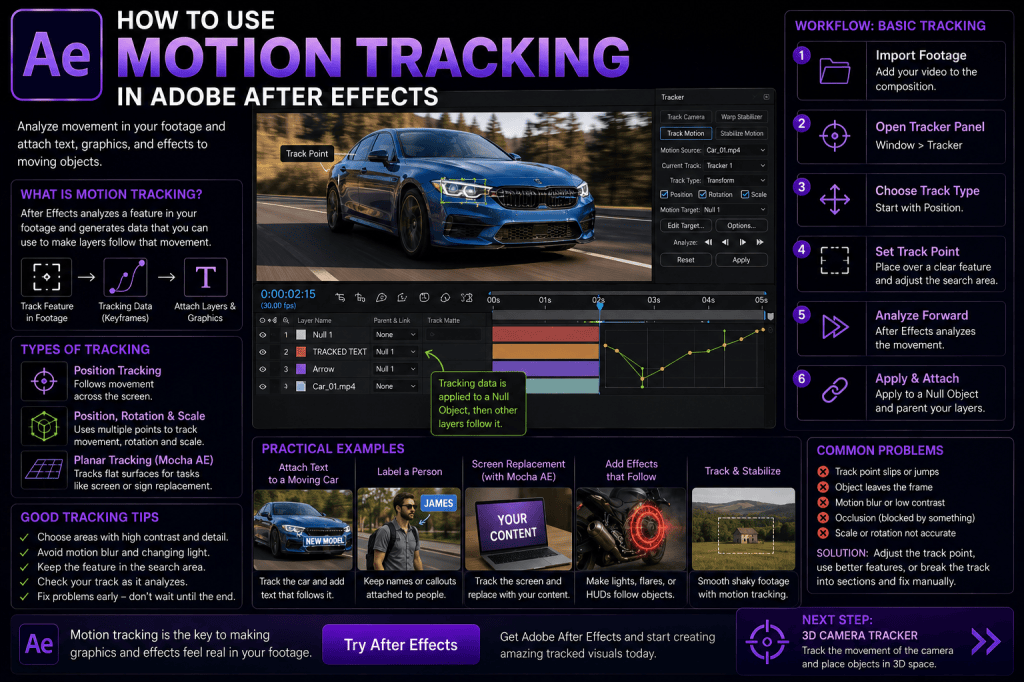
Motion tracking is one of the most useful visual-effects techniques you can learn in Adobe After Effects.
It allows After Effects to analyze movement in video and use that movement to control another layer.
For example, you can make text follow a moving car, attach a graphic to a laptop screen, place a label beside a moving person, make an effect follow an object, or track footage so another visual element appears to belong naturally inside the scene.
The basic principle is simple:
After Effects identifies a recognizable feature in your footage, analyzes how that feature moves from frame to frame, and converts that movement into animation data.
You can then apply that tracking data to another layer.
In this beginner guide, we’ll explore how motion tracking works, how to perform a basic point track, why Null Objects are useful, how Position, Rotation, and Scale tracking differ, how to improve difficult tracks, and where motion tracking fits into a modern After Effects workflow.
Affiliate disclosure: This article contains affiliate links. If you purchase Adobe After Effects through one of these links, we may earn a commission at no additional cost to you.
What Is Motion Tracking in After Effects?
Motion tracking is the process of analyzing the movement of visual features across a sequence of video frames.
Suppose you have footage of a car driving through a shot.
You want a text label saying:
NEW ELECTRIC MODEL
to remain attached to the car.
Manually animating the text frame by frame would be possible, but inefficient.
Instead, you can track a recognizable feature on the car.
After Effects analyzes how that point moves through the footage.
The resulting data can then control the position of your text or another layer.
The text appears to follow the car automatically.
What Can You Use Motion Tracking For?
Motion tracking is useful for many tasks, including:
- attaching text to moving objects;
- adding labels to people;
- screen replacement;
- attaching graphics to vehicles;
- tracking logos;
- adding visual effects;
- following products;
- stabilizing footage;
- replacing signs;
- creating callouts;
- compositing interface graphics;
- tracking masks and effects.
Once you understand motion tracking, many effects that initially appear complicated become much easier to build.
Motion Tracking vs Mask Tracking
These two techniques are related but serve different purposes.
Motion tracking analyzes movement and produces tracking data that can control another layer or property.
Mask tracking helps a mask follow an object or region.
For example:
If you want text to follow someone’s head, motion tracking may be appropriate.
If you want a blur mask to remain around someone’s face, mask tracking may be more convenient.
Professional projects often use several tracking techniques together.
Motion Tracking vs 3D Camera Tracking
Basic motion tracking typically follows specific image features.
The 3D Camera Tracker analyzes the broader movement of the camera through a scene and attempts to reconstruct aspects of that camera motion in 3D.
Basic motion tracking is useful when you want to follow a specific object or point.
3D Camera Tracking is often better when you want graphics to appear attached to surfaces in a scene filmed with a moving camera.
We’ll cover 3D Camera Tracking in the next article.
Before You Start
Motion tracking becomes easier if you already understand:
- layers;
- keyframes;
- Position;
- Scale;
- Rotation;
- masks;
- track mattes.
If you are following this tutorial series in order, you already have the necessary foundation.
If you’re ready to practice with After Effects yourself, you can check Adobe’s current After Effects options here:
Explore Adobe After Effects and current plans
Your First Motion Track
Let’s start with a simple Position track.
Choose a short video containing a clearly visible object moving through the frame.
Good beginner footage might contain:
- a car;
- a phone;
- a person’s shirt;
- a sign;
- a high-contrast object.
Avoid difficult footage for your first experiment.
Step 1: Import the Footage
Import your video into After Effects.
Create a composition from it or place it inside an existing composition.
Select the footage layer.
Step 2: Open the Tracker Panel
Open the Tracker panel if it isn’t already visible.
The Tracker panel provides access to several tracking-related functions.
Choose the appropriate motion-tracking option for the task.
After Effects will prepare the footage for tracking.
Step 3: Choose What to Track
For a basic track, you may start by tracking Position.
Depending on the task, you can also track:
- Rotation;
- Scale.
Position is the easiest place to begin.
Understanding the Track Point
When you create a point track, you’ll see a tracking control positioned over the footage.
The important parts conceptually are:
Feature Region
The smaller inner region identifies the visual feature After Effects should follow.
Search Region
The larger surrounding region tells After Effects where to look for that feature in subsequent frames.
There is also an attachment point associated with where the tracking data will effectively be applied.
Understanding these regions helps you create better tracks.
Choosing a Good Tracking Feature
The quality of your track depends heavily on what you choose.
A good tracking point usually has:
- strong contrast;
- clear edges;
- distinctive detail;
- consistent appearance;
- sufficient size.
For example, the corner of a white sticker on a dark laptop may track well.
A featureless section of a plain wall probably won’t.
After Effects needs something recognizable from frame to frame.
Avoid Low-Contrast Areas
Suppose you’re tracking a gray object against a slightly darker gray background.
There may not be enough visual information for reliable tracking.
Look for something more distinctive.
Corners are often useful because they provide contrast in multiple directions.
Examples include:
- window corners;
- logo edges;
- screws;
- buttons;
- high-contrast markings.
Step 4: Position the Tracking Point
Move the feature region over the detail you want to track.
Keep the feature inside the inner box.
Adjust the search region so After Effects has enough room to find the feature in the next frame.
Don’t make the search area enormous without reason.
A larger search region can require more processing and may increase the chance of finding the wrong feature.
Step 5: Analyze Forward
Start the tracking analysis.
After Effects moves through the footage frame by frame.
Watch the tracking point.
It should remain attached to the feature you selected.
If it begins drifting away, stop the analysis.
Correct the track.
Then continue.
Don’t simply start the tracker and leave the computer assuming everything will be perfect.
Reviewing the track as it develops can save time.
What Is Tracking Drift?
Tracking drift occurs when the tracking point gradually moves away from the intended feature.
For example, you begin tracking the corner of a phone.
After 100 frames, the tracker has moved several pixels away.
A few frames later, it’s following the background instead.
That’s drift.
It can occur because:
- the feature changes appearance;
- the object rotates;
- lighting changes;
- motion blur increases;
- another object blocks the feature;
- the feature leaves the frame.
Tracking isn’t always a one-click process.
Step 6: Create a Null Object
Once you have tracking data, it’s often useful to apply it to a Null Object rather than directly to your final graphic.
Create:
Layer → New → Null Object
A Null Object doesn’t render as a visible graphic.
Instead, it acts as a control layer.
This is one of the most useful concepts in After Effects.
Why Use a Null Object?
Suppose you’ve tracked a moving car.
You could apply the tracking data directly to a text layer.
But later you might want:
- text;
- an arrow;
- an icon;
- a box;
all to follow the same car.
If the tracking data lives on a Null Object, all those layers can be parented to the Null.
The Null handles the tracked movement.
The individual graphic layers remain easier to edit.
Conceptually:
Tracked footage → Null Object → Graphic layers
This creates a much cleaner workflow.
Step 7: Apply the Tracking Data
Set the Null Object as the target for your tracking data.
Apply the track.
The Null Object now contains keyframes representing the movement that After Effects analyzed.
Scrub through the Timeline.
The Null should follow the tracked object.
Step 8: Attach a Graphic
Create a text layer.
For example:
TRACKED OBJECT
Position it near the object.
Parent the text layer to the tracked Null Object.
Now preview the composition.
The text follows the tracked motion.
You’ve created your first tracked graphic.
What Does Parenting Do?
Parenting lets one layer inherit transformations from another.
If the parent moves, the child follows.
For example:
Null Object = parent
Text = child
When the Null moves because of the tracking data, the text follows.
But you can still adjust the text’s position relative to the Null.
This is why Null Objects and parenting are so useful for tracking.
Tracking Position
Position tracking follows movement across the frame.
This is appropriate when the tracked object mainly changes its X and Y position.
Examples:
- a car moving horizontally;
- a person walking;
- a ball moving;
- a phone moving through the shot.
For many simple tracking jobs, Position alone may be sufficient.
Tracking Rotation
Sometimes an object doesn’t only move.
It also rotates.
Imagine tracking a rectangular sign that turns slightly during the shot.
If you track only Position, your graphic may remain attached spatially but won’t rotate with the sign.
Rotation tracking helps solve this.
This generally requires tracking more than one feature so After Effects can determine the change in angle.
Tracking Scale
An object may also move closer to or farther from the camera.
Its apparent size changes.
If your graphic remains the same size, it may no longer look attached to the object.
Scale tracking helps account for this change.
Like Rotation, it generally relies on the relationship between multiple tracking points.
Two-Point Tracking
When tracking Position, Rotation, and Scale, After Effects can use two tracking points.
Imagine two points on a sign.
As the sign moves:
- both points move;
- the distance between them may change;
- their angle relative to each other may change.
From this information, After Effects can infer:
Position
Scale
Rotation
This creates a more complete track.
Example: Attach a Logo to a Moving Box
Suppose you filmed a cardboard box moving through a scene.
You want to add a logo to it.
Choose two high-contrast features on the box.
Track:
- Position;
- Rotation;
- Scale.
Apply the tracking data to a Null.
Parent the logo to the Null.
Now the logo follows the box’s overall movement more convincingly.
This still doesn’t account for every possible perspective change, but it’s a useful step beyond simple Position tracking.
Motion Tracking for Callouts
Callouts are common in:
- product videos;
- technical tutorials;
- corporate presentations;
- documentaries.
For example, a label might say:
AI PROCESSOR
with a line pointing toward a component inside a computer.
Track the component.
Apply the track to a Null.
Parent the callout to the Null.
Now the label follows the component as the camera or product moves.
Motion Tracking for Social Media
Tracking can also make short-form videos more engaging.
You might attach:
- emoji;
- text;
- labels;
- arrows;
- icons;
to moving subjects.
Because the graphic follows the real-world movement, it feels integrated into the footage rather than simply placed on top.
Motion Tracking for Product Videos
Imagine filming a smartphone.
You can track:
- the screen;
- a camera lens;
- a button;
- a logo.
Then attach explanatory graphics.
For example:
48 MP CAMERA
could follow the camera module while an animated line points toward it.
This is an effective way to combine product footage with motion graphics.
Motion Tracking for Screen Replacement
Screen replacement is one of the most popular tracking applications.
Imagine a video containing:
- phone;
- laptop;
- tablet;
- television.
You want to replace the original display with your own content.
Tracking allows the replacement content to follow the screen as it moves.
However, basic point tracking isn’t always the best tool for this.
Screens often involve perspective changes.
That’s where planar tracking tools can become useful.
What Is Planar Tracking?
Traditional point tracking follows individual features.
Planar tracking analyzes a broader flat surface.
Examples include:
- phone screens;
- computer monitors;
- signs;
- walls;
- book covers.
Because these surfaces can change perspective, planar tracking can be more appropriate than ordinary point tracking.
After Effects workflows often use Mocha AE for planar tracking.
What Is Mocha AE?
Mocha AE is integrated with After Effects workflows and is designed around planar tracking.
Instead of tracking one tiny feature, you define a region representing a planar surface.
Mocha analyzes the movement of that surface.
This is especially useful for:
- screen replacements;
- sign replacements;
- object cleanup;
- perspective tracking.
We’ll cover Mocha AE in greater detail in a dedicated tutorial.
Point Tracking vs Planar Tracking
A useful distinction is:
Point tracking
“Follow this feature.”
Planar tracking
“Follow this surface.”
If you only need a label attached to a moving point, ordinary motion tracking may be enough.
If you’re replacing a phone screen that rotates in perspective, planar tracking may be more appropriate.
Tracking Difficult Footage
Not every shot tracks easily.
Common problems include:
- motion blur;
- low contrast;
- camera shake;
- object rotation;
- occlusion;
- lighting changes;
- reflections;
- objects leaving the frame.
The solution depends on the problem.
Problem: Motion Blur
Fast movement can make the feature blurry.
After Effects may struggle to identify it consistently.
Possible solutions include:
- choose a different tracking feature;
- enlarge or adjust the feature region;
- manually correct problematic frames;
- use another tracking method.
Problem: Object Leaves the Frame
If the tracked feature disappears, the tracker cannot continue following it.
You may need to:
- track until the feature disappears;
- stop;
- choose another feature;
- continue the track;
- combine or correct the data as needed.
Planning the track before starting can save time.
Problem: Object Is Occluded
Imagine tracking a car.
A person walks in front of it for several frames.
The tracking feature disappears.
Automatic tracking may fail.
You may need to bridge the occluded section manually or track another visible feature.
Problem: Changing Light
Reflections and changing illumination can alter the appearance of the feature.
This is common on:
- cars;
- glass;
- screens;
- shiny products.
Choose stable structural features when possible rather than reflections.
Problem: Tracking Point Jumps
Stop immediately.
Return to the last good frame.
Correct the tracking point.
Then continue analyzing.
It’s usually easier to correct a problem when it begins than after hundreds of bad frames have been generated.
Review Tracking Data Before Building Graphics
Don’t immediately spend an hour designing the final graphic.
First test the track.
Create a temporary marker or simple text.
Attach it to the Null.
Preview the shot.
Look for:
- slipping;
- jitter;
- drift;
- incorrect rotation;
- incorrect scaling.
Fix the track first.
Then build the polished graphic.
Tracking Jitter
Even a successful track may contain small frame-to-frame movement that looks jittery.
Whether this matters depends on the shot.
Sometimes the jitter accurately reflects the source movement.
Sometimes it represents tracking noise.
You may need to smooth or refine the tracking data depending on the intended result.
Be careful not to smooth away genuine movement.
Motion Tracking and Masks
Motion tracking can work together with masking.
Suppose you want to blur a logo on a moving shirt.
You could:
- track the shirt;
- use the tracking data to help position the effect or mask;
- refine the mask as needed.
This is often more efficient than manually repositioning everything frame by frame.
Motion Tracking and Track Mattes
Tracking can also drive matte elements.
Imagine an animated circle used as an Alpha Matte.
Track an object.
Attach the circle to the tracking data.
The matte now follows the object.
This allows another layer to be revealed dynamically around the moving subject.
Once you understand After Effects, techniques begin to combine.
Motion Tracking and Text Animation
You don’t have to attach static text.
Create a fully animated title.
Pre-compose it.
Then parent that pre-comp to the tracked Null.
Now the title can:
- animate in;
- follow the subject;
- animate out.
The tracking handles movement through the shot.
The pre-comp handles the title’s internal animation.
This separation keeps your project manageable.
Motion Tracking and Shape Layers
Shape layers are excellent for tracked callouts.
Create:
- circle;
- line;
- text label.
Parent them to the tracked Null.
You can create an interface-style annotation that follows a real-world object.
This technique is common in technology and product videos.
Motion Tracking and Visual Effects
Tracking isn’t only for text and graphics.
Tracking data can also help position visual effects.
For example:
- glow;
- lens flare;
- light;
- particle source;
- distortion.
Track the desired location.
Use the tracking data to drive the effect’s position or an appropriate control layer.
Now the effect follows the real-world movement.
Example: Add a Glow to a Moving Object
Suppose a person carries a small device.
You want the device to emit a glow.
Track a recognizable feature on the device.
Apply the data to a Null.
Use the Null to control the position of your glow setup.
As the device moves, the glow follows it.
Combine this with masks and blending for a more convincing result.
Track First, Design Second
This is a useful production principle.
If your graphic depends on tracking:
Track the footage first.
Make sure the tracking works.
Then build the final visual treatment.
Otherwise, you may create an elaborate graphic only to discover that the shot cannot be tracked reliably using your intended method.
Use Short Test Sections
When learning, don’t start with a five-minute clip.
Choose:
5–10 seconds.
A short shot lets you:
- track quickly;
- identify problems;
- experiment;
- restart easily.
Once you’re comfortable with the process, move to more difficult footage.
How to Shoot Better Footage for Tracking
If you control the filming, you can make tracking easier.
Try to provide:
- visible detail;
- good lighting;
- manageable motion blur;
- high contrast;
- sufficiently high resolution.
For screen replacement, temporary tracking markers can sometimes be placed on a blank screen to provide strong reference points.
Production decisions can save substantial time in post-production.
Do You Always Need Tracking Markers?
No.
Modern tracking software can often use natural features already present in the footage.
But tracking markers can be useful when the surface lacks detail.
For example, a completely uniform green phone screen may provide few natural features.
Small high-contrast markers can give the tracker something to follow.
They can later be removed or covered by the replacement content.
Motion Tracking and AI
AI-assisted video tools are increasingly changing visual-effects workflows.
Object recognition and segmentation can help identify and isolate subjects.
However, traditional tracking remains highly relevant.
Why?
Because many compositing tasks still require precise information about:
- movement;
- position;
- rotation;
- scale;
- perspective.
AI can help identify what the object is.
Tracking helps determine where it goes over time.
These capabilities increasingly complement each other.
Is Motion Tracking Automatic?
Partially.
After Effects can analyze motion automatically.
But good tracking still requires human judgment.
You need to choose:
- the right feature;
- the correct tracking method;
- the correct search area;
- when to stop;
- when to correct;
- whether the final track is good enough.
Automatic analysis is a tool.
It doesn’t remove the need to evaluate the result.
Common Motion Tracking Mistakes
Mistake 1: Choosing a Bad Feature
Low-contrast areas produce unreliable tracks.
Mistake 2: Tracking Reflections
Reflections can move differently from the actual object.
Mistake 3: Ignoring Drift
Small errors accumulate.
Mistake 4: Never Reviewing the Track
Always preview the final result.
Mistake 5: Applying Everything Directly to the Graphic
A Null Object often creates a cleaner workflow.
Mistake 6: Using Point Tracking for Every Problem
Planar or 3D tracking may be more appropriate.
Mistake 7: Tracking Too Much Footage
Only track the section you actually need.
Mistake 8: Expecting One-Click Perfection
Difficult shots often require corrections.
Five Motion Tracking Exercises
Exercise 1 — Track a Ball
Attach a small graphic to a moving ball.
Exercise 2 — Track a Person
Attach a name label beside someone walking through the frame.
Exercise 3 — Track a Car
Create a callout identifying part of the vehicle.
Exercise 4 — Track a Product
Add a feature label to a moving product shot.
Exercise 5 — Track a Screen
Experiment with a simple screen replacement.
These exercises gradually introduce more difficult tracking situations.
A Simple Beginner Project
Film your computer mouse moving across a desk.
Import the footage.
Track a high-contrast feature on the mouse.
Apply the track to a Null.
Create text:
WIRELESS MOUSE
Add a small line or shape pointing toward the mouse.
Parent the graphic elements to the Null.
Preview.
You’ve now combined:
- real footage;
- motion tracking;
- Null Objects;
- parenting;
- text;
- shape layers.
This is exactly how After Effects skills begin to connect into complete motion-graphics workflows.
When Should You Use Basic Motion Tracking?
Basic point tracking is a good choice when:
- you have a clear feature;
- movement is relatively predictable;
- perspective change is limited;
- you mainly need Position, Rotation, or Scale data.
When Should You Use Mocha AE?
Consider planar tracking when:
- tracking a screen;
- replacing a sign;
- following a flat surface;
- perspective changes significantly.
When Should You Use 3D Camera Tracker?
Consider 3D Camera Tracking when:
- the camera moves through a scene;
- graphics need to appear attached to environmental surfaces;
- you need a reconstructed virtual camera.
When Should You Use Mask Tracking?
Mask tracking is useful when:
- an effect region needs to follow an object;
- a mask needs to remain around a moving subject.
Choosing the right tool is often more important than trying to force one tracker to solve every shot.
Does After Effects Include Motion Tracking?
Yes.
After Effects provides several native or integrated tracking workflows for different types of problems.
This makes tracking an important part of its broader compositing and visual-effects toolset.
If you want to practice motion tracking yourself, you can explore Adobe’s current After Effects options here:
Get Adobe After Effects and start practicing motion tracking
Frequently Asked Questions
What is motion tracking in After Effects?
Motion tracking analyzes movement in video and generates data that can be used to make other layers or properties follow that movement.
Can After Effects track a moving object?
Yes. Several tracking approaches are available depending on the object and shot.
What is a tracking point?
A tracking point identifies visual information that After Effects analyzes across frames.
What makes a good tracking point?
High contrast, distinctive detail, and a relatively consistent appearance.
Why should I apply tracking data to a Null Object?
A Null creates a flexible control layer. Multiple graphics can then inherit the same tracked movement.
Can After Effects track Rotation?
Yes.
Can After Effects track Scale?
Yes, when using an appropriate multi-point tracking setup.
What is planar tracking?
Planar tracking follows a broader flat surface rather than only a single feature.
What is Mocha AE?
Mocha AE provides planar-tracking capabilities integrated into After Effects workflows.
What’s the difference between motion tracking and 3D camera tracking?
Basic motion tracking follows specific image features, while 3D Camera Tracking analyzes camera movement and reconstructs a virtual 3D camera solution.
Can motion tracking be used for screen replacement?
Yes, although planar tracking is often particularly useful when the screen changes perspective.
What Should You Learn Next?
Once you’re comfortable with basic motion tracking, the next logical skill is 3D Camera Tracking.
Basic tracking lets you follow an object.
3D Camera Tracking lets you analyze how the camera itself moves through the scene.
This allows you to place:
- text on walls;
- graphics on floors;
- virtual objects inside footage;
- titles inside real environments.
The next tutorial in this series will therefore be:
Adobe After Effects 3D Camera Tracker: Complete Beginner Guide.
Final Thoughts
Motion tracking is one of the skills that changes what you think is possible in After Effects.
Before learning tracking, you may look at a shot and think:
“I’d have to animate that graphic manually.”
After learning tracking, you begin asking:
“Can After Effects analyze the movement for me?”
Often, the answer is yes.
Start with a simple Position track.
Choose a clear high-contrast feature.
Watch the analysis carefully.
Apply the data to a Null Object.
Attach a text or shape layer.
Then gradually progress to:
Position + Rotation + Scale
followed by:
Planar Tracking
and eventually:
3D Camera Tracking.
Most importantly, learn to choose the right tracking method for the shot.
Motion tracking isn’t about pressing one button and hoping for the best.
It’s about identifying useful visual information, analyzing it accurately, and using that data to integrate graphics and effects convincingly into moving footage.
Once you can do that, After Effects becomes a much more powerful compositing environment.
Explore Adobe After Effects and start building tracked visual effects






