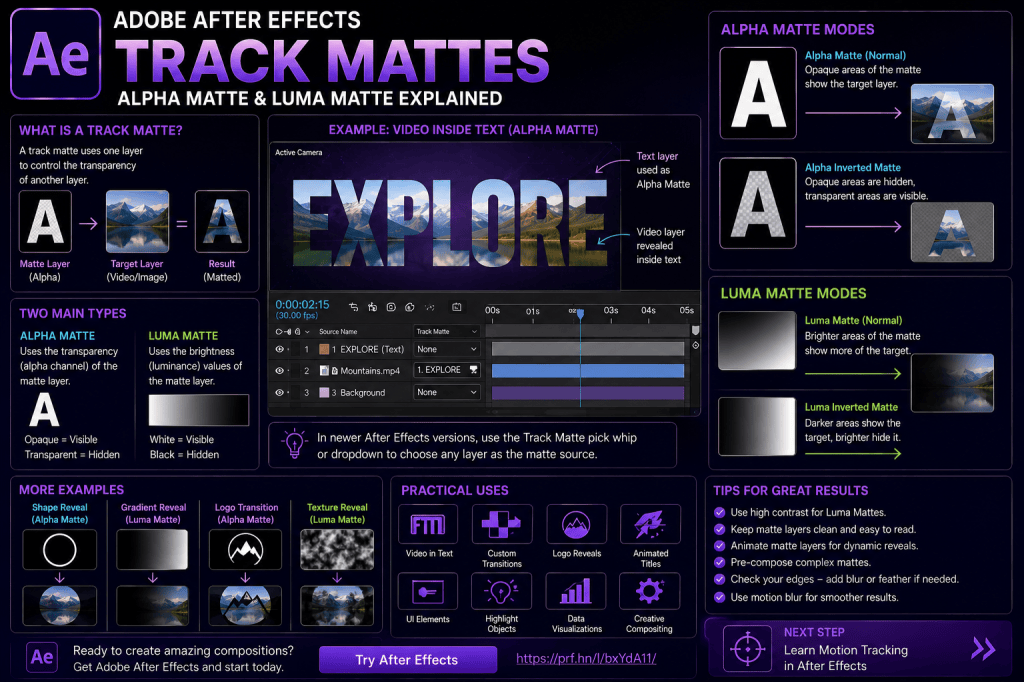
Track mattes are one of the most useful compositing tools in Adobe After Effects.
They let you use one layer to control which parts of another layer are visible.
That simple idea opens the door to a huge range of effects.
You can put video inside text, reveal photographs through animated shapes, create sophisticated title animations, build custom transitions, use gradients to fade footage, and combine layers in ways that would be much more difficult with ordinary masks alone.
If you’ve already learned how masks work, track mattes are the logical next step.
The important distinction is:
A mask is attached directly to a layer. A track matte uses information from another layer to control visibility.
In this guide, we’ll look at how track mattes work in Adobe After Effects, the difference between Alpha Matte and Luma Matte, how inverted mattes work, and several practical projects you can build yourself.
Affiliate disclosure: This article contains affiliate links. If you purchase Adobe After Effects through one of these links, we may earn a commission at no additional cost to you.
What Is a Track Matte in After Effects?
A track matte allows one layer to determine the transparency of another layer.
Imagine you have:
Layer A: A video of a city
Layer B: Large text saying LONDON
Normally, the video fills the screen and the text appears separately.
But what if you want the city video to appear only inside the letters of LONDON?
That’s a perfect job for a track matte.
The text becomes the matte.
The video uses that matte to determine where it should be visible.
The result is moving video contained inside the typography.
Why Are Track Mattes So Useful?
Track mattes separate two important things:
What the viewer sees
and
What controls where it appears.
That gives you tremendous flexibility.
A matte can be created from:
- text;
- shape layers;
- photographs;
- video;
- gradients;
- animated graphics;
- pre-compositions.
And the matte itself can be animated.
That means the visibility of another layer can change dynamically over time.
Track Matte vs Mask
Masks and track mattes are related, but they aren’t identical.
Mask
A mask exists directly on a layer.
You draw or animate a path that determines a region.
Track Matte
A track matte uses a separate layer as the source of transparency information.
A simple way to remember it is:
Mask = path controls layer
Track matte = layer controls layer
Both are extremely useful.
Neither completely replaces the other.
The Main Types of Track Mattes
The two concepts beginners need to understand first are:
Alpha Matte
and
Luma Matte
Both control transparency.
But they obtain that transparency information differently.
What Is an Alpha Matte?
An Alpha Matte uses the alpha channel, or transparency, of the matte layer.
In simple terms:
Opaque areas reveal the target layer.
Transparent areas hide it.
Imagine a white circle on an otherwise transparent layer.
Use that layer as an Alpha Matte for a photograph.
The photograph becomes visible inside the circle.
The transparent area around the circle hides the photograph.
The actual color of the circle is usually not what matters here.
Its transparency is what matters.
What Is an Alpha Inverted Matte?
An inverted alpha matte reverses the result.
Instead of showing the target layer where the matte is opaque, it hides that region.
So:
Opaque matte area → hidden
Transparent matte area → visible
This is useful when you want to create:
- holes;
- cutouts;
- inverse reveals;
- negative-space effects.
What Is a Luma Matte?
A Luma Matte works differently.
Instead of primarily using transparency, it uses the brightness values of the matte layer.
In simplified terms:
Brighter areas reveal more.
Darker areas reveal less.
This means a black-to-white gradient can create a gradual transparency transition.
That is one of the major reasons Luma Mattes are useful.
What Is a Luma Inverted Matte?
A Luma Inverted Matte reverses the brightness relationship.
Instead of bright areas revealing the target, darker areas become the revealing part of the relationship.
This can be useful when the source graphic has the opposite luminance structure from what you need.
Alpha Matte vs Luma Matte
Here’s the easiest way to remember the difference.
Alpha Matte
Uses transparency.
Luma Matte
Uses brightness.
If you have a text layer with transparent space around the letters, Alpha Matte is often the obvious choice.
If you have a grayscale gradient, texture, or image whose light and dark areas should determine visibility, Luma Matte may be more appropriate.
Your First Alpha Matte
Let’s create a simple example.
We’ll put a video inside text.
Step 1: Create a Composition
Create a new After Effects composition.
Import a video clip.
Drag it into the Timeline.
Step 2: Create Large Text
Choose the Text Tool.
Type something large, such as:
MOTION
Use a bold font so there’s plenty of area inside the letters for the footage to show through.
Step 3: Position the Layers
You now have:
- a video layer;
- a text layer.
The text will become the matte source.
Step 4: Set the Track Matte
Use the Track Matte controls in the Timeline to tell the video layer to use the text layer’s alpha information.
Depending on your After Effects version and workspace configuration, the exact controls may be presented differently than in older tutorials.
Modern versions of After Effects provide more flexible matte-layer selection than the older workflow that required the matte to sit immediately above the target layer.
Step 5: Preview
The video should now appear inside the letters.
The surrounding video disappears.
You have created an Alpha Matte.
Why Does the Text Disappear?
A common beginner question is:
Where did my text go?
The text is now functioning as a matte source.
Its purpose in this setup is to control the visibility of the video.
The visible result is the video appearing through the shape of the text.
If you also need a separately visible copy of the text, you can build the composition accordingly—for example, by duplicating or otherwise structuring the design to achieve the desired result.
Animate the Text Matte
Now animate the text.
Try changing its:
- Position;
- Scale;
- Rotation.
Because the text is controlling the matte, the visible video region changes as the text moves.
This is an important concept:
Track mattes can themselves be animated.
That makes them much more powerful than static cutouts.
Create a Video-in-Text Title
Here’s a practical title treatment.
Create large text:
ADVENTURE
Place landscape footage behind or within the matte setup.
Use the text as an Alpha Matte.
Then animate:
Scale: 90% → 100%
and perhaps:
Tracking: wide → normal
The moving landscape remains visible through the letters while the typography subtly animates.
This can create an effective opening title without any third-party plug-ins.
Use a Shape as an Alpha Matte
Text isn’t the only option.
Create a circle using a shape layer.
Use that shape as the Alpha Matte for a photograph.
The photograph appears inside the circle.
Now animate the circle’s Scale:
0% → 100%
The image is revealed through an expanding circle.
This is an easy way to create a polished graphic reveal.
Create a Rectangle Reveal
Create a rectangle shape.
Use it as an Alpha Matte for an image or title.
Animate the rectangle from narrow to wide.
The content is progressively revealed.
This technique is extremely common in:
- title animation;
- lower thirds;
- social-media graphics;
- corporate videos;
- presentations.
Animate the Matte, Not the Content
One useful workflow principle is to consider whether you should animate the visible layer or the matte.
Suppose you have a photograph inside a rectangular matte.
You can:
Option A: Move the photograph.
or
Option B: Move the matte.
These produce different results.
Animating the content changes what portion of the image appears within a stationary window.
Animating the matte moves the visible window itself.
Understanding this distinction gives you much more control.
Your First Luma Matte
Now let’s create a different effect.
Instead of using transparency, we’ll use brightness.
Create or import a grayscale gradient.
For example:
Black → Gray → White
Use it as a Luma Matte for an image.
The image’s visibility now depends on the brightness of the gradient.
Bright regions reveal more of the image.
Dark regions reveal less.
The gray regions produce intermediate transparency.
This creates a smooth fade.
Why Use Luma Instead of Alpha?
Imagine the gradient exists on a completely opaque layer.
There is no transparency.
An Alpha Matte would see the entire layer as opaque.
That isn’t useful for a gradient-based reveal.
But the Luma Matte sees:
- dark values;
- midtones;
- bright values.
Those brightness differences can become transparency information.
That’s the key advantage.
Create a Gradient Reveal
Create a black-to-white gradient.
Use it as a Luma Matte.
Animate the gradient across the frame.
The target footage gradually appears as the bright portion passes across it.
This creates a soft organic reveal.
You can experiment with:
- gradient angle;
- softness;
- speed;
- multiple gradient points.
Use Textures as Luma Mattes
Luma Mattes become particularly interesting when you use textured images.
For example:
- clouds;
- ink;
- smoke;
- grunge;
- watercolor;
- noise.
If the texture contains strong variations between light and dark areas, those variations can control transparency.
This can produce much more organic reveals than simple geometric masks.
Create an Ink Reveal
Imagine black ink spreading across a white background.
Use that footage as a Luma Matte for a photograph.
As the luminance pattern changes, the photograph is revealed.
This technique can create:
- artistic title sequences;
- photo reveals;
- transitions;
- music-video effects.
The matte itself doesn’t need to be beautiful as a visible image.
It only needs useful luminance information.
Create a Smoke Reveal
Smoke footage can also work as a matte source if it provides appropriate luminance contrast.
Use the smoke’s light and dark values to reveal another layer.
The target image seems to appear through the smoke.
This is a good example of using real-world footage as a procedural-looking transparency source.
Create a Textured Title
Track mattes also work in the opposite creative direction.
Instead of putting video inside text, you can use texture to control how text appears.
For example:
- Create a title.
- Create or import an animated high-contrast texture.
- Use that texture as a matte.
- Animate or modify the texture.
The title can appear irregularly rather than through a clean geometric wipe.
Track Mattes and Shape Layers
Shape layers are ideal matte sources because they can be animated procedurally.
You can use:
- circles;
- rectangles;
- stars;
- custom paths;
- repeated shapes;
- Trim Paths-based graphics.
For example, create several expanding circles and use the resulting shape animation to reveal a photograph.
Now your matte is a complete motion-graphics system.
Repeater + Track Matte
Here’s a more advanced idea.
Create one circle.
Add a Repeater.
Generate multiple circles.
Animate the Repeater’s properties.
Use the entire shape layer as a matte.
Now dozens of animated shapes reveal another layer.
Because the pattern is procedural, you can modify it without manually animating every circle.
Text Animators + Track Mattes
Text Animators can also create interesting matte effects.
Suppose you use a text layer as an Alpha Matte.
Then animate the text character by character.
As each character becomes part of the visible matte, the footage appears inside it.
This combines two powerful After Effects systems:
Text Animators
and
Track Mattes.
Track Mattes and Pre-Compositions
Sometimes your desired matte consists of multiple layers.
For example:
- several shapes;
- animated text;
- effects;
- textures.
Instead of trying to use them individually, you can often combine the matte design inside a pre-composition.
Then use that pre-comp as the matte source.
This keeps the main composition cleaner and lets you build sophisticated mattes from many elements.
Why Pre-Comps Are Useful for Mattes
Imagine your matte contains:
- 10 circles;
- 3 lines;
- 2 text layers.
That’s 15 separate elements.
Pre-compose them.
Your main Timeline now sees one matte layer.
Inside the pre-comp, you can continue editing all 15 components.
This separation makes complex motion graphics much easier to manage.
Track Mattes and Effects
Effects applied to the matte source can change the resulting transparency.
This can create interesting possibilities.
For example, modifying:
- blur;
- levels;
- contrast;
- noise;
on an appropriate matte source can alter the edge and structure of the reveal.
This is particularly useful with Luma Mattes.
Blur a Luma Matte
Suppose you have a high-contrast black-and-white matte.
The resulting edge is too hard.
Blur the matte.
The transition between bright and dark becomes softer.
Because those values control transparency, the resulting target-layer edge becomes softer as well.
This can produce a more natural blend.
Increase Matte Contrast
Sometimes the opposite is needed.
A Luma Matte may contain too many middle-gray values, creating unwanted semi-transparent areas.
Increase the contrast of the matte.
Dark areas become darker.
Bright areas become brighter.
The transparency becomes more defined.
This illustrates an important principle:
You can design the matte specifically for the transparency result you want.
Matte Layers Don’t Have to Look Good
This is worth emphasizing.
A matte layer isn’t necessarily intended for the viewer.
Its job is to create useful transparency information.
A strange black-and-white texture may look terrible by itself.
But as a Luma Matte, it may create exactly the organic reveal you need.
Think about the matte as data, not necessarily as finished artwork.
Track Mattes for Transitions
Track mattes are excellent for transitions.
Place:
Shot A
and
Shot B
in the composition.
Create an animated matte.
Use it to progressively reveal Shot B.
The matte could be:
- expanding shapes;
- moving lines;
- animated typography;
- texture;
- gradient;
- logo.
This lets you build transitions that match a project’s visual identity.
Logo-Based Transition
Suppose you’re creating branded videos.
Use the company’s logo as a matte.
Animate the logo’s Scale until it fills the frame.
Use it to reveal the next shot.
Now the transition itself reinforces the brand.
This can be much more distinctive than using a generic wipe.
Multiple Matte Ideas
Once you understand the concept, experiment.
Try using:
Text as a matte
Video appears inside typography.
Circle as a matte
Image appears inside an animated circle.
Logo as a matte
Footage appears through the logo.
Gradient as a Luma Matte
Image gradually fades into view.
Cloud footage as a Luma Matte
Image appears organically.
Animated shape pattern
Multiple shapes reveal a new scene.
The principle remains the same.
The creative possibilities change with the matte source.
Track Matte Controls in Modern After Effects
If you’re following an older After Effects tutorial, the track matte interface may look different from what you see in a current version.
Historically, workflows often required the matte layer to be placed directly above the target layer.
Newer After Effects versions introduced more flexible track matte controls, allowing you to select matte sources more independently.
This makes complex compositions easier to organize.
The core concepts—Alpha and Luma—remain important even as the interface evolves.
Why Old Tutorials Can Be Confusing
After Effects has been used professionally for decades.
There are thousands of excellent tutorials online.
But screenshots from older versions can show:
- different Timeline layouts;
- older track matte controls;
- different menu locations;
- older terminology or workflow assumptions.
Don’t assume you’re doing something wrong because your interface doesn’t exactly match a ten-year-old tutorial.
Focus on understanding the underlying concept.
Interfaces change.
The compositing principles remain much more stable.
Track Mattes and Masks Together
You don’t have to choose between masks and track mattes.
They can work together.
For example:
- Use a track matte to create the main reveal.
- Add a mask to refine the visible area.
- Feather the mask.
- Animate both independently.
Combining tools gives you greater control.
Professional compositing frequently involves several techniques working together.
Track Mattes and Rotoscoping
An isolated subject can also become part of a matte workflow.
Imagine you’ve isolated a person from the background.
That person’s silhouette can control the visibility of another layer.
For example, text could appear behind the person but in front of the background.
This is a common visual effect.
It creates the impression that typography exists inside the filmed environment.
Put Text Behind a Person
Here’s a classic compositing technique.
You have footage of a person walking.
You want large text behind them.
Conceptually, you need:
Foreground subject
Text
Background
Once the person is isolated, you can layer the elements so the typography passes behind the subject.
Masks, rotoscoping, AI-assisted object isolation, and mattes can all contribute to this type of effect.
Track Mattes and AI Object Isolation
Newer After Effects versions include increasingly capable AI-assisted object-isolation tools.
These can help create mattes for subjects that would previously have required more manual rotoscoping.
The AI-assisted result can then become part of a broader compositing workflow.
This is an important development.
AI isn’t replacing compositing concepts such as mattes.
It’s making it faster to generate some of the matte information those workflows require.
Understanding Alpha and Luma remains valuable.
Common Track Matte Mistakes
Mistake 1: Confusing Alpha and Luma
Remember:
Alpha = transparency
Luma = brightness
Mistake 2: Wrong Matte Source
Make sure the target layer is using the intended matte layer.
Mistake 3: Expecting Color to Matter in an Alpha Matte
For an Alpha Matte, transparency is the important information.
Mistake 4: Expecting Transparency to Define a Luma Matte
Luma is based on brightness values.
Mistake 5: Forgetting About Inversion
If you’re getting exactly the opposite result from what you want, check whether an inverted matte is appropriate.
Mistake 6: Poor Luma Contrast
A muddy gray matte can create unwanted semi-transparent results.
Mistake 7: Matte Doesn’t Cover the Required Area
Check the matte’s position, scale, and animation.
Mistake 8: Following an Old Interface Tutorial Too Literally
Track matte controls have evolved. Learn the concept rather than memorizing one historical layout.
Five Track Matte Exercises
Exercise 1 — Video Inside Text
Use text as an Alpha Matte for footage.
Exercise 2 — Circle Reveal
Use an expanding shape as an Alpha Matte.
Exercise 3 — Gradient Reveal
Use a gradient as a Luma Matte.
Exercise 4 — Texture Transition
Use an animated high-contrast texture to reveal another shot.
Exercise 5 — Logo Reveal
Use a logo as the matte for video or imagery.
Complete these five exercises and the Alpha/Luma distinction will become much more intuitive.
A Simple Practice Project
Let’s build a short travel title.
Create large text:
AMSTERDAM
Import city footage.
Use the text as an Alpha Matte.
Animate the text Scale from:
90% → 100%
Then add a subtle background.
Finally, animate the entire title composition out.
You now have a clean video-filled title.
The technique is simple, but it demonstrates how track mattes can turn ordinary typography into a more visually engaging graphic.
When Should You Use a Mask Instead?
Use a mask when the visibility region logically belongs directly to the layer.
For example:
- isolating a simple region;
- restricting an effect;
- manually tracing an object;
- creating a quick crop;
- tracking a region.
Use a track matte when another layer naturally defines the transparency.
For example:
- video inside text;
- image inside a logo;
- shape-driven reveal;
- gradient transparency;
- textured transition.
These aren’t rigid rules.
They’re useful starting points.
When Should You Use an Alpha Matte?
Alpha Matte is a strong choice when your matte already contains meaningful transparency.
Common examples include:
- text;
- logos;
- shapes;
- transparent PNG artwork;
- animated shape layers.
The visible/transparent structure already describes exactly where the target should appear.
When Should You Use a Luma Matte?
Luma Matte is particularly useful when brightness contains the useful information.
Examples include:
- gradients;
- clouds;
- smoke;
- ink;
- noise;
- grayscale textures;
- animated luminance patterns.
Think:
Could the light and dark areas of this image create an interesting transparency map?
If yes, experiment with a Luma Matte.
Do You Need Plug-Ins for Track Mattes?
No.
Track mattes are a native After Effects compositing feature.
You can create sophisticated results using:
- text;
- shapes;
- masks;
- effects;
- pre-compositions;
- Alpha Mattes;
- Luma Mattes.
Third-party tools can extend your options, but they aren’t necessary for learning or using the fundamental technique.
Practice Track Mattes in Adobe After Effects
The easiest way to understand mattes is to see them working.
Create a bold text layer.
Place a colorful video beneath it.
Use the text as an Alpha Matte.
Then switch to an inverted result.
After that, create a grayscale gradient and experiment with a Luma Matte.
Within ten minutes, the difference between Alpha and Luma should become much clearer.
If you’d like to practice these techniques yourself, you can check Adobe’s current After Effects options here:
Get Adobe After Effects and start practicing compositing
Frequently Asked Questions
What is a track matte in After Effects?
A track matte uses information from one layer to control the transparency of another layer.
What is an Alpha Matte?
An Alpha Matte uses the transparency information of the matte source.
What is a Luma Matte?
A Luma Matte uses brightness information from the matte source.
What is Alpha Inverted?
It reverses the normal Alpha Matte relationship so the target is hidden where the matte would normally reveal it.
What is Luma Inverted?
It reverses the normal luminance-based visibility relationship.
What’s the difference between a mask and a track matte?
A mask is applied directly to a layer, while a track matte uses a separate layer to control visibility.
Can text be used as a track matte?
Yes. This is commonly used to place images or video inside text.
Can a shape layer be a matte?
Yes. Animated shape layers are particularly useful matte sources.
Can a video be used as a Luma Matte?
Yes, provided its brightness information produces a useful transparency result.
Can a matte be animated?
Yes. Matte sources can be animated, allowing the target layer’s visibility to change dynamically.
Do matte layers have to sit directly above the target?
Current After Effects versions provide more flexible track matte source selection than older versions. If you’re following an old tutorial, the workflow shown may differ from the current interface.
What Should You Learn Next?
Now that you understand masks and track mattes, the next logical skill is motion tracking.
So far, we’ve mostly controlled graphics ourselves.
Motion tracking changes that relationship.
After Effects analyzes movement inside video and allows you to attach other elements to that movement.
For example, you can make:
- text follow a moving car;
- a graphic stick to a wall;
- an icon follow someone’s hand;
- a replacement screen remain attached to a phone;
- visual effects follow objects through a shot.
The next article in this series will therefore be:
How to Use Motion Tracking in Adobe After Effects: Complete Beginner Guide.
Final Thoughts
Track mattes initially sound more complicated than they really are.
The core concept is simply:
One layer controls the visibility of another.
Then remember the two major approaches:
Alpha Matte = transparency controls visibility.
Luma Matte = brightness controls visibility.
From those two concepts, you can create an enormous range of effects.
Put video inside text.
Reveal images through shapes.
Use gradients for soft transitions.
Use textures for organic reveals.
Use logos for branded transitions.
Combine mattes with masks, effects, pre-compositions, and animation.
Once you start thinking of layers not only as things viewers see, but also as information that can control other layers, After Effects compositing becomes much more powerful.
That shift in thinking is what makes track mattes such an important skill to learn.
Explore Adobe After Effects and start creating your own compositing effects






