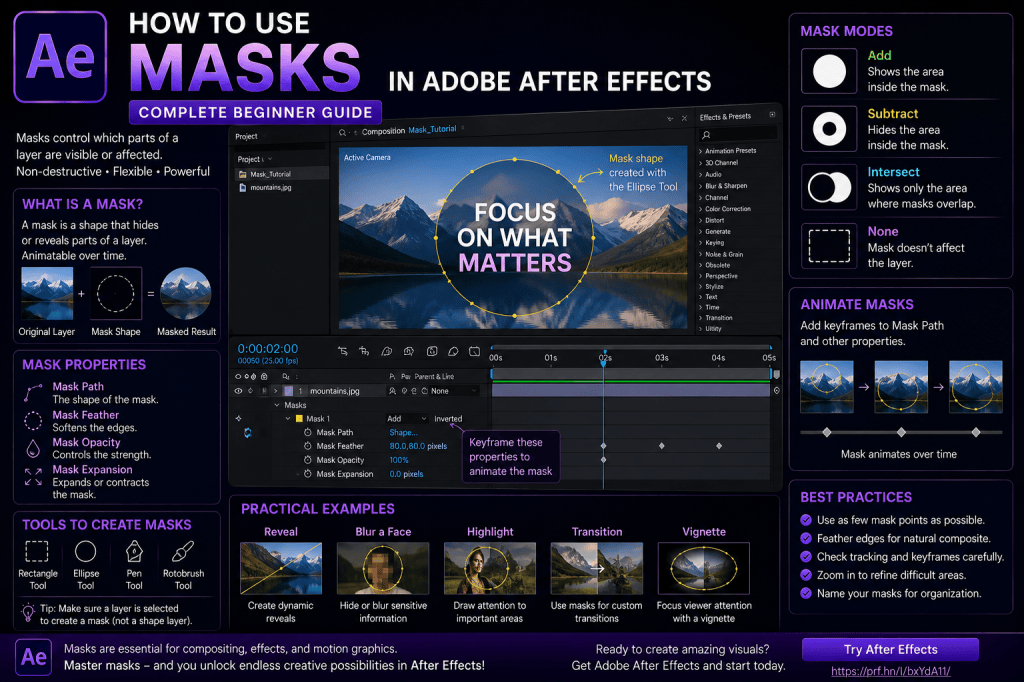
Masks are one of the fundamental tools you need to understand in Adobe After Effects.
They can hide part of a layer, reveal an object, isolate an area of footage, restrict an effect to a particular region, create transitions, produce animated reveals, and help with many compositing tasks.
At first, masks can seem confusing—especially because After Effects uses some of the same drawing tools for both masks and shape layers.
But the underlying concept is straightforward:
A mask defines which part of a layer should be visible or affected.
Once you understand that principle, masks become an incredibly useful part of your After Effects workflow.
In this guide, we’ll explore how masks work, how to create and edit them, the different mask modes, feathering, expansion, opacity, mask-path animation, tracking, effects, and practical techniques you can use in real projects.
Affiliate disclosure: This article contains affiliate links. If you purchase Adobe After Effects through one of these links, we may earn a commission at no additional cost to you.
What Is a Mask in Adobe After Effects?
A mask is a path applied to a layer that controls which parts of that layer are visible or affected.
Imagine you have a photograph covering your entire composition.
You draw a circle in the middle of the photograph.
With the appropriate mask settings, only the part of the photograph inside that circle remains visible.
Everything outside it disappears.
You haven’t deleted the rest of the photograph.
The mask is simply controlling its visibility.
This makes masking a non-destructive technique in many common workflows.
What Can You Do with Masks?
Masks are used for many different tasks in After Effects.
For example, you can use them to:
- reveal part of a video;
- hide unwanted areas;
- isolate an object;
- create custom transitions;
- animate text reveals;
- restrict effects to specific regions;
- blur a face;
- highlight an object;
- create vignettes;
- combine multiple shots;
- perform manual rotoscoping;
- create animated graphic elements.
Masking is therefore useful for both motion graphics and visual effects.
Masks vs Shape Layers
One of the first things beginners need to understand is the difference between masks and shape layers.
Both can be created with tools such as:
- Rectangle Tool;
- Ellipse Tool;
- Pen Tool.
But they serve different purposes.
A shape layer creates visible vector artwork.
A mask modifies an existing layer.
The difference often depends on what is selected when you begin drawing.
If no layer is selected, drawing with a shape tool will commonly create a new shape layer.
If an appropriate existing layer is selected, drawing can create a mask on that layer.
Always check what you have selected before drawing.
This simple habit prevents a lot of confusion.
Before You Start
If you’re completely new to After Effects, it helps to understand:
- layers;
- keyframes;
- Position;
- Scale;
- Opacity;
- basic Timeline navigation.
Our earlier tutorials cover these concepts.
You may also want to read:
Adobe After Effects Shape Layers: Complete Beginner Guide
because it explains the important distinction between shape content and masks.
If you want to practice the techniques in this tutorial, you can check Adobe’s current After Effects options here:
Explore Adobe After Effects and current plans
Create Your First Mask
Let’s create a simple mask.
Step 1: Import an Image or Video
Import an image or video clip into After Effects.
Drag it into a composition.
The footage now appears as a layer in your Timeline.
Step 2: Select the Layer
This step matters.
Click the footage layer so it is selected.
Step 3: Choose the Ellipse Tool
Select the Ellipse Tool from the toolbar.
Step 4: Draw Over the Layer
Draw an ellipse over the part of the image you want to keep visible.
After Effects creates a mask.
Depending on the current settings, the area outside the mask should become hidden.
You’ve created your first mask.
Finding the Mask Properties
Expand the layer in the Timeline.
You should see:
Masks
Expand that section.
You’ll see something like:
Mask 1
Expand it.
Important properties include:
- Mask Path;
- Mask Feather;
- Mask Opacity;
- Mask Expansion.
These four controls form the basis of a large amount of masking work.
What Is Mask Path?
Mask Path defines the actual shape of the mask.
If you created a circle, the Mask Path contains that circle.
Change the path and you change the visible region.
Most importantly:
Mask Path can be animated.
This means a mask can change its:
- position;
- size;
- shape;
over time.
That’s what makes masks useful for moving subjects and animated reveals.
What Is Mask Feather?
Mask Feather softens the edge of a mask.
With no feather, the boundary can be extremely sharp.
Increase the feather and the edge gradually transitions between visible and invisible.
This is particularly useful when blending footage.
For example, if you’re isolating part of a person’s face, a perfectly sharp mask edge may look artificial.
A small amount of feathering can help the composite look more natural.
What Is Mask Expansion?
Mask Expansion moves the mask boundary inward or outward.
Positive values generally expand the masked region.
Negative values contract it.
This is useful when the mask shape is basically correct but its boundary needs to be slightly larger or smaller.
Instead of manually editing every mask point, you can adjust Expansion.
What Is Mask Opacity?
Mask Opacity controls the strength of the mask.
At full opacity, the mask has its complete effect.
Reduce the value and the masked region becomes partially transparent depending on the mask mode and setup.
Mask Opacity can also be animated.
This can be useful for transitions and gradual reveals.
Understanding Mask Modes
After Effects masks can operate in different modes.
Important modes include:
- Add;
- Subtract;
- Intersect;
- None.
There are additional combinations and behaviors, but these are good ones to understand first.
Add Mask Mode
Add is one of the most common modes.
The area inside the mask is generally included in the visible result.
Imagine a photograph.
Draw a circular Add mask.
The area inside the circle remains visible while the surrounding area is hidden.
Subtract Mask Mode
Subtract does essentially the opposite.
The region inside the mask is removed from visibility.
This is useful when you want to cut a hole in a layer.
For example, you might use a Subtract mask to remove a circular section from an otherwise visible image.
Intersect Mask Mode
Intersect becomes useful when multiple masks overlap.
The resulting visibility is based on the intersection of mask regions.
This allows you to build more sophisticated masking arrangements.
None
The None mode lets the mask path exist without directly changing the layer’s visibility.
This can be useful when a mask path is needed for another purpose, such as driving an effect or workflow.
Multiple Masks on One Layer
A layer can contain more than one mask.
For example:
Mask 1 — Add
keeps one area visible.
Mask 2 — Subtract
removes another area.
This lets you build complex visible regions from multiple simple paths.
You don’t always need one extremely complicated mask.
Sometimes several simpler masks are easier to manage.
Create a Rectangle Mask
Select your footage layer.
Choose the Rectangle Tool.
Draw a rectangle.
This can be useful for:
- screen replacements;
- graphic reveals;
- split-screen effects;
- cropping-style animations.
Rectangle masks are particularly useful for clean motion-graphics transitions.
Create a Custom Mask with the Pen Tool
Not everything is circular or rectangular.
For custom shapes, use the Pen Tool.
Select the layer.
Choose the Pen Tool.
Click around the object or region you want to isolate.
Complete the path.
You now have a custom mask.
The points you created are called vertices.
These vertices can be repositioned to refine the mask.
Bezier Mask Curves
Masks don’t need to consist only of straight lines.
You can create curved segments using Bezier handles.
This is essential when masking organic objects such as:
- faces;
- shoulders;
- cars;
- products;
- furniture.
A smaller number of well-positioned curved points is often better than dozens of poorly positioned points.
Don’t Use Too Many Mask Points
This is a very common beginner mistake.
Suppose you’re masking a person’s head.
A beginner may create 100 points around the outline.
That seems precise.
But it creates a nightmare when the mask needs to be animated.
Every point may require adjustment.
Instead, use as few points as practical while still accurately describing the shape.
Clean masks are easier to animate and maintain.
Animate a Mask Path
This is where masking becomes much more powerful.
Suppose a person moves across the frame.
You want the mask to follow them.
At the beginning:
- Create the mask.
- Enable the Mask Path stopwatch.
Move forward in time.
Adjust the mask around the person’s new position.
After Effects creates another Mask Path keyframe.
Continue through the shot.
The mask changes between keyframes.
This is a basic form of manual rotoscoping.
Mask Path Keyframes
Mask Path keyframes store the shape of the mask at particular times.
That means the vertices can move between keyframes.
For example:
At frame 1, the person’s arm is down.
At frame 10, the arm is raised.
You adjust the mask around the arm at both points.
After Effects interpolates the mask shape between them.
You then inspect the intermediate frames and correct the mask where necessary.
Don’t Mask Every Frame Immediately
Manual rotoscoping can become extremely time-consuming.
A better approach is often:
- Mask the first important pose.
- Move several frames forward.
- Adjust the mask.
- Check the frames between.
- Add additional keyframes only where necessary.
This reduces unnecessary work.
The correct spacing depends on how much the subject changes.
Mask Tracking
If the object moves predictably, you may not need to animate every mask manually.
After Effects includes mask-tracking capabilities that can analyze motion and help the mask follow the subject.
This can dramatically accelerate certain tasks.
A common workflow is:
- Create a mask around the object.
- Open the tracking controls.
- Track the mask forward or backward.
- Review the result.
- Correct problem areas manually.
Tracking isn’t magic.
Always inspect the result.
Faster Mask Tracking in Modern After Effects
Adobe has continued improving tracking performance in recent After Effects releases.
That can make mask-based workflows faster, especially when tracking longer shots.
However, the fundamental principle remains the same:
Automation gives you a starting point. You remain responsible for checking the result.
Complex motion, motion blur, occlusion, low contrast, and changing object shapes can still require manual corrections.
Use Masks to Blur a Face
This is a classic practical use.
Suppose you need to obscure someone’s face.
Step 1
Apply a blur effect to the footage.
Step 2
Create a mask around the face.
Step 3
Configure the effect or masking arrangement so the blur applies only within the desired region.
Step 4
Add Mask Feather.
This softens the boundary.
Step 5
Track or animate the mask so it follows the face.
Now the person’s face remains blurred as they move.
This same technique can be used for:
- license plates;
- screens;
- logos;
- private information.
Use Masks to Highlight an Object
You can also use masks to draw attention rather than hide something.
For example:
- Duplicate the footage layer.
- Darken or blur the lower layer.
- Create a mask around the important subject on the upper layer.
- Feather the mask.
The subject remains clear while the surroundings become less prominent.
This is useful in:
- tutorials;
- product demonstrations;
- educational videos;
- presentations.
Create a Vignette
Masks can create a simple vignette.
Create an adjustment layer or appropriate effect layer.
Apply a darkening effect.
Create a large ellipse mask.
Invert or configure the mask appropriately so the edges receive the effect rather than the center.
Increase Mask Feather significantly.
The edges gradually darken.
This helps draw attention toward the center of the frame.
Use Masks with Effects
Masks don’t only need to control layer visibility.
They can also be used in workflows where an effect applies to a specific region.
This is extremely useful.
Imagine you want to:
- brighten someone’s face;
- blur the background;
- change the color of an object;
- sharpen one region.
Instead of affecting the entire frame, a mask can define the area where the adjustment occurs.
Adjustment Layers and Masks
Adjustment layers are particularly useful with masks.
An adjustment layer can apply effects to layers beneath it.
Add a mask to the adjustment layer and you can restrict those effects to a particular region.
For example:
Adjustment Layer
→ Gaussian-style blur
→ Ellipse mask
Now only the masked area receives the blur.
Animate the mask and the effect region can move.
Create a Simple Mask Reveal
Let’s create a motion-graphics effect.
Create a text layer.
Create a rectangular mask around it.
Adjust the setup so the text is initially outside the visible masked region.
Animate the text upward into the mask.
The letters appear as they cross into the visible region.
This creates a clean title reveal.
The technique is widely used in modern motion graphics.
Animate the Mask Instead
You can also keep the text stationary and animate the mask.
Start with a small mask.
Animate it so it expands across the title.
The text is progressively revealed.
This works well for:
- titles;
- logos;
- photographs;
- product images.
Create a Wipe Transition
Masks can create custom transitions between shots.
Place two video layers on top of each other.
Add a mask to the upper layer.
Animate the mask across the frame.
As the mask moves, the lower video is revealed.
Add feathering for a softer transition.
With custom mask shapes, you can create much more interesting wipes than basic rectangular transitions.
Diagonal Wipe
Create a large rectangular or custom polygon mask at an angle.
Animate it across the screen.
The next shot appears diagonally.
Add feathering if you want a softer edge.
This simple technique can look very effective in branded content.
Circular Reveal
Create an ellipse mask.
Start with the mask very small.
Animate it until it covers the entire composition.
The underlying or masked content appears through an expanding circle.
This is a classic iris-style transition.
Mask Expansion Animation
Instead of manually scaling a mask path, sometimes you can animate Mask Expansion.
For example:
Beginning: strongly negative value
End: positive value
Depending on the shape and setup, the visible region expands outward.
This can be an efficient way to create certain reveals.
Mask Feather Animation
Mask Feather can also be animated.
You might begin with a very soft edge and gradually make it sharper.
Or do the reverse.
This can create interesting dream-like transitions and reveal effects.
Mask Opacity Animation
Mask Opacity can be keyframed.
For example:
Beginning: 0%
End: 100%
The mask gradually gains influence.
This can be combined with other mask properties for more sophisticated transitions.
Masks and Motion Blur
If a masked element moves quickly, motion blur can affect the visual result.
Always inspect mask edges carefully.
Fast movement, motion blur, and feathering can interact in ways that expose unwanted edges.
There is no universal setting.
Judge the composite visually.
Masks and Green Screen
Masks are often used alongside chroma keying.
Suppose you’ve filmed someone against a green screen.
The green screen doesn’t fill the entire frame.
You may see:
- studio equipment;
- walls;
- lights;
- floor areas.
Before or alongside keying, you can create a rough mask around the usable green-screen region.
This is often called a garbage matte.
It removes areas that the keying effect doesn’t need to process.
Garbage Mattes
A garbage matte doesn’t need to trace the subject perfectly.
Its purpose is generally to remove obviously unwanted areas.
For example, if a person stands in the middle of a green screen, you might create a loose mask around them that excludes lighting stands visible at the sides.
The keyer then handles the more precise subject isolation.
Masks and Rotoscoping
Manual masking is one approach to rotoscoping.
You create masks around a moving subject and animate them over time.
For simple objects and short shots, this can work well.
For complex subjects such as people with moving hair, clothing, and limbs, other After Effects tools may be more efficient.
Modern After Effects includes increasingly sophisticated object-isolation workflows, including AI-assisted tools.
We’ll cover these in a dedicated article later in the series.
Masks vs Roto Brush
Masks and Roto Brush solve related but different problems.
Masks
give you direct control over vector paths.
Roto Brush
helps isolate subjects using a more assisted selection workflow.
Masks are excellent for:
- geometric objects;
- controlled boundaries;
- simple tracking;
- effect regions.
Roto Brush can be more practical for complex organic subjects.
Professional workflows may use both.
Masks vs Object Matte
Newer AI-assisted object-matte workflows aim to reduce the manual work involved in isolating subjects.
Instead of manually drawing and animating a detailed mask, the software can assist with identifying the object.
That doesn’t make masks obsolete.
Masks remain useful for:
- cleanup;
- corrections;
- effects;
- graphic reveals;
- simple isolation;
- custom transitions.
Understanding masks also makes advanced compositing tools easier to understand.
Masks vs Track Mattes
These concepts are frequently confused.
A mask belongs directly to a layer.
A track matte uses another layer to determine visibility.
For example, text could act as a matte revealing video through the letterforms.
Track mattes are extremely powerful for motion graphics and compositing.
They deserve their own tutorial and will be the next major topic in this series.
Mask Inversion
Sometimes you want the opposite of your current mask result.
Instead of showing the inside, you want to show the outside.
After Effects provides inversion and mask-mode options that can help achieve this depending on the setup.
This is particularly useful for:
- spotlights;
- vignettes;
- cutouts;
- effect regions.
Feather Carefully
Feathering is useful, but beginners often use too much.
A mask with enormous feathering may create a visible blurry halo.
The correct amount depends on:
- image resolution;
- subject;
- motion;
- depth of field;
- lighting;
- intended effect.
Use enough feathering to integrate the edge naturally, but not so much that the composite becomes visibly soft.
Zoom In When Refining Masks
Mask edges can look acceptable when the composition is displayed small.
Zoom in.
Inspect difficult regions.
Pay attention to:
- hair;
- shoulders;
- hands;
- object edges;
- motion blur.
Then zoom back out and judge the entire image.
Both views matter.
Don’t Chase Pixel-Perfect Masks Everywhere
Precision is important.
But not every frame requires obsessive pixel-level work.
Ask:
Will the viewer notice this edge at normal playback speed?
A tiny imperfection visible only at 800% zoom may not justify an hour of work.
Spend your time where it improves the final image.
Break Complex Subjects into Multiple Masks
Suppose you’re manually masking a person.
Instead of one enormous mask around the entire body, consider separate masks for:
- head;
- torso;
- left arm;
- right arm;
- legs.
Different body parts move differently.
Multiple masks can sometimes be easier to animate than one highly complex path.
This is a common rotoscoping principle.
Name Your Masks
After Effects creates names such as:
Mask 1
Mask 2
Mask 3
That becomes confusing quickly.
Rename important masks.
For example:
Face
Left Arm
Screen
Blur Region
Background Cutout
Good organization becomes increasingly important in complex composites.
Five Mask Exercises for Beginners
Exercise 1 — Circular Crop
Import a photograph and create an ellipse mask.
Experiment with Feather and Expansion.
Exercise 2 — Text Reveal
Create text and reveal it using an animated rectangular mask.
Exercise 3 — Blur a Face
Apply a blur and use a tracked or animated mask to keep the effect on the face.
Exercise 4 — Custom Wipe
Create a transition between two shots using an animated mask.
Exercise 5 — Moving Subject
Create a simple mask around a moving object and animate the Mask Path.
These five exercises teach most of the masking concepts you’ll use regularly.
Common Masking Mistakes
Mistake 1: Accidentally Creating a Shape Layer
Make sure the intended layer is selected before drawing.
Mistake 2: Using Too Many Vertices
More points usually mean more work.
Mistake 3: No Feathering
Perfectly hard edges can look artificial in live-action composites.
Mistake 4: Too Much Feathering
Excessive feather creates halos and soft edges.
Mistake 5: Tracking Without Reviewing
Automatic tracking should always be checked.
Mistake 6: One Mask for a Very Complex Subject
Multiple simpler masks may be easier.
Mistake 7: Ignoring Motion Blur
Fast-moving subjects may require careful edge treatment.
Mistake 8: Poor Organization
Rename masks and layers when projects become more complicated.
A Better Masking Workflow
Use this general approach:
1. Define the Purpose
What exactly should the mask accomplish?
2. Choose the Simplest Shape
Circle, rectangle, or custom path?
3. Use Minimal Vertices
Keep the mask manageable.
4. Add Feather
Only where necessary.
5. Adjust Expansion
Refine the boundary.
6. Track or Animate
Follow movement.
7. Review at Full Speed
Don’t judge only frame by frame.
8. Inspect Difficult Frames
Correct obvious problems.
9. Check the Final Composite
The goal is not a beautiful mask.
The goal is a convincing final image.
Are Masks Still Important in 2026?
Absolutely.
After Effects continues adding smarter object-isolation and AI-assisted workflows.
These can reduce the amount of repetitive manual work required for certain shots.
But masks remain fundamental because they provide direct control.
They are still useful for:
- motion graphics;
- effect isolation;
- transitions;
- cleanup;
- compositing;
- tracking;
- rotoscoping.
AI-assisted tools and traditional masks are complementary rather than mutually exclusive.
Do You Need Plug-Ins for Masking?
No.
After Effects includes extensive native masking capabilities.
Third-party tools can help with specialized workflows, but beginners should understand the built-in system first.
Once you understand masks, you’ll also understand many other compositing concepts more easily.
Practice Masking in Adobe After Effects
The best first project is simple.
Import a short video containing a moving object.
Create a mask around it.
Add some feathering.
Track or animate the mask.
Then place something behind the isolated region.
This immediately demonstrates why masks are so useful.
You aren’t simply drawing shapes.
You’re controlling how visual layers interact.
If you want to practice masking and compositing yourself, you can check Adobe’s current After Effects options below:
Get Adobe After Effects and start practicing masking techniques
Frequently Asked Questions
What does a mask do in After Effects?
A mask defines a region of a layer that can control visibility or participate in effects and compositing workflows.
How do I create a mask?
Select the intended layer and draw using a shape or Pen tool.
Why did After Effects create a shape instead of a mask?
Most commonly, the intended existing layer was not selected when you began drawing.
Can masks be animated?
Yes. Mask Path, Feather, Opacity, Expansion, and other relevant properties can be animated.
Can After Effects track a mask?
Yes. After Effects includes mask-tracking capabilities that can help masks follow moving subjects.
What is Mask Feather?
Mask Feather softens the transition around the mask boundary.
What is Mask Expansion?
Mask Expansion moves the mask boundary inward or outward without requiring you to manually reposition every vertex.
Can I have multiple masks on one layer?
Yes.
Can masks be used with effects?
Yes. Masks can be incorporated into workflows where effects are restricted to particular areas.
What’s the difference between masks and track mattes?
A mask is attached directly to a layer. A track matte uses another layer to control visibility.
What’s the difference between masks and Roto Brush?
Masks use manually controlled paths, while Roto Brush provides a more assisted workflow for isolating subjects.
What Should You Learn Next?
Once masks make sense, track mattes are the logical next step.
Masks control visibility directly on a layer.
Track mattes let one layer control the visibility of another.
That opens the door to effects such as:
- video inside text;
- animated image reveals;
- texture-filled typography;
- shape-based transitions;
- sophisticated compositing.
The next tutorial will therefore be:
Adobe After Effects Track Mattes: Alpha Matte and Luma Matte Explained.
Final Thoughts
Masks are one of those After Effects tools that appear simple but become increasingly powerful as your skills develop.
At the beginner level, you can use a mask to crop an image.
Then you discover feathering.
Then animated Mask Paths.
Then tracking.
Then effect isolation.
Then rotoscoping.
Then complex compositing.
The fundamental concept remains the same:
A mask defines a region.
What you do with that region is where the creative possibilities begin.
Start simple.
Create a circle mask.
Change its Feather.
Change its Expansion.
Animate the Mask Path.
Track it.
Use it to reveal text.
Use it to isolate an effect.
Once those techniques feel natural, you’ll have learned one of the most important building blocks in Adobe After Effects compositing.
Explore Adobe After Effects and start creating your own visual effects






