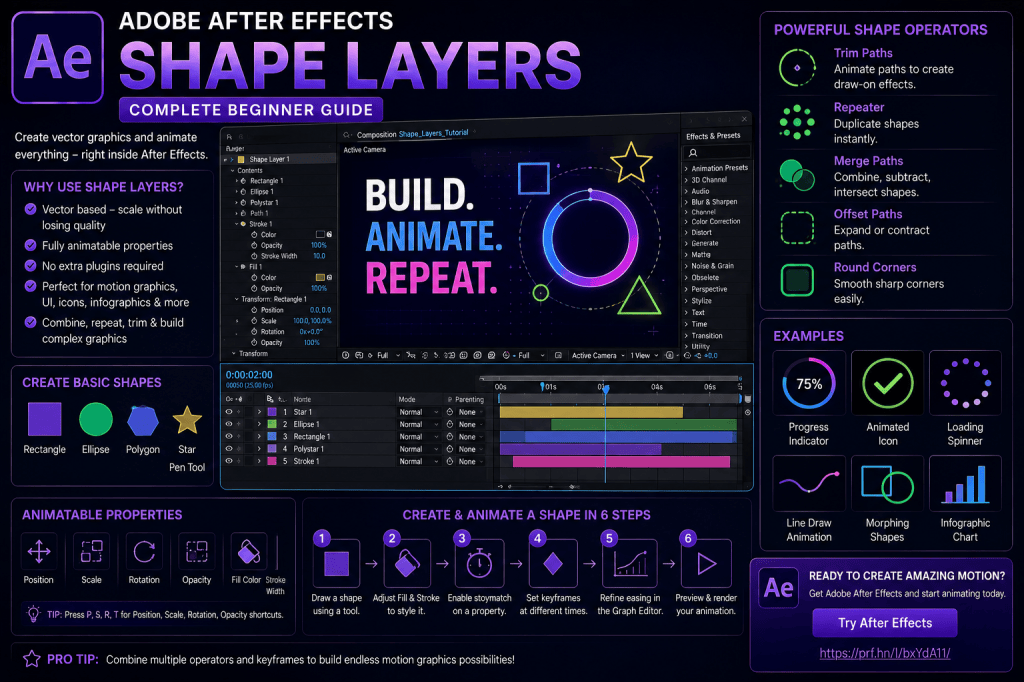
Shape layers are among the most versatile tools in Adobe After Effects.
They can be used to create simple circles and rectangles, but their real capabilities go much further. Shape layers can become animated icons, interface elements, infographics, backgrounds, transitions, charts, logos, callouts, lower thirds, abstract graphics, and complete motion-design sequences.
Best of all, they are vector-based.
That means you can create and animate graphics directly inside After Effects without needing to prepare every visual element in another application first.
In this beginner guide, we’ll explore how shape layers work, how to create them, how fills and strokes behave, how to animate shape properties, and how powerful operators such as Trim Paths, Repeater, Merge Paths, and Offset Paths can transform relatively simple geometry into sophisticated motion graphics.
Affiliate disclosure: This article contains affiliate links. If you purchase Adobe After Effects through one of these links, we may earn a commission at no additional cost to you.
What Is a Shape Layer in After Effects?
A shape layer is a special vector-based layer containing one or more shapes.
These can include:
- rectangles;
- ellipses;
- polygons;
- stars;
- custom paths;
- lines.
Unlike a raster image, vector shapes are mathematically defined.
That makes them particularly useful for motion graphics because they can generally be scaled without the same type of pixelation associated with enlarging a small raster image.
More importantly, After Effects exposes many of their properties for animation.
You can animate:
- size;
- position;
- rotation;
- scale;
- fill color;
- stroke color;
- stroke width;
- paths;
- corner radius;
- Trim Paths;
- repetitions;
- offsets.
This makes shape layers much more than simple drawing tools.
Why Should After Effects Beginners Learn Shape Layers?
Shape layers teach several fundamental After Effects concepts at the same time.
You learn about:
- layers;
- paths;
- fills;
- strokes;
- transforms;
- keyframes;
- easing;
- hierarchy;
- procedural animation.
They’re also extremely practical.
Even if you never become a dedicated motion designer, you’ll frequently need simple graphic elements such as:
- boxes behind titles;
- animated lines;
- circles around objects;
- arrows;
- highlights;
- buttons;
- backgrounds.
Shape layers let you create these directly in After Effects.
Before You Begin
This tutorial assumes you understand basic keyframes.
If you don’t, start with:
How to Use Keyframes in Adobe After Effects: Complete Beginner Guide
For smoother animation, also read:
Adobe After Effects Graph Editor: How to Create Smooth, Professional Animation
If you haven’t installed After Effects yet, you can check Adobe’s current options here:
Explore Adobe After Effects and current plan options
How to Create a Shape Layer
Let’s begin with a rectangle.
Create a composition.
Make sure no existing layer is selected.
Choose the Rectangle Tool from the toolbar.
Click and drag inside the Composition panel.
After Effects creates a new shape layer containing your rectangle.
Look at the Timeline.
Expand the layer.
You’ll see something similar to:
Contents
Inside Contents, you’ll find the shape and its related properties.
This hierarchy is important.
Understanding the Shape Layer Structure
A shape layer can contain multiple shapes.
For example:
Shape Layer
→ Contents
→ Rectangle 1
→ Ellipse 1
→ Star 1
Each shape can have its own properties.
This means one shape layer can contain a complete graphic rather than only one object.
That can be extremely useful, although very complicated layers can eventually become difficult to manage.
Shape Transform vs Layer Transform
This is one of the most important concepts to understand.
A shape can have its own Transform properties inside the Contents hierarchy.
The overall layer also has standard Transform properties.
These are not the same thing.
For example:
Rectangle Transform
controls the rectangle within the shape layer.
Layer Transform
controls the entire shape layer.
If your layer contains three shapes, changing the layer’s Position moves all three.
Changing only Rectangle 1’s Position moves that rectangle inside the layer.
Understanding this distinction prevents a lot of confusion.
Creating an Ellipse
Choose the Ellipse Tool.
With no layer selected, draw an ellipse.
After Effects creates another shape layer.
If you want a perfect circle, use the appropriate modifier key while drawing according to your platform and current After Effects behavior.
You can also adjust the ellipse numerically using its Size property.
Numerical values are often preferable when precision matters.
Creating a Polygon or Star
After Effects also provides polygon and star shapes.
These are particularly useful because their properties can be modified after creation.
You can experiment with:
- number of points;
- inner radius;
- outer radius;
- rotation.
Animate these values and simple geometry can become surprisingly complex motion graphics.
Fill and Stroke
Most shapes use some combination of a Fill and Stroke.
Fill
The Fill controls the interior appearance of the shape.
You can modify properties such as:
- color;
- opacity.
Stroke
The Stroke defines the outline.
You can control properties including:
- color;
- opacity;
- width;
- line caps;
- joins;
- dashes.
These properties are extremely useful for animated graphics.
Animate Fill Color
Create a circle.
Open its Fill properties.
Enable animation for the Fill Color.
At the beginning, choose one color.
Move forward in time.
Choose another.
After Effects interpolates between them.
This creates a smooth color transition.
Color animation can be useful for:
- brand graphics;
- status indicators;
- UI animation;
- backgrounds;
- abstract motion graphics.
Animate Stroke Width
Create a shape with a visible stroke.
Animate the Stroke Width.
For example:
Beginning: 2 px
End: 20 px
The outline grows thicker over time.
Combine this with Scale or Opacity for more elaborate effects.
Create a Simple Circle Animation
Let’s build a basic exercise.
Create a circle.
At the beginning:
Scale: 0%
Move forward approximately one second.
Set:
Scale: 100%
Apply Easy Ease.
Preview.
You now have a simple expanding circle.
Open the Graph Editor and refine the Scale curve.
Try making the circle grow quickly and settle gently.
This is an excellent way to practice animation fundamentals.
Add an Overshoot
Instead of:
0% → 100%
try:
0% → 110% → 100%
This creates a small overshoot.
Refine the timing so the circle expands rapidly, becomes slightly too large, and settles back to its final size.
Overshoot works well for:
- icons;
- buttons;
- callouts;
- notification graphics.
Use it carefully.
Not every shape needs to bounce.
Animate Position
Shape layers have Position controls just like other layers.
Press P with the layer selected.
Create two Position keyframes.
Move the shape from one side of the composition to the other.
Apply easing.
Then refine the motion in the Graph Editor.
Even a simple circle can teach you a great deal about timing and spacing.
Animate Rotation
Select a square or star.
Press:
R
Animate:
0° → 360°
Now combine Rotation with Scale.
For example:
Scale: 0% → 100%
Rotation: -90° → 0°
This creates a simple animated icon entrance.
Animate Opacity
Press:
T
Animate:
0% → 100%
Combine this with Position or Scale.
Multiple subtle changes usually produce more polished results than one extreme transformation.
What Are Shape Operators?
This is where shape layers become much more powerful.
After Effects provides special operations that can modify or generate shape geometry.
Examples include:
- Trim Paths;
- Repeater;
- Merge Paths;
- Offset Paths;
- Round Corners;
- Pucker & Bloat;
- Twist;
- Zig Zag;
- Wiggle Paths;
- Wiggle Transform.
These tools can create complex graphics from simple shapes.
Trim Paths
Trim Paths is one of the most useful shape-layer tools in After Effects.
It lets you animate how much of a path is visible.
Imagine a circle outline.
Instead of the complete circle appearing immediately, Trim Paths can make the stroke draw itself around the circumference.
This is commonly used for:
- logo reveals;
- animated icons;
- loading indicators;
- line animation;
- maps;
- diagrams;
- handwriting-style effects.
How to Use Trim Paths
Create a circle.
Disable the Fill if you want only an outline.
Add a Stroke.
Inside the shape layer’s Contents, choose:
Add → Trim Paths
You’ll see controls including:
- Start;
- End;
- Offset.
Animate End from:
0% → 100%
Preview.
The circle draws itself onto the screen.
This simple technique is one of the most useful effects you can learn.
Start and End
Trim Paths gives you control over both ends of the visible section.
For example:
Start = 0%
End = 50%
Only half the path is visible.
Animate both values and you can create moving line segments.
This is useful for:
- loading animations;
- interface graphics;
- circular indicators;
- abstract loops.
Animate Offset
Offset rotates the visible Trim Paths section around a closed path.
Create a short visible segment on a circle.
Animate Offset.
The segment travels around the circle.
You have created a basic loading indicator.
Create an Animated Line
Shape layers aren’t limited to closed shapes.
Use the Pen Tool to create a path.
Add a Stroke.
Add Trim Paths.
Animate End from:
0% → 100%
The line draws itself.
This technique can create:
- routes;
- arrows;
- charts;
- underline animations;
- diagrams;
- connector lines.
Create an Animated Arrow
Draw a line with a shape path.
Add an arrowhead or construct one from additional shape geometry.
Animate the line using Trim Paths.
You can then animate the arrowhead along with the line.
This is useful in:
- tutorials;
- explainer videos;
- presentations;
- technical diagrams.
Repeater
The Repeater duplicates shape content procedurally.
Instead of manually duplicating the same shape ten times, you can create one shape and let the Repeater generate multiple copies.
This is incredibly powerful.
Create a Repeated Circle Pattern
Create one small circle.
Add:
Repeater
Increase the number of copies.
Adjust the Repeater Transform Position.
The circles spread out.
Now experiment with:
- Scale;
- Rotation;
- Position;
- Opacity.
One circle can become an entire pattern.
Create a Radial Pattern
Create a small shape.
Add a Repeater.
Increase the copies.
Instead of moving each copy horizontally, adjust the Repeater’s Rotation.
With the correct positioning and anchor setup, the copies form a circular pattern.
This can be used for:
- loading graphics;
- decorative elements;
- bursts;
- radial interfaces.
Animate the Repeater
Repeater properties can themselves be animated.
You could animate:
- number of copies;
- rotation;
- position;
- scale.
This means procedural patterns can evolve over time.
A simple shape can become a sophisticated abstract animation without dozens of manually duplicated layers.
Merge Paths
Merge Paths lets you combine shape geometry in different ways.
It can perform operations conceptually similar to vector path operations in illustration software.
Depending on your setup, shapes can be:
- combined;
- subtracted;
- intersected;
- excluded.
This is useful for creating more complex icons and geometric graphics.
Why Merge Paths Is Useful
Imagine a large circle and a smaller circle.
Using the appropriate Merge Paths configuration, you can subtract the smaller circle from the larger one.
The result becomes a ring or crescent-like shape depending on positioning.
Animate the shapes and the geometry changes dynamically.
This creates opportunities for:
- logo animation;
- icon transitions;
- morphing geometry;
- abstract design.
Offset Paths
Offset Paths expands or contracts a path.
This is useful when you want to create variations around existing geometry.
For example, a shape can expand outward without simply scaling the entire layer.
That distinction can matter when creating strokes, outlines, and procedural animations.
Round Corners
Round Corners can soften sharp geometry.
A square can gradually become more rounded.
Animate the corner radius and the shape can transform visually over time.
This is useful for interface and icon animation.
Pucker & Bloat
Pucker & Bloat distorts shape geometry inward or outward.
Applied carefully, it can create interesting transitions.
Applied aggressively, it creates much more stylized results.
This is a good tool for experimentation, but don’t assume every available operator belongs in every project.
Twist
Twist rotates parts of a shape progressively around its center.
This can turn simple geometry into spiral-like designs.
Animate the amount and the shape appears to twist over time.
This works particularly well for abstract motion graphics.
Zig Zag
Zig Zag adds repeated variations along a path.
You can create:
- waves;
- jagged edges;
- decorative patterns.
Animate its properties and static geometry becomes dynamic.
Wiggle Paths
Wiggle Paths introduces procedural irregularity into a shape.
Instead of a perfectly clean path, you can create more organic variation.
This can be useful for:
- hand-drawn looks;
- energetic graphics;
- abstract animation.
Use it carefully if your design requires precision.
Wiggle Transform
Wiggle Transform can introduce procedural changes to transform properties.
It can create randomized variations without manually creating dozens of keyframes.
This can be helpful for:
- particles;
- decorative elements;
- playful animation;
- background motion.
Create a Simple Loading Animation
Let’s combine several techniques.
Create a circle.
Remove the Fill.
Add a Stroke.
Add Trim Paths.
Set:
Start = 0%
End = 25%
Now animate Offset through a complete cycle.
The visible portion moves around the circle.
You now have a simple loading spinner.
Add easing or continuous looping behavior depending on the style you want.
Create an Animated Checkmark
Draw a checkmark using a path.
Add a Stroke.
Add Trim Paths.
Animate End from:
0% → 100%
The checkmark draws itself.
Then add a subtle Scale overshoot to the entire layer.
This creates a polished confirmation animation suitable for interface mockups and explainer videos.
Create an Animated Button
Create a rounded rectangle.
Add text above it or coordinate it with a text layer.
Animate:
Scale: 100% → 95% → 100%
This simulates a click.
You can also animate Fill Color slightly.
The result is a simple micro-interaction.
Shape layers are excellent for UI animation prototypes.
Create an Animated Progress Bar
Create a rectangle.
Set its anchor and alignment appropriately.
Animate its horizontal Scale or Rectangle Size from a low value toward full width.
Add a background rectangle behind it.
You now have a progress bar.
Combine this with text displaying a percentage for a more complete interface element.
Create Animated Charts
Shape layers are extremely useful for data visualization.
You can create:
- bar charts;
- line graphs;
- pie-style graphics;
- progress circles.
For a bar chart, animate the height of rectangles.
For a line graph, animate paths using Trim Paths.
For circular indicators, use strokes and Trim Paths.
This is useful for corporate videos and explainers.
Shape Layers and Text
Shape layers frequently work together with text.
For example:
Text
“NEW FEATURE”
Shape
Colored rectangle behind the text.
Animate the rectangle first.
Then animate the text a few frames later.
This staggered motion creates a clean title reveal.
Shape Layers and Track Mattes
Shape layers can also be used as mattes.
For example, a rectangle can determine which part of an image or text layer is visible.
Animate the rectangle and you create a reveal.
Track mattes are an important After Effects concept and deserve their own tutorial later in this series.
Shape Layers and Masks Are Not the Same
Beginners often confuse shapes and masks because both can be drawn using similar tools.
The result depends partly on what is selected when you draw.
A shape creates vector graphic content.
A mask modifies the visibility or processing of an existing layer.
Understanding this distinction is essential.
We’ll cover masks in detail in the next article.
Shape Layers and Illustrator
After Effects can work with vector artwork created in Adobe Illustrator.
Illustrator is often better for designing complex vector artwork.
After Effects is excellent for animating it.
Recent Illustrator and SVG workflow improvements can make moving vector content into After Effects more convenient in supported workflows.
A practical approach is:
Illustrator → Design
After Effects → Animate
But for simple motion graphics, you may be able to create everything directly with shape layers.
Shape Layers in 3D
Shape layers can also participate in 3D compositions.
Enable the 3D switch and you can position the layer in X, Y, and Z space.
Combine shape layers with:
- cameras;
- lights;
- text;
- other 3D layers.
This is useful for creating layered motion-design scenes.
Motion Blur
Fast shape animation can benefit from motion blur.
Enable motion blur for quickly moving or rotating layers where appropriate.
Compare the animation with and without it.
Motion blur can make fast movement feel more natural.
But don’t use it so heavily that graphic edges become unreadable.
Use the Graph Editor
Shape layers are perfect for Graph Editor practice.
A simple circle gives you no visual distractions.
Animate it from one side of the composition to the other.
Then experiment with different curves.
Try:
- linear;
- Easy Ease;
- fast start, slow finish;
- slow start, fast finish;
- aggressive acceleration;
- gentle acceleration.
The shape remains identical.
Only the motion changes.
This demonstrates how important timing is.
Shape-Layer Organization
Shape layers can become complicated quickly.
You may end up with:
- multiple groups;
- multiple paths;
- several fills;
- strokes;
- Trim Paths;
- Repeaters;
- transforms.
Rename important groups.
Instead of:
Rectangle 1
Rectangle 2
Group 3
use:
Background
Icon Circle
Progress Ring
Good naming saves time later.
One Shape Layer or Multiple Shape Layers?
There is no universal answer.
A single layer containing several shapes can be convenient when the shapes belong together.
Separate layers may be easier when elements require independent:
- timing;
- effects;
- parenting;
- 3D positioning.
Choose the structure that makes the animation easiest to understand and maintain.
Common Shape Layer Mistakes
Mistake 1: Confusing Shapes with Masks
Check what is selected before drawing.
Mistake 2: Animating the Wrong Transform
Remember that individual shape groups and the entire layer can have separate Transform controls.
Mistake 3: Creating Too Many Layers
Sometimes several related shapes can live inside one organized shape layer.
Mistake 4: Creating One Giant Complicated Layer
The opposite problem also exists.
If one shape layer becomes impossible to understand, separate it into logical components.
Mistake 5: Ignoring Easing
Shape animation with linear timing can feel mechanical.
Mistake 6: Overusing Shape Operators
Just because Twist, Zig Zag, Repeater, and Pucker & Bloat exist doesn’t mean you need all of them simultaneously.
Mistake 7: Poor Naming
Complex shape layers become difficult to edit when every group retains its default name.
Five Shape Layer Exercises
Exercise 1 — Expanding Circle
Animate Scale from 0% to 100%.
Add easing.
Exercise 2 — Drawing Line
Create a path and animate it using Trim Paths.
Exercise 3 — Loading Spinner
Create a stroked circle and animate Trim Paths/Offset.
Exercise 4 — Repeated Pattern
Create one shape and use Repeater to generate a pattern.
Exercise 5 — Animated Icon
Build a simple checkmark, arrow, or notification icon and animate its components.
These exercises introduce most of the concepts you’ll use repeatedly.
A More Advanced Exercise: Animated Infographic
Create a simple statistic:
75%
Add:
- circular progress indicator;
- percentage text;
- small label.
Use a shape-layer stroke and Trim Paths for the progress circle.
Animate the text slightly later.
For example:
- Circle begins drawing.
- Percentage appears.
- Label fades in.
This teaches coordination between shapes and typography.
Shape Animation for Social Media
Shape layers work particularly well for short-form content.
Use them to create:
- animated highlights;
- callouts;
- arrows;
- captions;
- progress indicators;
- transitions;
- backgrounds.
Simple bold shapes often remain readable on small mobile screens.
Shape Animation for YouTube
You can use shape layers for:
- lower thirds;
- subscribe animations;
- title backgrounds;
- chapter graphics;
- arrows;
- diagrams;
- information panels.
Because they are vector-based, they are flexible for different output sizes.
Shape Animation for Corporate Video
Shape layers are ideal for clean business graphics.
Examples include:
- charts;
- diagrams;
- statistics;
- process graphics;
- labels;
- lower thirds;
- timeline graphics.
Use restrained motion and consistent styling.
Do You Need Plug-Ins?
No.
Shape layers are one of the strongest native motion-design systems in After Effects.
You can create surprisingly sophisticated animation using:
- keyframes;
- Graph Editor;
- Trim Paths;
- Repeater;
- Merge Paths;
- shape operators;
- expressions.
Third-party tools can accelerate particular workflows, but understanding native shape layers first makes you a much stronger After Effects user.
Practice Shape Layers in Adobe After Effects
A useful first project is an animated icon.
Create a circle.
Add a checkmark.
Animate the circle’s Scale.
Use Trim Paths to draw the checkmark.
Offset the timing slightly.
Apply easing.
Add subtle motion blur where appropriate.
In just a few layers, you’ve created a practical piece of motion design.
If you want to practice these techniques yourself, you can check the current Adobe After Effects options here:
Get Adobe After Effects and start creating shape animations
Frequently Asked Questions
What is a shape layer in After Effects?
A shape layer contains vector-based shape content that can be created and animated directly inside After Effects.
Are After Effects shape layers vector?
Yes. Shape-layer geometry is vector-based, making it particularly useful for scalable motion graphics.
What is Trim Paths?
Trim Paths is a shape operator that controls how much of a path is visible and can be animated to create drawing and line-reveal effects.
What does Repeater do?
Repeater creates multiple procedural copies of shape content.
Can I animate shape colors?
Yes. Fill and Stroke colors can be animated.
Can I animate a shape path?
Yes. Shape paths can be animated, enabling geometry to change over time.
Can shape layers be used as mattes?
Yes. Shape layers can participate in matte-based workflows to reveal or hide other content.
What’s the difference between a mask and a shape?
A shape is vector graphic content. A mask generally controls visibility or processing on an existing layer.
Can shape layers be 3D?
Shape layers can be positioned and animated as 3D layers in After Effects compositions.
Do I need Illustrator to create shapes?
No. After Effects includes extensive native shape tools, although Illustrator remains useful for more complex vector design.
What Should You Learn Next?
Now that you understand shape layers, the next skill should be masks.
Masks are fundamental to:
- compositing;
- object isolation;
- selective effects;
- reveals;
- transitions;
- rotoscoping.
They’re also an important stepping stone toward understanding track mattes and more advanced compositing.
The next tutorial in this series will therefore be:
How to Use Masks in Adobe After Effects: Complete Beginner Guide.
Final Thoughts
Shape layers are one of the best tools for learning motion design in Adobe After Effects.
Start with simple geometry:
Circle.
Rectangle.
Line.
Then animate basic properties:
Position.
Scale.
Rotation.
Opacity.
Once those feel comfortable, move into:
Trim Paths.
Repeater.
Merge Paths.
Offset Paths.
From there, you can create complete motion-graphics systems using little more than vector geometry, typography, keyframes, and good timing.
Don’t underestimate simple shapes.
A beautifully animated circle can demonstrate more motion-design skill than a complicated composition filled with unnecessary effects.
The goal isn’t complexity.
The goal is controlled, purposeful movement.
And shape layers give you an excellent environment for learning exactly that.
Explore Adobe After Effects and start building your own motion graphics






