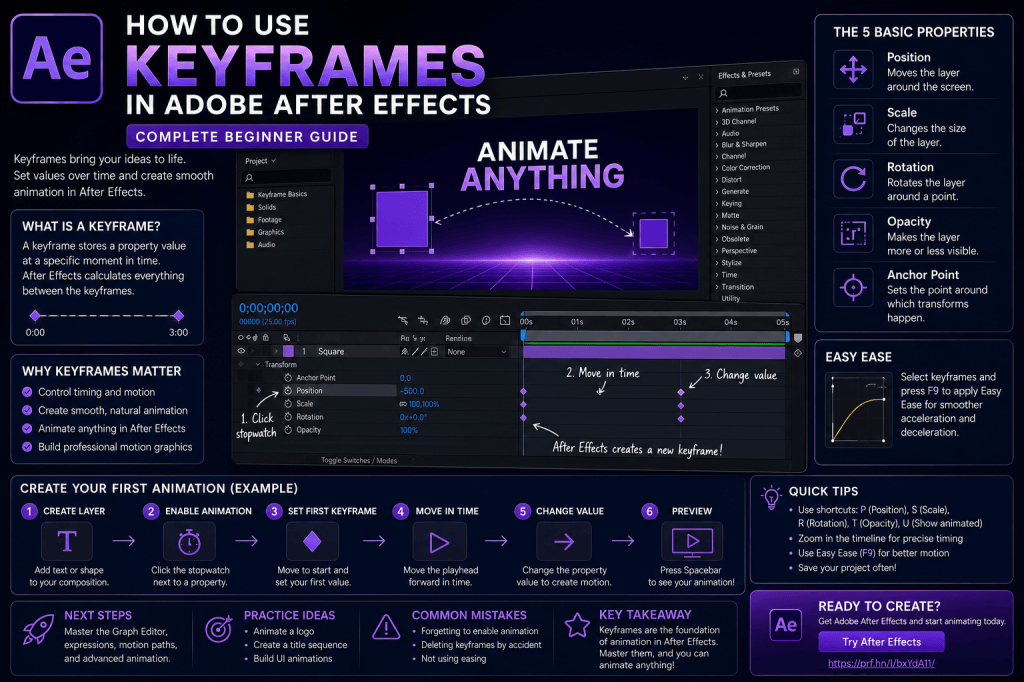
Keyframes are one of the most important concepts you will ever learn in Adobe After Effects.
If you understand keyframes, you can animate almost anything.
You can make text move across the screen, make a logo grow from nothing, rotate an object, fade an image in or out, animate an effect, move a camera through a 3D scene, change colors, control masks, and create sophisticated motion graphics.
The principle is surprisingly simple:
A keyframe tells After Effects what value a property should have at a particular moment in time.
After Effects then calculates what happens between your keyframes.
In this beginner guide, we’ll go step by step through how keyframes work, how to create them, how to move and edit them, how interpolation and easing affect animation, and how to avoid some of the most common beginner mistakes.
By the end, you’ll be able to create your own basic animations instead of relying entirely on presets.
Affiliate disclosure: This article contains affiliate links. If you purchase Adobe After Effects through one of these links, we may earn a commission at no additional cost to you.
What Is a Keyframe in After Effects?
A keyframe stores the value of an animatable property at a particular point in time.
For example, imagine a circle.
At the beginning of your composition, the circle is on the left side of the screen.
At three seconds, the circle is on the right side.
You create:
Keyframe 1 — 0 seconds: circle on the left.
Keyframe 2 — 3 seconds: circle on the right.
After Effects calculates the positions between those two keyframes.
When you play the composition, the circle moves across the screen.
That is keyframe animation.
The same principle applies to thousands of properties throughout After Effects.
What Can You Animate with Keyframes?
A huge number of properties can be animated.
Common examples include:
- Position
- Scale
- Rotation
- Opacity
- Anchor Point
- mask paths
- text properties
- shape properties
- effect controls
- camera settings
- light properties
- colors
- blur amount
- audio levels
- 3D properties
Whenever you see a stopwatch icon beside a property, that is a strong indication that the property can be animated.
The Five Transform Properties Beginners Should Learn First
Every beginner should become comfortable with the basic Transform properties.
Select a layer and expand Transform.
You’ll normally see:
Anchor Point
Defines the point around which transformations such as rotation and scaling occur.
Position
Controls where the layer appears in the composition.
Scale
Controls the size of the layer.
Rotation
Controls the layer’s rotation.
Opacity
Controls how transparent the layer is.
These five properties provide an excellent environment for learning keyframes.
Your First Keyframe Animation
Let’s create a simple animation.
We will move a text layer from one side of the screen to the other.
Step 1: Create a Composition
Create a new After Effects composition.
For this exercise, a short composition is enough.
Five seconds is plenty.
Step 2: Create Some Text
Choose the Text tool.
Click in the Composition panel and type:
HELLO
Your text appears as a layer in the Timeline.
Step 3: Open Position
Select the text layer.
Expand:
Transform → Position
You will see the current X and Y position values.
Step 4: Move the Playhead to the Beginning
Place the current-time indicator at:
0:00
Move the text toward the left side of the composition.
Step 5: Click the Stopwatch
Click the stopwatch beside Position.
After Effects creates your first Position keyframe.
The stopwatch is now active.
This means changes to the property at different times can create additional keyframes.
Step 6: Move Forward in Time
Move the playhead to approximately:
3 seconds
Step 7: Move the Text
Drag the text to the right side of the composition.
After Effects automatically creates another Position keyframe.
Step 8: Preview
Return to the beginning and play the composition.
The text moves from left to right.
You have created a keyframe animation.
Why Did After Effects Create the Movement?
After Effects knows two things.
At the first keyframe:
The text is here.
At the second keyframe:
The text is there.
The application calculates the intermediate positions.
This is called interpolation.
Interpolation is one of the most important ideas in animation.
Keyframes Don’t Only Control Movement
Beginners often associate keyframes exclusively with Position.
But keyframes control values, not simply movement.
Let’s look at several examples.
Animate Scale
Select the layer and open:
Transform → Scale
At the beginning, set Scale to:
0%
Create a keyframe.
Move forward one second.
Set Scale to:
100%
Preview.
The object grows into view.
Animate Opacity
Open:
Transform → Opacity
At the beginning:
0%
After one second:
100%
Now the object fades in.
Animate Rotation
Open:
Transform → Rotation
Start at:
0°
Move forward two seconds.
Set Rotation to:
360°
The layer performs one complete rotation.
Combine Several Properties
This is where animation becomes more interesting.
Try animating:
Position
from slightly below the final position.
Scale
from 80% to 100%.
Opacity
from 0% to 100%.
Apply all three animations over approximately one second.
The result is a much more polished entrance than using a single property.
Professional motion design often involves multiple subtle property changes working together.
Keyboard Shortcuts for Transform Properties
After Effects provides extremely useful shortcuts for revealing Transform properties.
With a layer selected:
P — Position
S — Scale
R — Rotation
T — Opacity
A — Anchor Point
These shortcuts save enormous amounts of time.
Instead of repeatedly expanding the Transform section, press the appropriate key.
For example:
Select the layer.
Press P.
Position appears immediately.
Show All Animated Properties
Another useful shortcut is:
U
Select a layer and press U.
After Effects reveals properties containing keyframes or animation.
This becomes extremely useful once a layer contains many effects and properties.
Pressing U helps you concentrate on what is actually animated.
How to Add Another Keyframe
There are several ways to create additional keyframes.
If animation is already enabled for a property, simply:
- Move the playhead.
- Change the property value.
After Effects creates a new keyframe.
You can also use the keyframe controls beside the property to add or navigate between keyframes.
How to Move a Keyframe
Keyframes can be moved horizontally in the Timeline.
Moving a keyframe changes when that value occurs.
This is important because animation is not only about values.
It is also about timing.
Suppose your animation takes three seconds.
Move the second keyframe to one second.
The same movement now happens much faster.
Move it to five seconds.
The movement becomes slower.
You haven’t changed the start or end positions.
You changed the timing.
Timing Is Fundamental to Animation
Two animations can have exactly the same keyframe values and still feel completely different.
Imagine a logo moving from the bottom of the screen to the center.
Version A takes:
0.3 seconds
It feels fast and energetic.
Version B takes:
3 seconds
It feels slow and deliberate.
Same positions.
Different timing.
Motion design depends heavily on these decisions.
How to Copy Keyframes
You can copy keyframes just like other items.
Select the keyframes.
Copy them.
Move the playhead.
Paste.
This is useful for repeating animations.
For example:
A shape moves right.
Then you copy those keyframes and reuse the movement later.
You can also copy keyframes between compatible properties and layers in many workflows.
How to Delete Keyframes
Select the keyframes you no longer want and delete them.
Be careful with the stopwatch.
Clicking an active stopwatch does not simply delete one selected keyframe.
It can remove the animation from that property.
Beginners sometimes accidentally destroy an entire animation this way.
When you want to remove individual keyframes, select those keyframes and delete them instead.
What Is Linear Animation?
Your first keyframes often use linear temporal interpolation.
That means the property changes at a relatively constant rate between the keyframes.
For Position, the object may:
start instantly,
move at a constant speed,
stop instantly.
This can look mechanical.
Real objects often accelerate and decelerate.
That’s where easing becomes important.
What Is Easy Ease?
Easy Ease changes the timing around keyframes to create smoother acceleration and deceleration.
Select your keyframes and apply:
Easy Ease
Then preview the animation again.
The movement should feel less robotic.
Instead of instantly reaching full speed and abruptly stopping, the animation transitions more smoothly.
This is one of the simplest improvements you can make to beginner animations.
Easy Ease In and Easy Ease Out
After Effects also provides more specific easing options.
Easy Ease In
Affects how animation approaches a keyframe.
Easy Ease Out
Affects how animation leaves a keyframe.
Understanding the difference becomes useful when you start designing more deliberate motion.
For now, standard Easy Ease is a good starting point.
Why Easing Matters
Consider a ball falling onto the floor.
It doesn’t normally move at one constant speed.
Gravity accelerates it.
Then the impact changes the movement.
Or imagine a drawer sliding closed.
It may move quickly at first and slow as it reaches the final position.
Easing helps create this kind of visual behavior.
Even abstract motion graphics often benefit from acceleration and deceleration because viewers are accustomed to seeing motion influenced by physical forces.
The Graph Editor
Easy Ease is only the beginning.
The Graph Editor provides much more precise control over animation timing.
Instead of only seeing keyframes as points in time, you can examine graphical representations of how values or speed change.
This allows you to create:
- fast starts;
- slow finishes;
- sharp acceleration;
- gentle deceleration;
- overshoots;
- custom motion curves.
The Graph Editor is one of the most important tools for moving from beginner animation toward professional motion design.
We will cover it in detail in a dedicated tutorial.
Spatial vs Temporal Interpolation
After Effects animation can involve two different ideas.
Temporal Interpolation
Controls how a value changes over time.
This affects speed and easing.
Spatial Interpolation
Controls the path an object follows through space.
For Position animation, this determines whether an object follows a straight line or a curved path.
Understanding this distinction helps explain why Position animation has additional controls compared with properties such as Opacity.
Create a Curved Motion Path
Animate an object’s Position between two points.
When the layer is selected, you can see its motion path in the Composition panel.
Adjust the path handles to create a curve.
The object now travels along that curved route instead of moving in a straight line.
This is useful for:
- flying objects;
- icons;
- character elements;
- particles;
- decorative motion graphics.
Hold Keyframes
Not every animation should transition smoothly.
Sometimes you want a value to remain unchanged and then switch instantly.
A Hold Keyframe does exactly that.
Imagine animating a number:
1 → 2 → 3 → 4
You may not want After Effects to create intermediate decimal values.
You want:
1
then instantly:
2
then:
Hold interpolation can create this stepped behavior.
It is useful for:
- counters;
- stop-motion effects;
- frame-by-frame style animation;
- switching states.
Keyframes and Effects
Transform properties are only the beginning.
Effects also contain animatable parameters.
Suppose you apply a blur effect.
You could create:
0 seconds: Blur = 0
1 second: Blur = 50
2 seconds: Blur = 0
The image becomes blurry and then sharp again.
This means virtually every effect can become part of an animation rather than remaining static.
Keyframes and Color
Color properties can also be animated.
For example:
At the beginning:
Blue
At two seconds:
Purple
After Effects interpolates between the colors.
This is useful for:
- animated backgrounds;
- brand transitions;
- shape animations;
- text effects;
- stylized motion graphics.
Keyframes and Text
After Effects has sophisticated text-animation capabilities.
You can animate an entire text layer using standard Transform properties.
But Text Animators allow much more precise control.
You can animate individual:
- characters;
- words;
- lines.
This can produce:
- letter-by-letter reveals;
- rotating characters;
- animated tracking;
- opacity sequences;
- kinetic typography.
All of these workflows ultimately rely on the same fundamental idea: properties changing over time.
Keyframes in 3D
Keyframes become even more powerful when you start working in 3D.
A 3D layer can be animated across:
- X;
- Y;
- Z.
You can animate objects toward or away from the camera.
You can also animate:
- camera position;
- camera orientation;
- Depth of Field;
- lights;
- 3D objects.
The animation principles don’t change.
You still create values at specific moments and allow After Effects to interpolate between them.
Keyframes and AI-Assisted Workflows
After Effects is adding more AI-assisted features, but keyframes remain fundamental.
AI may help isolate a subject or automate a repetitive task.
You still need to decide:
- when an element appears;
- where it moves;
- how quickly it moves;
- when an effect changes;
- how the composition develops over time.
AI can accelerate production.
Keyframes give you creative control.
A Simple Professional-Looking Text Animation
Let’s combine what we’ve learned.
Create a text layer.
Place it slightly below its final position.
At frame 0:
Position: lower than final position
Opacity: 0%
Scale: 90%
At approximately 15–20 frames:
Position: final position
Opacity: 100%
Scale: 100%
Apply Easy Ease.
Enable motion blur if appropriate.
Preview.
This simple combination can produce a clean, modern text entrance.
No plug-in required.
Create an Overshoot Animation
Here’s another useful technique.
Suppose an object should finish at:
Scale = 100%
Instead of animating directly from:
0 → 100
try:
0 → 110 → 100
The object grows slightly too large and then settles back.
This creates an overshoot.
You can use the same principle with Position and Rotation.
Don’t exaggerate every animation.
Small overshoots can add character without becoming distracting.
Create a Bounce with Keyframes
A simple bounce can be created using Position keyframes.
Imagine a ball falling.
Keyframe 1:
Ball at the top.
Keyframe 2:
Ball touches the floor.
Keyframe 3:
Ball rises.
Keyframe 4:
Ball returns to the floor.
Make each bounce smaller.
Then refine the timing and easing.
This exercise teaches several important concepts:
- timing;
- spacing;
- easing;
- acceleration;
- diminishing motion.
It’s an excellent beginner animation exercise.
Create a Fade Transition
Keyframes make simple transitions easy.
For Layer A:
Opacity: 100 → 0
For Layer B:
Opacity: 0 → 100
Overlap the animations.
You now have a crossfade.
The technique is simple, but understanding it reinforces the idea that keyframes can control relationships between multiple layers.
Create a Looping Animation
Keyframes can also form the basis of repeating animation.
For example, create a rotation:
0 seconds: 0°
2 seconds: 360°
The animation completes one rotation.
Later, you can use expressions such as looping expressions to repeat that animation automatically.
But even before learning expressions, you can duplicate keyframes to create repeated cycles.
Keyframe Workflow Tips
Name Your Layers
Don’t leave everything named:
Shape Layer 1
Shape Layer 2
Shape Layer 3.
Use names such as:
Logo
Background Circle
Headline
CTA Button
Good organization makes animation easier.
Use Shortcuts
P, S, R, T, A, and U can save enormous amounts of time.
Zoom Into the Timeline
Precise timing is difficult when your entire ten-minute composition is squeezed onto the screen.
Zoom in when adjusting closely spaced keyframes.
Preview Frequently
Don’t create twenty keyframes before checking the result.
Animate.
Preview.
Adjust.
Repeat.
Keep Early Projects Simple
A beautifully animated circle is a better learning exercise than an unfinished 100-layer composition.
Common Keyframe Mistakes
Mistake 1: Forgetting to Enable the Stopwatch
If animation isn’t enabled, changing a value simply changes the property for the entire layer.
Mistake 2: Clicking the Stopwatch Again
Beginners sometimes click the stopwatch to create another keyframe.
Don’t.
Once animation is enabled, move to another time and change the property value.
Clicking the active stopwatch can remove the animation.
Mistake 3: Using Only Linear Keyframes
Linear animation often feels mechanical.
Learn Easy Ease early.
Mistake 4: Making Everything the Same Speed
Different animation elements should not necessarily have identical timing.
Experiment.
Mistake 5: Too Many Keyframes
More keyframes don’t automatically create better animation.
Use as few as necessary to describe the motion.
Mistake 6: Ignoring the Graph Editor
Once you’re comfortable with basic keyframes, the Graph Editor should become one of your next priorities.
How to Practice Keyframes
Create five small exercises.
Exercise 1 — Moving Square
Animate Position from left to right.
Exercise 2 — Logo Reveal
Animate Scale and Opacity.
Exercise 3 — Spinning Icon
Animate Rotation.
Exercise 4 — Bouncing Ball
Animate Position with multiple keyframes and easing.
Exercise 5 — Animated Title
Combine Position, Scale, Opacity, and easing.
These exercises teach far more than simply memorizing menu locations.
Keyframes vs Presets
Animation presets can save time.
But beginners should not rely exclusively on them.
A preset gives you a result.
Understanding keyframes teaches you why the result happens.
Once you understand keyframes, presets become much more useful because you can modify them intelligently rather than accepting their default behavior.
Keyframes vs Expressions
Keyframes define values at specific points in time.
Expressions use code-like instructions to control properties.
For example, an expression might automatically create repetitive movement without dozens of manually created keyframes.
Neither replaces the other.
Professional After Effects projects often use both.
Beginners should learn keyframes first.
Expressions make much more sense once manual animation is familiar.
Do You Need Plug-Ins for Good Keyframe Animation?
No.
After Effects’ native animation tools are extremely powerful.
You can create professional motion graphics using:
- keyframes;
- easing;
- Graph Editor;
- shape layers;
- text animators;
- expressions;
- masks.
Plug-ins can accelerate specialized workflows, but they are not a substitute for animation fundamentals.
Why Keyframes Are Still Important in 2026
After Effects is evolving rapidly.
AI assists with object isolation.
3D capabilities are expanding.
Tracking is becoming faster.
Vector workflows are improving.
But keyframes remain at the center of motion design.
No matter how sophisticated the tools become, someone still needs to decide:
What happens?
When does it happen?
How quickly does it happen?
How should it feel?
Those are animation decisions.
Keyframes are one of the primary ways you communicate those decisions to After Effects.
Ready to Practice in After Effects?
If you haven’t installed After Effects yet, you can check Adobe’s current plans and trial options here:
Get Adobe After Effects and start practicing keyframe animation
Start with a five-second composition.
Create one object.
Add two Position keyframes.
Apply Easy Ease.
Then experiment.
Move the keyframes closer together.
Move them farther apart.
Change the positions.
Add Scale.
Add Rotation.
Add Opacity.
This experimentation is how keyframe animation starts becoming intuitive.
Frequently Asked Questions
What is a keyframe in After Effects?
A keyframe stores a property’s value at a specific point in time. After Effects can interpolate between multiple keyframes to create animation.
How do I create a keyframe?
Open an animatable property and click its stopwatch to enable animation and create the initial keyframe. Move to another time and change the property’s value to create another.
Why isn’t my animation moving?
Check that you have at least two keyframes with different values and that they occur at different times.
What does Easy Ease do?
Easy Ease adjusts acceleration and deceleration around keyframes, helping animation feel smoother and less mechanical.
What does U do in After Effects?
With a layer selected, pressing U reveals its animated properties.
What does P do?
P reveals Position.
What does S do?
S reveals Scale.
What does R do?
R reveals Rotation.
What does T do?
T reveals Opacity.
Can effects be keyframed?
Yes. Many effect properties can be animated.
Can keyframes animate 3D objects?
Yes. The same keyframe principles apply to many 3D layer, camera, light, and object properties.
What Should You Learn After Keyframes?
Once basic keyframes feel comfortable, your next major skill should be the Graph Editor.
Keyframes tell After Effects:
where an animation begins and ends.
The Graph Editor gives you much greater control over:
how the animation travels between those points.
That distinction is one of the keys to creating professional-looking motion.
Final Thoughts
Keyframes are the foundation of Adobe After Effects animation.
The concept is simple:
Choose a property.
Set a value.
Choose a time.
Create a keyframe.
Move to another time.
Change the value.
After Effects creates the transition.
But mastering keyframes goes far beyond simply creating them.
Timing changes the personality of movement.
Easing changes how natural it feels.
Motion paths change how objects travel.
Combining multiple properties creates richer animation.
And the Graph Editor gives you precise control over acceleration and deceleration.
Don’t try to master all of that today.
Start with Position.
Then Scale.
Then Rotation.
Then Opacity.
Create simple animations and experiment with the timing.
Once keyframes become intuitive, a huge part of After Effects begins to make sense.
Explore Adobe After Effects and start creating your own animations






