Creating keyframes in Adobe After Effects is easy.
Creating animation that actually feels good is more difficult.
You can place an object at one position, move forward in time, change its position, and After Effects will create the movement between those two points. Technically, you have created an animation.
But it may look mechanical.
The object starts suddenly, travels at an unnatural speed, and stops abruptly.
Professional motion graphics usually feel different. Objects accelerate, decelerate, overshoot, settle, bounce, or move with carefully controlled momentum.
One of the most important tools for creating that type of motion is the Graph Editor.
The Graph Editor lets you go beyond basic keyframes and control how animation changes between them.
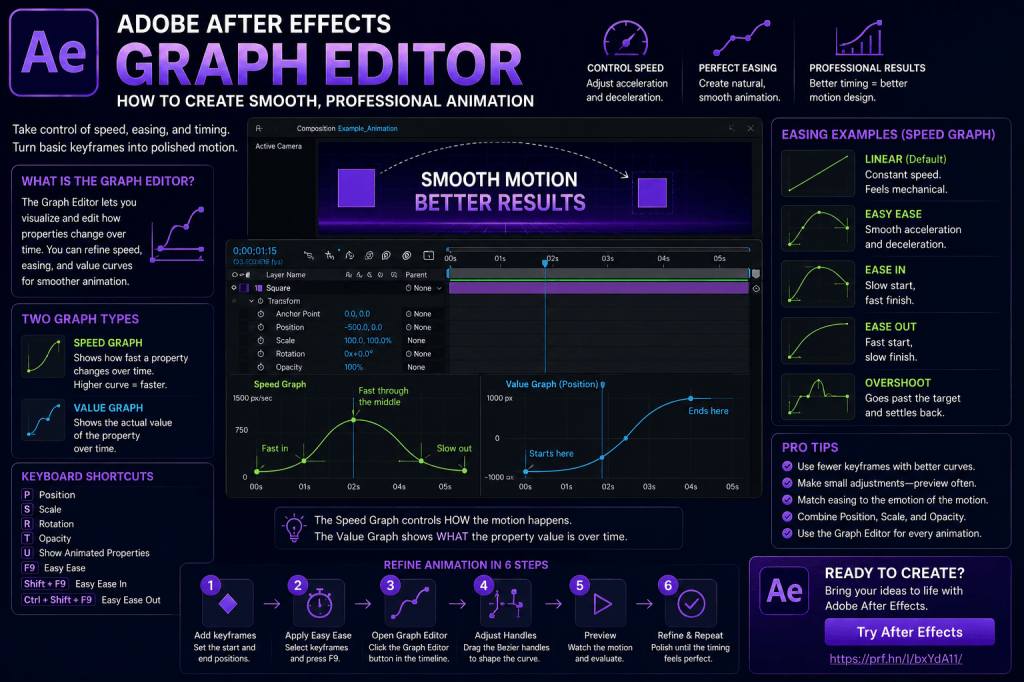
In this guide, we’ll explore the Adobe After Effects Graph Editor from a beginner’s perspective, including the Speed Graph, Value Graph, Easy Ease, influence handles, acceleration, overshoot, and practical techniques you can use to make animations look considerably more polished.
Affiliate disclosure: This article contains affiliate links. If you purchase Adobe After Effects through one of these links, we may earn a commission at no additional cost to you.
What Is the Graph Editor in After Effects?
The Graph Editor is a visual interface for controlling how animated properties change over time.
Normally, the After Effects Timeline shows keyframes positioned along a horizontal timeline.
For example:
Keyframe 1 → Keyframe 2
That tells you when the keyframes occur.
But it doesn’t immediately show you how quickly the animation changes between them.
The Graph Editor visualizes that behavior as a graph.
This allows you to control the animation’s:
- speed;
- acceleration;
- deceleration;
- timing;
- easing;
- influence;
- value changes.
Instead of accepting After Effects’ default interpolation, you can deliberately shape the motion.
Why Is the Graph Editor Important?
Consider a simple animation.
A circle moves from the left side of the screen to the right.
You create two Position keyframes.
The first is at zero seconds.
The second is at two seconds.
By default, the animation may move at a relatively constant speed.
It works.
But it doesn’t necessarily look interesting.
Now imagine the circle:
- starts slowly;
- accelerates quickly;
- travels rapidly through the middle;
- decelerates;
- gently settles into its final position.
The start and end positions haven’t changed.
The duration hasn’t changed.
Only the velocity between the keyframes has changed.
Yet the animation can feel completely different.
That’s why the Graph Editor matters.
Before Learning the Graph Editor: Understand Keyframes
The Graph Editor makes much more sense once you’re comfortable with basic keyframes.
You should already understand how to animate properties such as:
- Position;
- Scale;
- Rotation;
- Opacity.
You should also know how to:
- create keyframes;
- move keyframes;
- delete keyframes;
- preview animation;
- apply Easy Ease.
If you’re still learning those concepts, read:
How to Use Keyframes in Adobe After Effects: Complete Beginner Guide
Then return to this tutorial.
Where Is the Graph Editor?
Create or open an After Effects composition.
Select a layer containing animation.
Look at the Timeline panel.
The Graph Editor button appears among the Timeline controls.
Click it.
The normal layer Timeline changes into the graphical animation view.
If nothing useful appears, make sure:
- your layer is selected;
- an animated property is visible;
- that property contains keyframes.
Once the appropriate property is selected, its animation curve should become visible.
The Two Graphs You Need to Understand
After Effects provides two main ways of examining animation in the Graph Editor:
Speed Graph
and
Value Graph
They represent different information.
Understanding the distinction is essential.
What Is the Speed Graph?
The Speed Graph shows how quickly an animated property changes over time.
Think of the horizontal axis as:
Time
and the vertical axis as:
Speed
A higher curve means faster movement.
A lower curve means slower movement.
If the graph reaches zero, the animation has stopped changing at that point.
This makes the Speed Graph extremely useful for controlling acceleration and deceleration.
A Simple Speed Graph Example
Imagine an object moving from left to right over two seconds.
With basic linear animation, the object might travel at roughly the same speed throughout the movement.
The Speed Graph would therefore look relatively flat.
Now apply Easy Ease.
The graph changes.
The object begins slowly.
It accelerates.
It reaches its highest speed somewhere between the keyframes.
Then it slows again before stopping.
The graph now resembles a hill.
That hill represents the changing speed of your animation.
What Is the Value Graph?
The Value Graph displays the actual value of the animated property over time.
For example, suppose Scale changes from:
0% → 100%
The Value Graph shows that numerical change.
The horizontal axis represents time.
The vertical axis represents the property’s value.
This is useful when you want to understand or manipulate the progression of the actual property rather than just its speed.
Speed Graph vs Value Graph
A simple way to remember the difference is:
Speed Graph = How fast is it changing?
Value Graph = What is the value?
Both can be useful.
Some motion designers prefer one for particular types of animation and the other for different situations.
As a beginner, experiment with both.
Understanding what each graph communicates is more important than deciding that one is universally better.
Your First Graph Editor Animation
Let’s create a practical example.
Step 1: Create a Composition
Create a short composition.
Five seconds is more than enough.
Step 2: Create a Shape
Create a circle or square.
Place it on the left side of the frame.
Step 3: Animate Position
At the beginning of the Timeline, create a Position keyframe.
Move forward approximately two seconds.
Move the shape to the right side of the composition.
After Effects creates the second keyframe.
Step 4: Preview the Animation
Play it.
The shape moves across the screen.
But the movement probably feels fairly mechanical.
That’s exactly what we want to improve.
Step 5: Apply Easy Ease
Select both Position keyframes.
Apply Easy Ease.
Preview again.
The animation should already feel better.
The object now accelerates and decelerates instead of moving with purely linear timing.
Step 6: Open the Graph Editor
With the animated Position property selected, open the Graph Editor.
Look at the curve.
You can now see the easing visually.
This is where the real refinement begins.
Easy Ease Is the Starting Point, Not the Finish
Easy Ease is extremely useful.
But pressing Easy Ease does not automatically create perfect animation.
Think of it as a starting point.
It replaces mechanical linear timing with a smoother acceleration/deceleration pattern.
The Graph Editor then allows you to customize that behavior.
You might want the object to:
- accelerate much faster;
- stop very gently;
- leave slowly and arrive quickly;
- snap into place;
- overshoot;
- bounce.
These are creative decisions.
Understanding Bezier Handles
When working with eased keyframes in the Graph Editor, you’ll encounter handles.
Dragging these handles changes the influence around a keyframe.
You can use them to alter how quickly the animation accelerates or decelerates.
This is similar conceptually to manipulating Bezier curves in vector-design applications, although here you’re shaping animation behavior rather than a visible vector path.
Small handle changes can make a surprisingly large difference.
Creating a Fast Middle and Smooth Ends
This is one of the most useful motion-design patterns.
You want an object to:
start slowly → move quickly → finish slowly
Create two Position keyframes.
Apply Easy Ease.
Open the Speed Graph.
Adjust the influence handles so the speed rises sharply between the keyframes while remaining low near the beginning and end.
The resulting graph becomes taller and narrower.
Preview the animation.
The object should now accelerate more aggressively through the middle.
This often feels more deliberate and polished than default easing.
Creating a Fast Entrance
Suppose a title enters from the left.
You don’t want it drifting slowly onto the screen.
Instead:
- It enters quickly.
- It decelerates.
- It settles into position.
The Graph Editor lets you shape exactly that behavior.
The object’s speed is high early in the animation and progressively decreases as it approaches its final keyframe.
This technique works well for:
- titles;
- lower thirds;
- logos;
- UI elements;
- social-media graphics.
Creating a Fast Exit
Now reverse the idea.
An object begins stationary.
Then it rapidly accelerates off the screen.
You want:
slow start → rapid exit
The Graph Editor can shape the acceleration accordingly.
This is useful for:
- transitions;
- title exits;
- graphic wipes;
- scene changes;
- animated interface elements.
Why Motion Shouldn’t Always Be Symmetrical
Beginners often make entrance and exit motion identical.
For example:
slow → fast → slow
for everything.
But real motion isn’t always symmetrical.
A title might enter rapidly and settle slowly.
Its exit might begin gently and then accelerate aggressively.
Different timing creates different emotional qualities.
Motion can feel:
- energetic;
- elegant;
- heavy;
- playful;
- mechanical;
- luxurious;
- dramatic.
The Graph Editor helps you design that personality.
Using the Graph Editor with Scale
Position is a good way to learn the Graph Editor, but Scale provides another excellent exercise.
Create a shape.
Animate:
Scale: 0% → 100%
Apply Easy Ease.
Open the Graph Editor.
Adjust the curve.
Instead of slowly growing at a constant rate, make the object expand quickly and then settle gently at 100%.
The difference can be dramatic.
Create an Overshoot Animation
Overshoot is a classic motion-design technique.
Instead of animating Scale directly from:
0% → 100%
try:
0% → 110% → 100%
The object grows beyond its final size and then settles backward.
The Graph Editor can refine this movement so it doesn’t look like three disconnected mechanical steps.
Shape the curves so the transitions flow naturally.
A subtle overshoot can make:
- buttons;
- icons;
- logos;
- text;
- interface graphics;
feel more responsive.
Don’t Overuse Overshoot
Once beginners discover overshoot, they often apply it to everything.
Every title bounces.
Every logo overshoots.
Every icon springs into place.
Eventually the entire project feels like rubber.
Motion should support the design.
A corporate financial presentation may require controlled, restrained animation.
A children’s animation can tolerate much more exaggerated movement.
The Graph Editor gives you control.
It doesn’t mean every animation should be dramatic.
Creating a Bounce
Let’s create a simple bouncing ball.
Animate the ball’s Position.
Create keyframes for:
Top
Floor
Smaller bounce
Floor
Even smaller bounce
Floor
The distance of each bounce decreases.
But position alone isn’t enough.
The timing matters.
A falling object accelerates toward the floor.
It doesn’t normally float downward at constant speed.
Use the Graph Editor to shape the motion.
The ball should accelerate downward, change direction rapidly at impact, and lose energy with each bounce.
This is a great exercise because it forces you to think about movement rather than simply keyframes.
Timing vs Spacing
Animation often involves two related concepts:
Timing
How long does the movement take?
Spacing
How much does the object move between frames?
The Graph Editor helps you understand both.
When an object is moving slowly, successive positions are closer together.
When it is moving quickly, they’re farther apart.
The graph is essentially giving you a visual way to control these changes.
Use Reference from the Real World
One of the best ways to improve animation is to observe movement around you.
Watch:
- a door closing;
- a car stopping;
- a bouncing ball;
- a person sitting down;
- a drawer opening;
- a phone dropping onto a sofa.
Objects rarely move at perfectly constant speeds.
They accelerate.
They decelerate.
They respond to gravity.
They collide.
They lose momentum.
Even abstract motion graphics benefit from understanding these principles.
Graph Editor and Opacity
Opacity is interesting because it doesn’t involve physical movement.
Animate:
Opacity: 0% → 100%
Open the Value Graph.
You can control how the fade progresses.
A linear fade changes evenly.
A curved fade can remain nearly invisible initially and then become visible rapidly.
Or it can appear quickly and spend the remainder of the animation gently reaching full opacity.
This allows fades to coordinate more naturally with movement.
Combine Position, Scale, and Opacity
Professional-looking entrances often combine several properties.
For example:
At the beginning:
Position: 80 pixels below final position
Scale: 95%
Opacity: 0%
At the end:
Position: final position
Scale: 100%
Opacity: 100%
Apply easing.
Then refine the Position and Scale curves in the Graph Editor.
The result can be subtle and polished.
This is often more effective than applying an elaborate preset.
Staggering Multiple Layers
Suppose you have three text lines.
Don’t necessarily animate all three at exactly the same time.
Instead:
Line 1 begins.
A few frames later, Line 2 begins.
Then Line 3.
This is called staggering.
Each individual animation may use exactly the same Graph Editor curve.
But offsetting the layers creates rhythm.
This technique is extremely common in:
- title sequences;
- UI animations;
- presentations;
- explainer videos;
- social-media graphics.
The Graph Editor and Motion Paths
Don’t confuse Graph Editor curves with spatial motion paths.
The Graph Editor controls how properties change over time.
A Position motion path controls where the object travels through the composition.
These work together.
You might create a curved spatial path and then use the Graph Editor to control how quickly the object moves along that path.
This gives you control over both:
where the object goes
and
how it gets there.
Graph Editor and 3D Animation
The same principles become even more important in 3D.
You can use the Graph Editor to refine:
- 3D Position;
- Rotation;
- camera movement;
- Depth of Field;
- object Scale;
- light properties.
A camera moving through a 3D composition often looks amateurish if it starts and stops mechanically.
Careful easing can make camera motion feel considerably more cinematic.
Graph Editor and Text Animation
Text animation is another major use case.
Imagine a headline sliding upward.
A basic linear movement looks functional.
A carefully eased movement can feel polished and deliberate.
Combine that with:
- opacity;
- character animation;
- tracking;
- scale;
- staggered timing;
and relatively simple typography can become sophisticated motion design.
Graph Editor and Shape Layers
Shape layers are ideal for practicing animation curves.
Try animating:
- circles;
- rectangles;
- lines;
- icons.
Because the objects are visually simple, you can concentrate on motion rather than design complexity.
For example:
Animate a circle from left to right.
Then spend ten minutes adjusting only the Graph Editor.
You’ll quickly see how many different personalities can be created from exactly the same two positions.
Speed Is Part of Design
Motion designers don’t simply decide:
“Move this object from A to B.”
They decide:
“How should this object feel while moving from A to B?”
A luxury brand might use slow, controlled movement.
A gaming advertisement might use aggressive acceleration.
A children’s animation might use springy overshoot.
A technology interface might use fast but precise easing.
The Graph Editor transforms speed into a design variable.
Common Graph Editor Mistakes
Mistake 1: Staying with Linear Keyframes
Linear movement is sometimes appropriate.
But using it for everything makes motion feel mechanical.
Experiment with easing.
Mistake 2: Applying Easy Ease and Stopping
Easy Ease improves animation.
But don’t assume it’s automatically optimal.
Open the Graph Editor and refine it.
Mistake 3: Extreme Curves Everywhere
More dramatic isn’t always better.
Aggressive curves can make animations feel abrupt or unnatural.
Mistake 4: Ignoring Context
A bouncing animation may look great on an entertainment graphic and ridiculous in a serious corporate presentation.
Mistake 5: Animating Every Property Differently
Too many competing motion behaviors can create visual chaos.
Build a consistent motion language.
Mistake 6: Forgetting to Preview
A graph may look elegant while the actual animation looks terrible.
Your eyes are the final judge.
Preview constantly.
A Simple Graph Editor Practice Exercise
Create five circles.
Give every circle the same:
- start position;
- end position;
- animation duration.
Then give each one a different easing curve.
For example:
Circle 1: Linear
Circle 2: Easy Ease
Circle 3: Fast acceleration, slow finish
Circle 4: Slow acceleration, fast finish
Circle 5: Very fast middle section
Play them simultaneously.
This is one of the fastest ways to understand what Graph Editor curves actually do.
Another Exercise: Animate a Logo
Take a logo or simple shape.
Animate:
Scale: 80% → 105% → 100%
Opacity: 0% → 100%
Then use the Graph Editor to refine the Scale animation.
Try making the overshoot very subtle.
The goal is not to create a dramatic bounce.
The goal is to make the logo feel as though it naturally settles into position.
Practice with UI Animation
Create a simple button.
Animate:
Scale: 100% → 95% → 100%
Imagine someone clicking it.
Use the Graph Editor to make the response quick and responsive.
This type of micro-animation is an excellent exercise because the movement is small, meaning poor timing becomes immediately obvious.
How Professional Animation Becomes Faster
At first, Graph Editor work feels slow.
You adjust handles.
Preview.
Adjust again.
Preview again.
But eventually you develop intuition.
You begin recognizing what kind of curve is likely to produce the motion you want.
You’ll also develop reusable animation patterns for:
- entrances;
- exits;
- overshoots;
- UI responses;
- camera moves;
- transitions.
The goal isn’t to memorize one “perfect curve.”
There is no universal perfect curve.
The goal is to understand the relationship between the curve and the resulting motion.
Does AI Replace the Graph Editor?
No.
AI can automate increasingly sophisticated production tasks in After Effects.
For example, newer AI-assisted features can help isolate objects.
But animation timing remains fundamentally creative.
AI may help create an asset.
You still decide:
- when it appears;
- how it moves;
- how quickly it moves;
- whether it overshoots;
- how it interacts with other elements.
The Graph Editor remains one of the tools that gives motion designers precise control over those decisions.
Do You Need Plug-Ins for Smooth Animation?
No.
There are excellent After Effects plug-ins and scripts that can accelerate animation workflows.
But the native Graph Editor is extremely powerful.
Learning it first provides two advantages.
First, you understand the fundamentals.
Second, when you eventually use animation plug-ins, you understand what they’re actually changing.
Tools become more valuable when you understand the principles behind them.
Keyboard Shortcuts That Help
Several shortcuts are particularly useful when working with animation.
P — Position
S — Scale
R — Rotation
T — Opacity
A — Anchor Point
U — Show animated properties
These help you reach the properties you want without repeatedly opening layer sections.
Learning a few shortcuts at a time can substantially improve your workflow.
A Better Animation Workflow
Instead of trying to perfect an animation immediately, use several passes.
Pass 1 — Blocking
Create the basic keyframes.
Don’t worry about perfect easing.
Pass 2 — Timing
Move keyframes until the duration feels right.
Pass 3 — Easing
Apply appropriate easing.
Pass 4 — Graph Editor
Refine acceleration and deceleration.
Pass 5 — Secondary Motion
Add subtle Scale, Rotation, overshoot, or follow-through where appropriate.
Pass 6 — Polish
Add motion blur and make final timing adjustments.
This approach keeps you from spending twenty minutes polishing a movement that later needs to be completely retimed.
Build a Consistent Motion Language
If you’re creating motion graphics for a brand, don’t treat every animation independently.
Develop consistent rules.
For example:
Titles
Fast entrance, gentle stop.
Buttons
Short, responsive scale animation.
Large images
Slower, more deliberate movement.
Transitions
Fast acceleration through the center.
This creates a recognizable motion language.
The Graph Editor is one of the primary tools for implementing it consistently.
How Long Does It Take to Learn the Graph Editor?
You can understand the basic idea in an afternoon.
Developing a strong sense of animation timing takes much longer.
That’s normal.
The Graph Editor is not difficult because the interface is extraordinarily complicated.
It’s difficult because good motion requires judgment.
That judgment improves through practice.
The best exercise is simple:
Animate something.
Watch it.
Change the curve.
Watch it again.
Repeat.
Should Beginners Learn the Graph Editor?
Absolutely.
You don’t need to master every Graph Editor feature immediately.
But beginners should understand it early.
Otherwise, it’s easy to develop a habit of creating keyframes, applying Easy Ease, and never thinking carefully about motion.
Learning the Graph Editor changes the way you see animation.
You stop thinking only in terms of:
start position → end position
and start thinking about:
acceleration → speed → deceleration → impact → settling.
That’s a major step toward professional motion design.
Get Adobe After Effects
If you’re learning motion graphics and want to practice keyframes, easing, and the Graph Editor yourself, you can check Adobe’s current After Effects options below.
Get Adobe After Effects and start practicing motion design
Start with simple shapes rather than complicated projects.
A square moving across the screen can teach you more about the Graph Editor than a 50-layer composition where you can’t tell which property is responsible for the movement.
Frequently Asked Questions
What is the Graph Editor in After Effects?
The Graph Editor provides a graphical representation of animated properties, allowing you to refine how values and speeds change between keyframes.
What is the Speed Graph?
The Speed Graph shows how quickly a property changes over time.
What is the Value Graph?
The Value Graph shows how the actual value of a property changes over time.
Should beginners use the Speed Graph or Value Graph?
Learn what both represent and experiment with each. Different animation tasks and personal workflows may make one more convenient than the other.
What is Easy Ease?
Easy Ease adjusts interpolation around keyframes to produce smoother acceleration and deceleration than basic linear timing.
Is Easy Ease enough for professional animation?
It can be appropriate for some movements, but the Graph Editor gives you much greater control over the character and timing of motion.
Why does my animation look robotic?
Common causes include linear interpolation, poor timing, identical timing across every element, and abrupt starts or stops.
Can I use the Graph Editor for Scale?
Yes. You can use it with many animated properties, including Scale, Rotation, Opacity, effects, and numerous 3D properties.
Can the Graph Editor improve camera animation?
Yes. Carefully controlled acceleration and deceleration can make camera movement feel substantially more natural and cinematic.
Do I need third-party plug-ins?
No. After Effects’ native keyframe and Graph Editor tools are capable of producing sophisticated professional animation.
What Should You Learn Next?
Once you’re comfortable with keyframes and the Graph Editor, the next logical skill is text animation.
Text is everywhere in motion design:
- advertisements;
- YouTube videos;
- title sequences;
- explainers;
- corporate videos;
- social media;
- presentations.
And After Effects has much more powerful text-animation tools than simply moving an entire text layer around the screen.
The next tutorial in this series will explore how to animate text using both standard properties and After Effects Text Animators.
Final Thoughts
The Graph Editor is one of the most important tools in Adobe After Effects.
Basic keyframes tell After Effects:
Start here.
Finish here.
The Graph Editor lets you define what happens between those two moments.
That’s where much of the personality of animation comes from.
You can create motion that feels:
- smooth;
- energetic;
- elegant;
- heavy;
- responsive;
- playful;
- cinematic.
Start with something simple.
Create a circle.
Add two Position keyframes.
Watch the linear animation.
Apply Easy Ease.
Watch it again.
Then open the Graph Editor and adjust the curve.
Keep changing it and watching the result.
That simple exercise will teach you one of the most important lessons in motion design:
The keyframes define the destination, but the motion between them defines the experience.
Explore Adobe After Effects and start creating smoother animations






