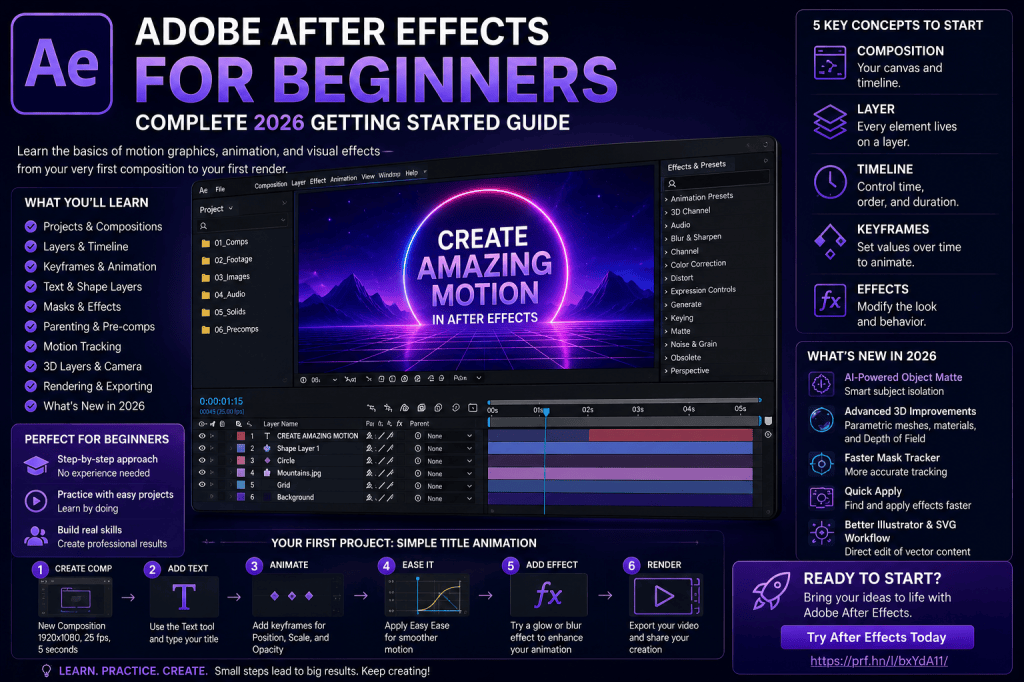
Adobe After Effects can look intimidating the first time you open it.
There are panels everywhere. The Timeline contains unfamiliar switches and controls. Words such as compositions, keyframes, pre-compositions, masks, mattes, expressions, and null objects appear almost immediately.
But here’s the good news:
You don’t need to understand everything in After Effects to start creating.
In fact, most beginners can make their first useful animation after learning only a handful of concepts.
This Adobe After Effects beginner guide will take you through those fundamentals step by step. We’ll look at how After Effects works, how to create a composition, import media, understand layers, create keyframes, animate text and shapes, use masks and effects, preview your work, and export your first project.
We’ll also look at some of the newer capabilities available in After Effects in 2026, including AI-assisted workflows and the expanding Advanced 3D environment.
If you’ve just downloaded After Effects—or you’re considering trying it—this is a good place to begin.
Affiliate disclosure: This article contains affiliate links. If you purchase Adobe After Effects through one of these links, we may earn a commission at no additional cost to you.
What Is Adobe After Effects?
Adobe After Effects is professional software for:
- motion graphics;
- animation;
- compositing;
- visual effects;
- animated typography;
- tracking;
- 2D and 3D motion design.
It is widely used to create things such as animated titles, logo animations, lower thirds, advertisements, visual effects, explainer graphics, social-media animations, screen replacements, and composited video shots.
The important thing for beginners to understand is that After Effects is not primarily a traditional video-editing application.
If you need to assemble a long video from dozens of clips, an editor such as Premiere Pro is generally better suited to that task.
After Effects specializes in creating and manipulating the graphics and visual elements within individual shots or sequences.
What Can You Make with After Effects?
You can use After Effects for an enormous range of projects.
For example:
Logo animation
Take a static logo and transform it into an animated brand introduction.
Kinetic typography
Animate words and letters to music, narration, or dialogue.
YouTube graphics
Create intros, outros, subscribe animations, lower thirds, and animated diagrams.
Visual effects
Composite footage, remove backgrounds, replace screens, track graphics, and create stylized effects.
Advertising
Create animated product promotions and social-media campaigns.
Explainer videos
Animate icons, diagrams, charts, and illustrations.
3D motion graphics
Combine cameras, lights, text, shapes, models, and materials in three-dimensional compositions.
The same fundamental After Effects skills can be applied across all of these areas.
Is After Effects Difficult for Beginners?
After Effects has a learning curve.
But much of the difficulty comes from trying to learn too much at once.
A beginner does not need to understand every panel, effect, expression, and rendering option.
Instead, focus on these concepts first:
- Projects
- Compositions
- Layers
- Timeline
- Transform properties
- Keyframes
- Text
- Shape layers
- Masks
- Effects
- Pre-compositions
- Rendering
Once these make sense, After Effects becomes considerably easier.
Before You Begin: Get Adobe After Effects
If you haven’t installed After Effects yet, Adobe provides the application through Creative Cloud.
You can check the current plans, availability, and any trial options directly through Adobe.
Get Adobe After Effects and check the current options
Before installing, also check Adobe’s current system requirements.
After Effects can be demanding, especially with high-resolution footage and complex projects.
Step 1: Understand the After Effects Interface
When you first open After Effects, you’ll see several panels.
You don’t need to memorize all of them.
Concentrate initially on four areas.
Project Panel
The Project panel contains the assets used in your project.
These might include:
- video;
- images;
- audio;
- compositions;
- Illustrator files;
- Photoshop files.
Think of it as the organizational area for your project.
Composition Panel
The Composition panel shows what your current composition looks like.
This is where you visually see your animation.
Timeline Panel
The Timeline is where much of the actual animation work happens.
It shows:
- layers;
- time;
- keyframes;
- animation properties;
- layer duration.
You will spend a lot of time here.
Toolbar
The toolbar contains tools for tasks such as selecting objects, creating text, drawing shapes, and navigating your composition.
Don’t worry about every tool yet.
The Selection, Text, Shape, Hand, and Zoom tools are enough to begin.
Step 2: Understand Projects and Compositions
One of the first concepts that confuses beginners is the difference between a project and a composition.
A project is the overall After Effects file.
It can contain many assets and many compositions.
A composition is an individual animation or scene inside that project.
For example, imagine you’re creating a YouTube video package.
Your After Effects project might contain:
- Intro composition
- Logo composition
- Lower-third composition
- Subscribe animation
- Outro composition
All of those compositions can exist inside one project.
Step 3: Create Your First Composition
Create a new composition.
After Effects will ask you for several settings.
The most important are:
- width;
- height;
- frame rate;
- duration.
For your first experiment, keep things simple.
You could create a short Full HD composition at the frame rate appropriate for your intended output.
Don’t make your first animation ten minutes long.
Ten seconds is more than enough to learn the basics.
Step 4: Understand Layers
Layers are fundamental to After Effects.
Almost every visual element in your composition exists on a layer.
You might have:
Layer 1: Text
Layer 2: Logo
Layer 3: Video
Layer 4: Background
The order matters.
Layers higher in the Timeline generally appear in front of layers below them.
If you have used Photoshop, the concept will feel familiar.
Step 5: Create a Text Layer
Let’s create something visible.
Select the Text tool and click inside the Composition panel.
Type:
My First Animation
After Effects creates a text layer.
Look at the Timeline.
You should see your text represented as a layer.
You’ve now created your first After Effects element.
Step 6: Learn the Five Transform Properties
Select the text layer and expand its Transform properties.
You’ll see several important controls.
Anchor Point
The point around which transformations occur.
Position
Controls where the layer appears.
Scale
Controls its size.
Rotation
Controls its angle.
Opacity
Controls transparency.
These five properties are among the most important things you’ll ever learn in After Effects.
And they can all be animated.
Step 7: Create Your First Keyframes
Now we’ll make the text move.
Move the playhead to the beginning of the Timeline.
Open Position.
You’ll see a stopwatch icon.
Click it.
You have created a keyframe.
Now move the playhead forward several seconds.
Move the text somewhere else in the Composition panel.
After Effects creates another Position keyframe.
Play the composition.
The text moves from the first position to the second.
That simple action explains the fundamental logic of After Effects animation.
What Is a Keyframe?
A keyframe tells After Effects:
At this particular moment, this property should have this value.
Suppose your first keyframe says:
At 0 seconds, the text is on the left.
Your second says:
At 3 seconds, the text is on the right.
After Effects calculates what happens between those two moments.
This process is called interpolation.
Once you understand this idea, you can animate almost anything.
Step 8: Animate More Than Position
Position is only the beginning.
Try animating Scale.
Start at:
0%
and animate to:
100%.
Your text appears to grow into the frame.
Now animate Rotation.
Try:
0°
to:
360°.
Then animate Opacity:
0%
to:
100%.
Your text fades in.
You can combine these properties.
For example:
Opacity: 0 → 100
Scale: 80 → 100
Position: slightly lower → final position
Together, these produce a much more polished entrance animation.
Step 9: Learn Easy Ease
Your first animation may look mechanical.
The object starts moving instantly, travels at a constant speed, and stops abruptly.
Natural motion usually accelerates and decelerates.
Select your keyframes and apply Easy Ease.
The movement should immediately feel smoother.
This introduces one of the most important principles in motion design:
Good animation isn’t only about where something moves. It’s about how it moves.
Later, you can use the Graph Editor for much more precise control.
But Easy Ease is an excellent starting point.
Step 10: Create a Shape Layer
Next, create a shape.
Choose the Rectangle or Ellipse tool.
Draw a shape in the Composition panel.
After Effects creates a shape layer.
Shape layers are extremely powerful.
You can control:
- fill;
- stroke;
- size;
- position;
- rotation;
- paths;
- multiple shapes.
And, of course, these properties can be animated.
Step 11: Make a Simple Shape Animation
Create a circle.
Animate its Scale from:
0%
to:
100%.
Add Easy Ease.
Then animate its Position.
You now have a basic motion-graphics element.
Try adding several shapes with slightly different animation timing.
Even simple shapes can create sophisticated motion when timing is handled carefully.
Step 12: Learn About the Timeline
The Timeline represents time horizontally.
Move the playhead and you move through your composition.
Layers also have beginning and ending points.
This means an element doesn’t need to exist for the entire composition.
For example:
Text appears from 0–3 seconds.
A logo appears from 2–6 seconds.
A second title appears from 5–8 seconds.
By controlling layer timing, you begin constructing sequences.
Step 13: Import an Image
Now let’s add external media.
Import an image into the Project panel.
Then drag it into your composition.
The image becomes a layer.
Because it’s a layer, it has the same familiar Transform properties:
- Position;
- Scale;
- Rotation;
- Opacity.
You can animate an imported photograph using exactly the same keyframe principles you used for text.
This consistency is one of the strengths of After Effects.
Step 14: Import Video
Video works similarly.
Import a video clip.
Drag it into a composition.
It appears as a layer.
You can now combine video with:
- text;
- shapes;
- effects;
- masks;
- graphics;
- other video.
This is where After Effects begins moving from simple animation toward compositing.
Step 15: Understand Compositing
Compositing means combining multiple visual elements into one final image.
Imagine a shot containing:
- background footage;
- an isolated person;
- animated text;
- particles;
- a logo;
- color effects.
These elements may come from completely different sources.
After Effects combines them into one finished shot.
This is one of the application’s central purposes.
Step 16: Learn Masks
Masks allow you to control which parts of a layer are visible.
For example, you could draw a mask around part of a video.
Everything outside the mask can become hidden.
Masks are used for:
- object isolation;
- visual effects;
- transitions;
- selective adjustments;
- compositing.
They can also be animated.
This means a mask can change shape or position over time.
Step 17: Try Mask Tracking
If the object you’re masking moves, manually adjusting the mask on every frame would be extremely time-consuming.
That’s where tracking comes in.
After Effects can analyze movement and help a mask follow the subject.
The Mask Tracker received significant performance improvements in the 2026 release cycle, making this workflow faster for many types of footage.
Tracking is an important skill if you plan to work with live-action video.
Step 18: Understand Effects
Effects modify the appearance or behavior of layers.
After Effects contains many categories of effects.
These include tools for:
- blur;
- color;
- distortion;
- keying;
- noise;
- stylization;
- transitions;
- sharpening;
- simulation.
Apply an effect to a layer and look at its controls.
Many effect properties can also be animated with keyframes.
This gives you enormous flexibility.
Step 19: Use Quick Apply
Modern After Effects versions include workflow improvements designed to help you find and apply tools more quickly.
Quick Apply can make it easier to locate effects and other items without repeatedly navigating through menus.
For beginners, anything that reduces time spent searching through the interface can make learning easier.
Instead of memorizing where every effect lives, concentrate on understanding what the effect does.
Step 20: Learn Pre-Compositions
Pre-compositions—or pre-comps—are another fundamental After Effects concept.
Imagine you have five layers forming an animated logo.
Instead of managing those five layers everywhere, you can place them inside their own composition.
That composition can then behave like a single layer inside another composition.
This helps organize complex projects.
Think of pre-composing as:
Putting several layers inside a reusable container.
As your projects become larger, pre-comps become increasingly important.
Step 21: Learn Parenting
Parenting allows one layer to follow another.
Imagine a car made from:
- body;
- front wheel;
- rear wheel;
- headlights.
You could parent these elements to a master layer.
When the master moves, the other elements move with it.
This makes complex animation much easier to control.
Parenting is frequently combined with null objects.
Step 22: What Is a Null Object?
A null object is an invisible control layer.
It doesn’t normally appear in the final render.
Instead, it can control other layers.
For example, you might parent several text and graphic layers to one null.
Animate the null, and the entire group moves.
Null objects become extremely useful as projects grow more sophisticated.
Step 23: Learn Motion Blur
Objects moving quickly in the real world usually appear slightly blurred.
Perfectly sharp movement can look artificial.
After Effects can simulate motion blur.
Enable it on a moving layer and compare the result.
For fast animations, motion blur can make movement feel considerably more natural and cinematic.
Step 24: Explore Text Animators
After Effects has much more sophisticated text-animation capabilities than simply moving an entire text layer.
Text Animators can animate individual:
- characters;
- words;
- lines.
You can create effects where letters:
- fade in individually;
- move into position;
- rotate;
- scale;
- change spacing.
This makes After Effects particularly powerful for kinetic typography.
Step 25: Explore AI-Powered Object Matte
After Effects 2026 introduces AI-assisted Object Matte capabilities.
The goal is to make object isolation faster.
Imagine a person walking through a scene.
You want animated text to appear behind them.
Traditionally, isolating that person could involve significant rotoscoping or masking work.
AI-assisted object isolation can help generate the matte that separates the subject from the background.
For beginners, this demonstrates an important trend:
AI is increasingly helping with repetitive production tasks while you remain responsible for the creative result.
Step 26: Try 3D Layers
After Effects isn’t limited to flat 2D compositions.
Layers can exist in 3D space.
Enable 3D for a layer and you gain another dimension:
Z position.
Instead of only moving:
left/right and up/down,
you can also move:
forward/backward.
This allows you to arrange layers at different depths.
Step 27: Add a Camera
Once you’re working in 3D, add a camera.
Instead of moving every object individually, you can move the camera through your scene.
Imagine several text layers positioned at different depths.
Move the camera forward.
The camera travels through the typography.
This simple technique can produce impressive results.
Step 28: Explore Advanced 3D
After Effects’ 3D environment has become considerably more capable.
Recent versions support workflows involving:
- 3D models;
- parametric meshes;
- Substance materials;
- material displacement;
- lights;
- shadows;
- Depth of Field.
You don’t need these features during your first week.
But they provide significant room to grow once you’re comfortable with basic 2D animation.
Step 29: Try Parametric 3D Meshes
Modern After Effects can create basic 3D geometry directly.
Examples include:
- cubes;
- spheres;
- cylinders;
- cones;
- toruses.
You can animate these objects using familiar After Effects concepts.
This is particularly useful for motion designers who want basic 3D elements without building every object in separate 3D software.
Step 30: Understand Depth of Field
Depth of Field simulates camera focus.
One object can remain sharp while objects closer or farther away become blurred.
This helps:
- create visual depth;
- direct attention;
- produce cinematic compositions.
After Effects 26.3 expanded Depth of Field capabilities within Advanced 3D workflows.
Once you’re comfortable with cameras, this is an excellent feature to explore.
Step 31: Learn Expressions Later
Expressions allow properties to be controlled with small pieces of code or mathematical logic.
For example, an expression can make an object:
- wiggle;
- follow another property;
- loop;
- react automatically;
- create procedural animation.
Expressions are incredibly powerful.
But beginners often make the mistake of trying to learn them too early.
First understand keyframes.
Then understand parenting.
Then start experimenting with simple expressions.
You’ll appreciate them much more once you understand the problems they solve.
Step 32: Preview Your Animation
As you work, you’ll need to preview the animation.
After Effects may need to calculate and cache frames before they play smoothly.
The complexity of your project affects preview speed.
If playback is slow, you can temporarily reduce preview resolution.
For example, working at a lower preview resolution can make animation faster while you’re designing.
You can return to full quality when evaluating details or rendering.
Step 33: Save Frequently
This deserves its own section.
Save your project.
Then save it again.
Creative applications can be dealing with:
- large media files;
- third-party plug-ins;
- GPU processing;
- complicated effects;
- huge compositions.
Don’t rely exclusively on luck.
Develop a disciplined saving and backup routine.
For important projects, consider versioned saves such as:
Project_v01
Project_v02
Project_v03
This can save enormous frustration if something goes wrong.
Step 34: Organize Your Project
Good organization becomes increasingly important.
Use folders in the Project panel.
For example:
01_Comps
02_Video
03_Images
04_Audio
05_Illustrator
06_Precomps
This may seem unnecessary for a five-layer beginner project.
It becomes invaluable when a project contains hundreds of assets.
Learn good habits early.
Step 35: Export Your First Animation
Eventually, you need to turn your composition into a finished file.
After Effects provides rendering workflows, and Adobe Media Encoder may also be used depending on the required format and workflow.
For your first project, focus on understanding the basic process:
Composition → Render/export → Finished video
The ideal output settings depend on where the video will be used.
A master file for professional post-production has different requirements from a compressed social-media video.
Your First After Effects Project
If you’re unsure what to make, try this.
Create a five-second animated title.
Use:
- one background;
- one text layer;
- one shape;
- Position animation;
- Scale animation;
- Opacity animation;
- Easy Ease;
- motion blur.
That’s enough.
Don’t add ten effects.
Don’t add particles.
Don’t add complicated expressions.
Concentrate on timing and smooth movement.
A polished simple animation teaches you more than an unfinished complicated one.
A 7-Day After Effects Beginner Learning Plan
Day 1 — Interface and Compositions
Learn projects, compositions, layers, and Timeline navigation.
Day 2 — Keyframes
Animate Position, Scale, Rotation, and Opacity.
Day 3 — Text and Shapes
Create typography and shape-layer animations.
Day 4 — Easing and Motion
Learn Easy Ease, timing, and basic Graph Editor concepts.
Day 5 — Masks and Effects
Experiment with compositing fundamentals.
Day 6 — Pre-Comps and Parenting
Learn how to structure more complicated animations.
Day 7 — Complete a Project
Create a short finished animation without following every step of a tutorial.
That final step is crucial.
You learn much faster when you have to solve small problems yourself.
Common After Effects Beginner Mistakes
Trying to Learn Everything
You don’t need every feature.
Learn the fundamentals first.
Using Too Many Effects
Good motion design isn’t created by stacking random effects.
Timing and composition matter more.
Ignoring Organization
Name your layers.
Organize your assets.
Your future self will appreciate it.
Ignoring Easing
Linear keyframes often produce mechanical animation.
Learn easing early.
Starting with Huge Projects
Don’t make your first project a ten-minute science-fiction film.
Create ten seconds of good animation.
Installing Too Many Plug-Ins
Learn native After Effects before depending on third-party tools.
Forgetting to Save
Save regularly and maintain backups.
What Computer Do Beginners Need?
You don’t need the world’s fastest workstation to learn After Effects.
But more capable hardware makes the experience considerably better.
Pay particular attention to:
- CPU;
- RAM;
- GPU;
- SSD storage.
16 GB of RAM can work for lighter learning projects, while 32 GB is a much stronger target for users buying a computer specifically for regular After Effects work.
Fast SSD storage is also highly recommended.
For detailed guidance, see:
Adobe After Effects 2026 System Requirements: What Computer Do You Need?
Should Beginners Use the Latest After Effects Version?
Generally, learning on a current supported version makes sense.
You’ll have access to recent workflow improvements and features.
However, make sure your hardware and operating system are compatible.
Professional users with existing projects and third-party plug-ins may have additional reasons to keep older versions installed.
Beginners usually have fewer compatibility concerns.
Is After Effects Worth Learning in 2026?
If you’re interested in motion graphics, animation, visual effects, compositing, or advanced video graphics, yes.
The application continues evolving.
Recent releases combine established After Effects capabilities with newer technologies such as:
- AI-assisted object isolation;
- enhanced 3D workflows;
- parametric geometry;
- Substance materials;
- faster tracking;
- better Illustrator/SVG integration.
The fundamental skills remain valuable even as individual features change.
Understanding timing, keyframes, composition, masks, tracking, and motion design gives you a foundation that extends beyond any single software version.
Try Adobe After Effects
If you’re ready to start learning, the best thing you can do now is create something.
You don’t need to wait until you’ve watched twenty hours of tutorials.
Install After Effects.
Create a composition.
Add text.
Create two keyframes.
Press Play.
Then improve it.
Get Adobe After Effects and check the current trial and plan options
What Should You Learn Next?
Once you’re comfortable with the basics, move into dedicated topics.
A useful learning sequence is:
- keyframe animation;
- Graph Editor;
- text animation;
- shape layers;
- masks;
- track mattes;
- motion tracking;
- Roto Brush and Object Matte;
- pre-compositions;
- parenting and null objects;
- expressions;
- 3D layers;
- cameras and lights;
- Advanced 3D;
- rendering and optimization.
Each of these deserves its own tutorial.
And that’s exactly where we’ll go next in this After Effects 2026 series.
Final Thoughts
Adobe After Effects looks complicated because it is capable of doing an enormous number of things.
But beginners don’t need to learn all of them.
Start with:
Composition → Layer → Property → Keyframe → Animation
That is the foundation.
Once you understand those concepts, text animation becomes easier.
Shape animation becomes easier.
Masks make more sense.
Tracking makes more sense.
3D becomes less intimidating.
And eventually, even expressions begin to feel logical.
The biggest mistake you can make is waiting until you “know After Effects” before creating something.
You learn After Effects by creating with After Effects.
Start small.
Animate one title.
Create one logo animation.
Track one object.
Complete one five-second project.
Then make the next one slightly more ambitious.
Over time, those small projects turn an intimidating professional application into a creative tool you actually understand.
Start with Adobe After Effects and explore the current options






